
This post may contain affiliate links. Please read our disclosure policy.
Learn how to make delicious gluten free challah bread that everyone will love. Serve this delicious enriched, braided bread at the holiday table, or any day!

Table of Contents
- What makes this gluten free challah recipe special?
- What is the taste and texture of good challah?
- Handling the dough without too much flour
- Braiding gluten free challah bread strands into a loaf
- Tips for making the best gluten free challah
- How to serve this challah bread substitute
- How to store and freeze your gluten free braided bread
- Gluten free challah bread ingredient substitution suggestions
- FAQs for this challah recipe
- The Best Gluten Free Challah Bread Recipe
What makes this gluten free challah recipe special?
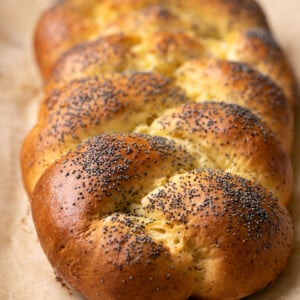
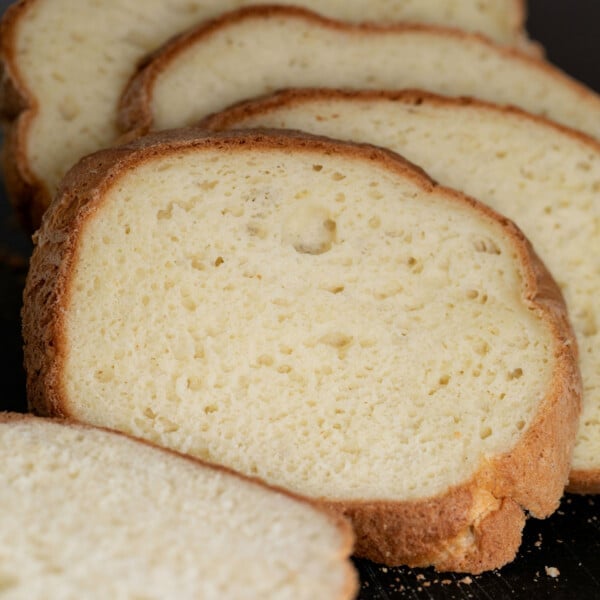
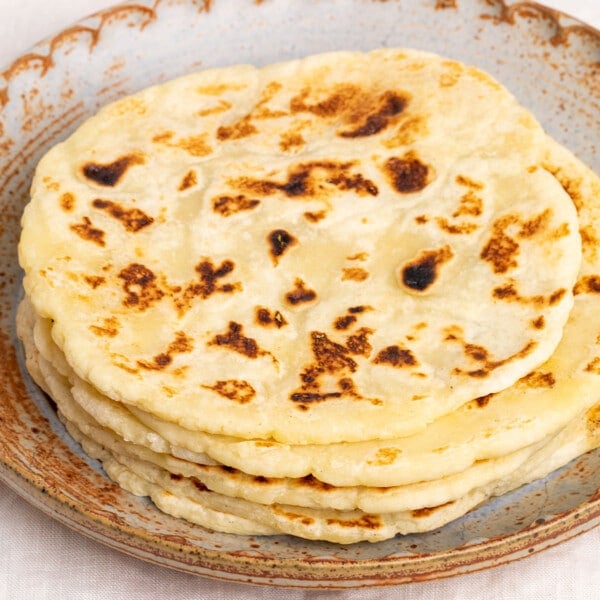
This recipe is unlike many other gluten free challah bread recipes you'll find. It can hold its shape as a true, braided bread without being stiff and dry. It has the most beautiful, moist, and tender open crumb.
Most gluten free challah recipes you'll find are made in a molded loaf pan that mimics the shape of braided bread. If you search the web for “gluten free challah bread,” you'll often find recipes that ask you to expect that your bread will be “heavier” or more “dense.”
The texture, flavor, aroma, and crumb of your gluten free bread should be no different from whatever conventional bread you've come to expect. And this gluten fee bread hits all the right notes, so keep those expectations high, where they should be!
What is the taste and texture of good challah?
Challah bread is a highly enriched bread, made with plenty of oil, egg yolks, and some sugar, too. That's how you get that thin, tender, dark brown crust and the rich aroma of deeply browned bread.
Challah is not a high-rising, fluffy bread. Instead, it's meant to hold its shape after being braided, and to have a more closed, chewy crumb. It tastes slightly, but not overly, sweet and tastes pleasantly eggy, like a cross between Hawaiian rolls and brioche.

Handling the dough without too much flour
Challah dough must be handled quite a lot, since it's separated into 3 parts, each part is rolled into a long strand, and then all 3 strands are braided together. This isn't a very wet dough, since wet batter-style gluten free bread dough can't be shaped, so it's very important not to add much more of any type of flour when you shape the dough.
The dough is prepared properly by being chilled well in a tightly sealed container, and then dusted very very lightly with tapioca starch. Both of these steps are designed to make the dough easier to handle without kneading in more flour.
When you're preparing bread dough and you add more flour, the more you add, the lower the hydration ratio of the bread is. If the bread dough is not properly hydrated, it won't rise well.
If this dough were too wet, you couldn't possibly handle it enough to braid it. Plus, the dough would never hold its shape during rising and baking. We need to find that sweet spot, where you can handle and shape the bread with a light touch aided only by a little bit of extra starch.
If the dough seems too hard to handle and you're tempted to add even more starch, place it back in the container and let it chill in the refrigerator for at least another hour. The dough will absorb more of the moisture, but it will still be locked inside. Plus, cold dough is less sticky by nature.

Braiding gluten free challah bread strands into a loaf
You can braid gluten free challah bread in a 3-strand, 4-strand, or even a 6-strand loaf. The braiding technique begins the same way as any braided bread recipe—but the handling of the dough requires some special care.
I've used a 3-strand braid here because it's the simplest (if you can braid a ponytail, you can braid a 3-strand challah!). If the three strands side by side (by side) are in places 1, 2, and 3, the braiding process is:
- 1 over 2, and return old 2 to 1 spot;
- 3 over 2, and return old 2 to 3 spot;
- Repeat until you reach the end of the braid.
Do not ever pull on the strands, though. They must not fray. Place them where you want them, overlapping them carefully and with intention.
Of course, if you'd prefer, you can use a challah mold pan and place the unshaped dough into the pan to rise and then bake.

Tips for making the best gluten free challah
Start with room-temperature ingredients
Unlike many gluten free yeast bread recipes that call for warm ingredients to activate the yeast quickly, this recipe calls for ingredients at room temperature. We then let the bread rest in the refrigerator so that the liquids are absorbed into the flour.
Use the right amount of sugar
Sugar in baking isn't just for sweetness. In fact, it's most valuable here in this recipe, and in many others, for tenderizing the bread, and keeping it fresh for longer.
The sugar here feeds the yeast so that it can grow. It also helps aid the browning and results in that deep brown challah crust.

Refrigerate your gf challah bread dough for easier handling
Refrigerating the raw dough in a tightly sealed container makes handling the dough easier.
First, it allows the flours time to absorb the liquid. You don't sacrifice any liquid, which the bread needs for rising and for texture, but the dough is less sticky. Second, refrigerating the dough makes it colder, making it easier to handle.
If you don't have time to refrigerate the dough, you can still work with it. It will just be a bit harder to handle and more fragile.
Give your gluten free challah bread dough time to rise
Yeast bread dough rises faster in warm (not hot) temperatures closer to 80°F that aren't drafty. It rises more slowly in colder temperatures.
It also must be covered properly as it rises, so the moisture in the dough doesn't evaporate. If the moisture evaporates, the dough will be too stiff and the yeast will not grow properly.
Add an egg wash before baking
An egg wash is just a beaten egg with either water or milk. Here, we're using water to keep it dairy-free easily.
After the braided raw dough has risen, we brush the egg wash on top of the braids and all along the perimeter. The egg wash helps the braids brown beautifully and keeps the dough from breaking through the surface during its oven rise.
Avoid letting the egg wash pool in the space between the braids. We want that portion to rise freely.

How to serve this challah bread substitute
This challah bread is amazing in the center of your Jewish holiday meal. But you don't have to celebrate Jewish holidays to enjoy this gluten free challah!
Sliced thickly, this challah makes rich, eggy, lightly sweet gluten free French toast. You'll find yourself snatching some slices from the loaf to ensure there are leftovers for gluten free bread pudding, too.
Try toasting a generous slice and topping it with light and fluffy scrambled eggs. Or just a big schmear of cream cheese and a light sprinkling of chives.
How to store and freeze your gluten free braided bread
If you're not planning to serve your bread right away, you can keep it fresh for about 8 hours at room temperature. Just wrap it tightly in plastic and eliminate as much air as possible.
For any leftover bread, be sure to slice it how you'd like to serve it, wrap it tightly in the same manner, and freeze it. Defrost it one slice at a time in the microwave or at room temperature, and refresh it in the toaster oven.
I don't recommend freezing raw yeast bread, only baked yeast bread. If the temperature drops too low, you may kill the yeast and waste all that hard work and delicious bread!
Gluten free challah bread ingredient substitution suggestions
This challah is already dairy-free. Let's talk about suggestions for making other substitutions.
Can you make this gluten free challah bread without eggs?
It isn't as easy to replace egg yolks as it is to replace whole eggs. You can try using three tablespoons of vegan butter in place of the three egg yolks to replace the fat of the yolks.
Can you make vegan gluten free challah?
If you replace the egg yolks with vegan butter successfully, you'll need to replace the honey to have a recipe for gluten free vegan challah bread. In place of honey, try using light corn syrup.
Does it matter which gluten free flour blend you use in this gf challah recipe?
Yes! It matters a lot which gf flour blend you use. And it matters that you add the additional 75 grams of tapioca starch/flour.
I highly recommend using Better Batter (or our DIY mock Better Batter style blend) as the all purpose gluten free flour blend. It took me years to develop a reliable gluten free challah bread recipe without using our gluten free bread flour to make it easy and dairy free.
Don't use Cup4Cup gluten free flour here, even though it is one of my favorite blends. It's simply too high in starch to produce proper bread that holds its shape as intended (it would make a paler, fluffier, and more out-of-shape loaf)—and browns properly here.
This recipe relies even more than usual on true precision in ingredient selection, and in measurement accuracy. For reliable results like the photos that taste amazing, you must use the flours specified, and you must measure by weight.

FAQs for this challah recipe
No. Traditionally, challah bread is made with wheat flour, along with lots of dairy-free enrichments like egg yolks, oil, and honey or other sugars.
This bread is what you might think of as a challah bread substitute, since it's made wheat-free. But it's a substitute that tastes just as it should—and no one will know that it's made with an all purpose gluten free flour blend.
No. Both brioche and challah are enriched breads, but they're not at all the same.
Brioche is a richer, heartier bread than challah, and challah is best made without butter, so it's pareve (neither milk nor meat, which can't be mixed in kosher meal) and can be served with any holiday meal.
Resist the urge to add much more flour or starch! Try returning the dough to its sealed container and placing it in the refrigerator to chill for at least another hour.
There are many reasons that you might have trouble getting a yeast bread to rise. Here are some questions to ask yourself:
Did you use one of my recommended flour blends, measured by weight?
Did you add more than a light dusting of extra flour on your dough during shaping?
Is your yeast fresh?
Did you wait long enough? Overproofing is not a matter of too long a rise, but too much of a rise. Sometimes a rise takes much longer than anticipated depending on the temperature and humidity in your kitchen.
Yes, this gluten free challah bread is already dairy-free. It's made with olive oil instead of butter, and water instead of milk. If you want to replace the olive oil, I recommend using vegan butter. Do not use a flavorless oil like canola or vegetable oil, or the flavor will suffer.
The Best Gluten Free Challah Bread Recipe
Equipment
- Stand mixer with paddle attachment (See Recipe Notes)
Ingredients
- 1 ¾ cups (245 g) all purpose gluten free flour blend, (I used Better Batter and recommend it highly here; please click thru for appropriate blends you must choose carefully for results!)
- ¾ teaspoon xanthan gum, omit if your blend already contains it
- ⅝ cup (75 g) tapioca starch/flour, plus more for sprinkling
- 1 ⅔ teaspoons (5 g) instant yeast, (See Recipe Notes)
- ¼ cup (50 g) granulated sugar
- 2 teaspoons (6 g) kosher salt
- ¾ cup (6 fluid ounces) lukewarm water, plus a teaspoon or so more if necessary
- 4 tablespoons (56 g) extra virgin olive oil
- 3 (75 g) egg yolks, at room temperature
- 2 tablespoons (42 g) honey
- Egg wash, 1 large egg, at room temperature, beaten with 1 tablespoon water
- Poppyseeds or sesame seeds, for sprinkling (optional)
Instructions
Make the challah bread dough
- In the bowl of a stand mixer fitted with the paddle attachment, place the flour blend, xanthan gum, tapioca starch/flour, instant yeast, and granulated sugar. Whisk to combine well.
- Add the salt, and whisk again to combine.
- Add a bit more than 1/2 cup of the water, olive oil, egg yolks, and honey. Using the paddle attachment, beat vigorously.
- With the mixer running, add as much of the remaining water as necessary for the dough to smooth out. In a warm, humid environment, it may take a bit less than the full 3/4 cup of water. In a dry, cold environment, it may take less. Watch the texture very carefully.
- The dough mixture will come together in a clump and then smooth out and stick to the sides of the bowl. Keep beating until it begins to look whipped, and the color lightens a bit (about 6 minutes total).
- Transfer the mixture to a lightly oiled bucket or bowl with a very tight-fitting lid. Place the container in the refrigerator, tightly sealed, for at least an hour and up to 2 days.
Shape the braided gf challah
- When you’re ready to bake, turn out the chilled dough onto a surface very very lightly dusted with tapioca starch/flour.
- Sprinkle the top very very lightly with more starch, and divide the dough into 3 equal portions. Do not add much starch, or your bread will not rise properly.
- If the dough seems too hard to handle and you're tempted to add even more starch, place it back in the container and let it chill in the refrigerator for at least another hour.
- Working with one piece at a time, knead the dough in your clean, dry hands, without adding any additional flour of any kind, pinching any seams that separate.
- Begin working the dough into a cylindrical shape, pinching any gaps together, fanning your hands out toward the edges to lengthen the strand.
- Rolling back and forth, create strands about 15 inches long from end to end that taper slowly from the center to each end, with very tapered ends. Sprinkle each strand lightly with more tapioca flour on the outside of the cylinder to smooth the surface, then set it aside.
- Place the 3 strands on a lightly floured surface parallel to one another and about 5 inches apart from one another. Gather the tapered ends on one side together, pinch them securely and tuck the very end under the knot.
- Plait the 3 strands as you would any 3-strand braid. Do not pull the strands, as they’ll fray. Just place them on top of one another as you work toward from one end to the other.
- Beginning as close as possible to the bound end, place one outside strand across the center strand, exchanging the center for the outside strand you just moved to the center.
- Repeat with the other outside strand and center strand. Repeat the process, alternating one side and then the other until you reach the end. Tuck the end under as you did the other side.
- Placing your hands carefully under each side of the braided loaf, carefully lift the braid onto a lined baking sheet. Press the finished braid gently on each ends toward center to shorten the length a bit.
- Sprinkle the top of the braid lightly with more tapioca starch and brush off excess from the valleys between braids.
Let the bread rise.
- Cover the braid securely with plastic wrap, and place the loaf in a warm, draft-free location. Allow the loaf to rise until it’s at least 150% its original size (anywhere from 45 minutes to hours).
- If any of the tops of the strands begin to separate from one another as the dough rises, try to smooth and pinch them closed. When the dough is nearing the end of its rise, preheat your oven to 350°F.
Bake the bread.
- Uncover the risen bread and brush the tops and sides of the braids very generously with the egg wash. Avoid letting the egg wash pool in between the braids. Sprinkle the top evenly with the optional seeds.
- Place the baking sheet in the center of the preheated oven. Bake for 30 minutes, rotate the baking sheet 180° and reduce the oven temperature to 325°F.
- Continue to bake for about 15 minutes, or until the bread bounces back when pressed on a center braid and the internal temperature is at least 190°F on an instant read thermometer.
- Remove the bread from the oven and allow it to cool on the baking sheet for at least 20 minutes before transferring to a wire rack too cool completely. Slice and serve.
Video
Notes
Nutrition information is automatically calculated, so should only be used as an approximation.


Which better batter flour did you use? I saw a few different ones on their site and wanted to make sure I purchased the right one. Thank you!
I only ever use their “classic blend,” I believe they now call it, Sara. It was the only one until they came out with their “rice-free” blend, which I tested quite a bit and just don’t care for at all. Hope that helps!
My dough was in the refrigerator 24 hours and it did not rise at all. I did use rapid rise yeast.
Any suggestions
Without any details, I’m afraid I can’t know where you deviated from the recipe as written, Gracia. Here are the things I always suggest you check when your yeast bread dough isn’t rising in the refrigerator: 1. Did you measure by weight, not volume (if you undermeasure water or overmeasure flour, your hydration ratio will be off and your dough won’t rise)? 2. Did you use the ingredients as directed, particularly the flour blend? You can’t use just any gf flour blend. 3. Did you have your dough rising in a proofing bucket with a tight-fitting lid? If not, your dough is drying out as it’s sitting in the refrigerator, which will prevent rising.
I measured EVERYTHING by weight and used the better batter flour blend and it was a more like a pancake batter. Didn’t rise at all. I’m not sure what I’m doing wrong. I alot of bread recipes I try never turns out right with your weight measurements. I always end up needing to add more flour
Everyone says that they “followed the recipe to a T” but it’s rarely the case, in ways you just don’t realize are important, but are.
Here are some considerations and questions to ask yourself as you attempt to figure out where you deviated from the recipe as written:
Did you make ingredient substitutions? You mentioned that you used Better Batter’s flour blend. Did you use the “classic blend,” or did you use the newer artisan blend, which will not work in my recipes.
With respect to yeast bread, did you allow the dough to rise long enough, and was your dough covered properly? Overproofing is a function of rising too much, not too long. It can take a long time for yeast bread to rise properly in a cool, dry environment, especially. A lack of rise with a super wet bread likely means that the yeast wasn’t fresh, since the main reason that yeast bread dough doesn’t rise at all is lack of moisture. Clearly, that’s not your issue. I’m afraid that’s all I can do to help you figure out where you went wrong, as I’m not there with you.
Nicole,
Thank you for taking the time to perfect this recipe! We have missed homemade challah since we had a Celiac diagnosis in our home! I have made this twice and am really happy with the results. I do struggle a bit with the quantity vs. measurements of some ingredients. For example, 3 egg yolks weigh a lot less than 75 grams for me…even 4 yolks were not 75 grams. Same with honey. Should I follow the weights or the quantities/TBS? The second time a made this, the dough was wetter and harder to handle so I am wondering if my ingredient measures are off.
Thanks again,
Wendy
You should always go by the weight measurements, Wendy, since volume measurements are fraught with human error and non-standardized, so they are inherently unreliable. The corresponding volume measurements are merely there because otherwise readers get very angry at their absence. There is nothing to be gained from measuring by volume and then checking the weight.
Thank you so much for this wonderful recipe. It turned out amazing! My family doesn’t eat gluten free but we have many friends who avoid it or have celiac disease. It makes it hard to know what to serve when they come over. I now have a solid go to. I couldn’t get ahold of the blend you suggested but found DIVIDED SUNSET gf flour at Walmart that had the same ingredient list as your blend. It was missing pure powder pectin. I added 1tsp ground chia seeds instead. It tasted just like bread. My husband and kids raved “one of the best breads I have ever made” Our GF meals will never be the same again !! Thank you
I’ve never heard of that blend before, Alli, but I’m so glad you were able to find something that worked so well for you. And that’s so kind of you to go out of your way like that for your gluten free friends. People like you make it possible to eat gluten free out of the house!
Hi Nicole, I love your recipes!! Second time making this Chalksh and same thing happened- followed recipe very specific, all was good through the rising and putting in oven, but during the baking the braid separated and areas in the middle created valleys where it separated. It looked perfect going into the oven. Can you help me trouble shoot? Thanks.
It sounds like your issues are in shaping, Robyn. Just reread the portion of the recipe and the post where I discuss how to braid it without putting any tension on the strands. The egg wash is also very useful in sealing the rise in the oven, which I also discuss. It takes a bit of practice, but it sounds like you’re well on your way!
Thanks Nicole! Will work on that tension!
I was so excited bout this recipe. Unfortunately after I took the dough out of the fridge after chilling for over an hour, the dough was extremely sticky and I was completely unable to knead it. Unfortunately this was a waste of time, energy and supplies for me.
Dan, this recipe works when made as written, but it must be made precisely with the ingredients specified, especially including the flour blend and additional tapioca starch, all measured by weight. It took me years to arrive at a reliable recipe, but it must be followed precisely.
I am SO appreciative of your help!
I did weigh the water to 6oz, but I wonder if it’s the salt? You call for 2 teaspoons (6 g) kosher salt and I measured to 6g but 2 teaspoons of salt weighs 12g? Do I have that wrong?
PS First, I proofed the sticky dough for 2 hours and it did rise, but other than the outside, it was still super sticky. I dumped it on a baking sheet, brushed with the egg wash and baked it up. It was lopsided, gorgeous color and tasted great! Second, I am going to try it again and this time I weighed each ingredient and took a photo of every thing I had to measure, just to make sure I’m doing it correctly! So we’ll see! Thank you again (would love to know about that salt question!)
PPS Your privacy policy box isn’t showing an X or check mark…fyi.
Katie, if you used a fine grain salt, like table salt, it will be denser per volume. But when you’re measuring by weight, volume is irrelevant. If you’ve been using volume in any way where weight is directed, that’s a mistake. I’m afraid I just don’t know where your process took a turn.
Thank you for your speedy response, Nicole! I am sure this is my fault! But I can’t figure out what I did wrong. I watched your video prior to making it, I used Better Batter GF flour, and I weighed everything listed by weight in grams. I didn’t add xanthum bc my understanding is that Better Batter already has it. I used Tapioca flour, not Tapioca starch. It’s been in the fridge for about 12 hours now and is sticky to the touch. Could the tapioca flour v. starch be the problem? Thanks in advance!
Hi, Katie, Tapioca starch and tapioca flour are the same thing, and you did the right thing not adding more xanthan gum. The only other things I can think of is you over-measured your water? After sitting in a sealed container in the refrigerator, it might have absorbed enough of the moisture to be properly workable. I’m still optimistic! Try not to add too much flour during shaping, and add tapioca starch, not more Better Batter, as instructed, and I think you’ll be fine. :)
One more thing – I just mixed everything – triple checking that it’s all weighed out – my photos came in handy for that. I have a video of how soupy it is if you want to see it. I am baffled. What could I be doing wrong?
This sounds amazing, thank you so much! I’m going to a shabbat dinner on friday and decided to try this. The dough is now in the fridge but was it supposed to be kind of goopy? Almost pourable and gooey as it goes from the mixer bowl to the lightly greased bowl? Thanks in advance!
No, it’s not, Katie. Please see the photos and the video for a closer look. It sounds like you either used a gluten free flour blend that isn’t one of my recommended blends, or measured by volume, not weight. Both of those are essential for success, as described in more detail in the post.
I baked my goo and though it wasn’t braided, it tasted great. I will try this again, and hope I get it right! Thanks for the recipe.
Try measuring the water by weight, too, Katie. 1 fluid ounce of water = 1 weighted ounce. Are you beating the dough well enough, in a stand mixer fitted with the paddle attachment? That could also be part of the issue.
I gave it a try and it turned out perfectly!! It tastes as I remember it from my days before GF. I have been hoping for this recipe for a long time. When working with the dough, I wore nitrile gloves and kept them dusted with tapioca starch. Stickiness was minimal. I am thinking of forming the dough into knotted buns for a variation.
I’m so glad you were willing to give it a try, Milvi! I worked on it for so many years because nothing less than authentic would do. The smell was so recognizable that I knew after it had only spent like 5 minutes in the oven. I’d love to hear how it goes with knotted buns, if you decide to try!