
This post may contain affiliate links. Please read our disclosure policy.
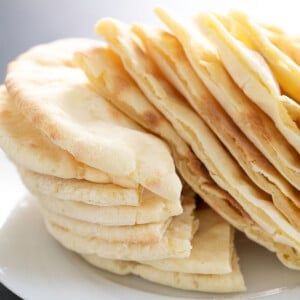
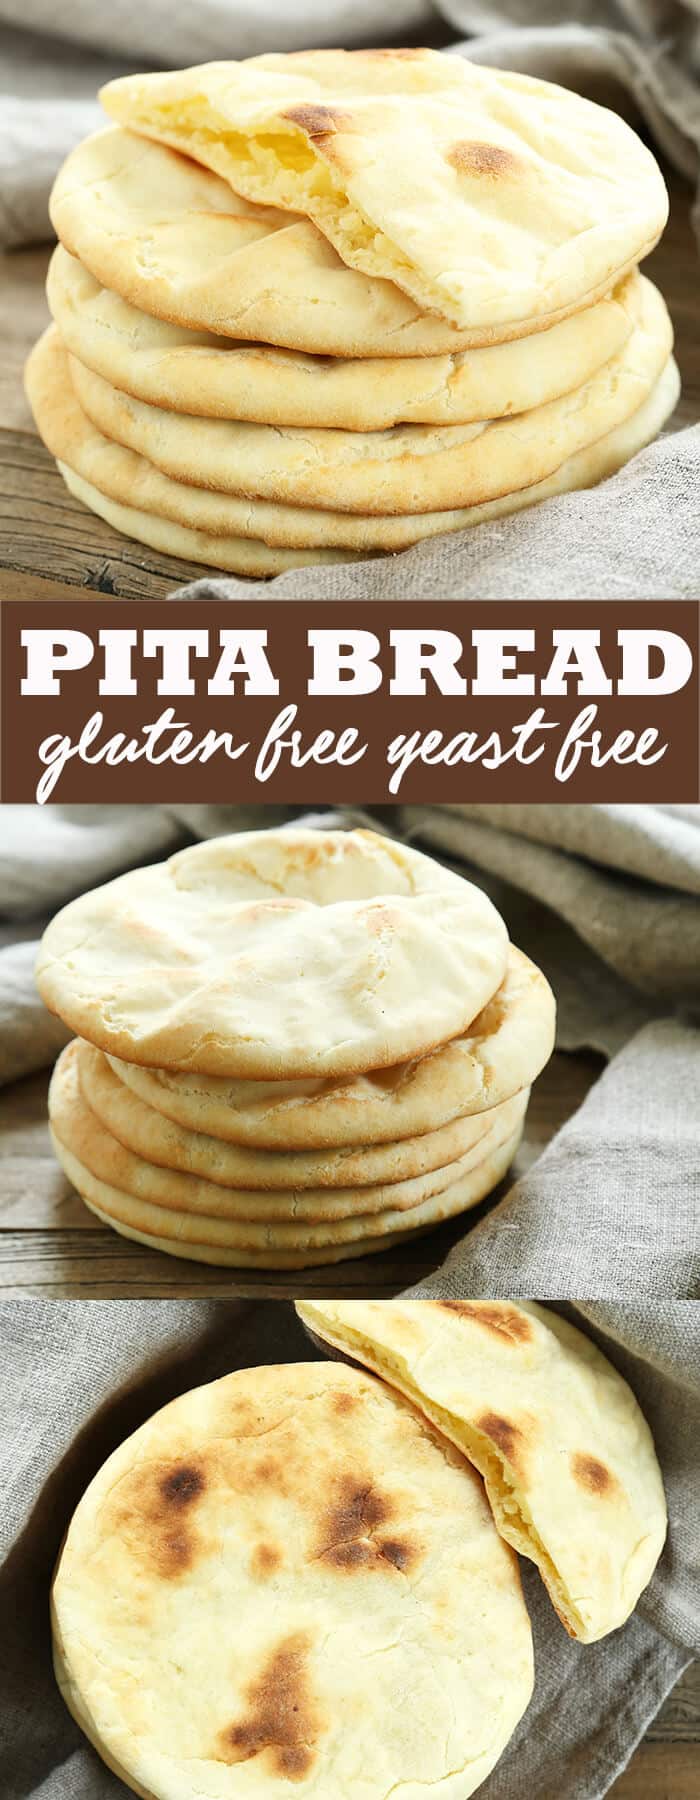
This soft and tender gluten free pita bread is also yeast free, so there’s no rising time. Store-bought gluten free flatbreads simply can’t compare.
Why this recipe works
Adding this gluten free pita bread to nearly any meal will turn your ingredients turn into a hearty and satisfying meal. This recipe is one of the most valuable ones I've ever created for that reason alone!
Here are some of the other attributes of this special gf bead recipe:
- It's super fast to prepare. No yeast means no rising time!
- It's cheaper than buying store-bought gf flatbread, which always seems to taste like mashed potatoes (no one knows why).
- These pitas have no dubious additives and preservatives, and no freezer burn from something that's been sitting in your grocer's freezer until someone was willing to overpay for it.
- The pita pockets are fluffy, tender, and buttery (all without any butter added).
If you are enjoying making bread, you must try out my classic gluten free bread recipe and both my gluten free pumpkin bread and gluten free bread crumbs recipes.
Why make your own gluten free pita bread?
Without a really good recipe for gluten free pita bread, if you're gluten free, you'll never again know the beauty of, falafel stuffed into a pita. Or homemade pita chips.
I believe that there is even a value to knowing that you can make your own pita bread even if you do it once and never again. Or even if you never actually make this bread.
Sometimes, just knowing that you can make something gluten free can create a feeling of encouragement and hopefulness. It can help you resist “cheating” on a gluten free diet, too.
Yeast free bread
This recipe for gluten free pita bread is even a bit more special, since it's yeast free. If you're hesitant to try baking yeast bread, or you simply have to eat that way, this recipe is going to be quite a relief.
If you feel like making bread but you find that you're suddenly all out of yeast, or you find that the store shelves are empty, you can make plenty of gluten free bread without yeast.
Key ingredient notes
Here's what it takes to make this pita bread in your own kitchen, and explanations for what each ingredient does:
- Gluten free flour blend – I highly recommend making this recipe using Better Batter gluten free flour's classic blend, or my mock Better Batter blend. This is a relatively simple recipe, and Better Batter simply has the best formula for making gluten free bread.
- Expandex modified tapioca starch – This is the chemically modified, not genetically modified, form of tapioca starch that plays a central role in our gluten free bread flour blend. Adding a touch of it to this recipe helps strengthen the dough, making it easier to shape raw (as it requires less liquid), and making a more stable gf pita. If you don't have Expandex or don't want to use it, you can replace it with more Better Batter, and increase the liquid by ⅓ as directed in the Recipe Notes below.
- Baking powder – Since we aren't using any yeast in this bread, baking powder provides nearly all the rise. Make sure yours is fresh.
- Salt – Salt adds brightness and complexity to the pita. Bread without salt has no taste at all!
- Oil – A single tablespoon of a neutral oil (like grapeseed, canola, or vegetable oil) adds some richness and tenderness to the bread without adding any competing flavor.
- Eggs – One egg and one egg white help add structure, a bit of richness, and help your pita bread rise.
- Milk – Milk adds liquid, and some richness, and helps tenderize the dough. Make sure you use milk with some fat, as skim milk will add essentially nothing more than water would.
Equipment needed
To make a smooth dough, you'll need either a stand mixer fitted with a paddle attachment, or a food processor fitted with the steel blade. This isn't a dough that you can make with a dough hook, or with the regular beaters on a handheld mixer as they'll simply shred the dough without combining it properly.
If you have a pizza stone, it's really useful to use one in your oven. It will retain enough heat to brown and blister your pitas a bit in the few minutes they're in the oven without having to bake them so long that they end up stiff and tough. If not, at least use an overturned baking sheet to allow the oven's heat to circulate on all sides as much as possible.
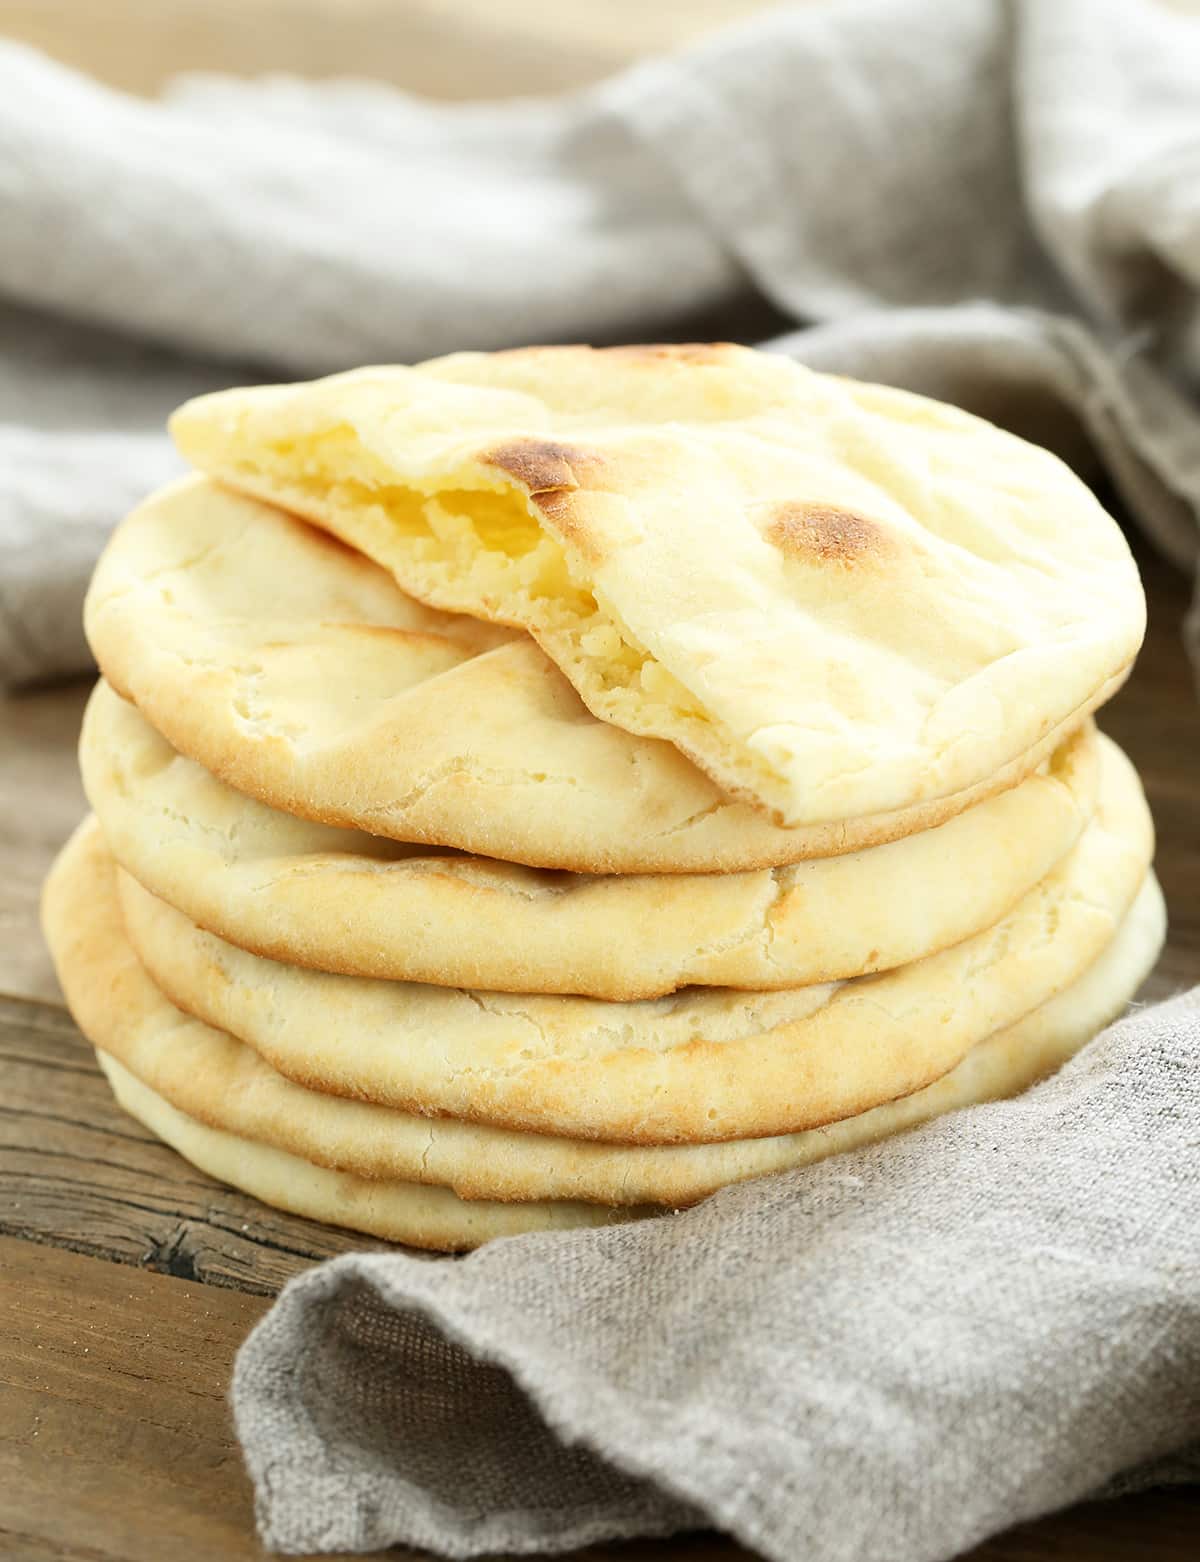
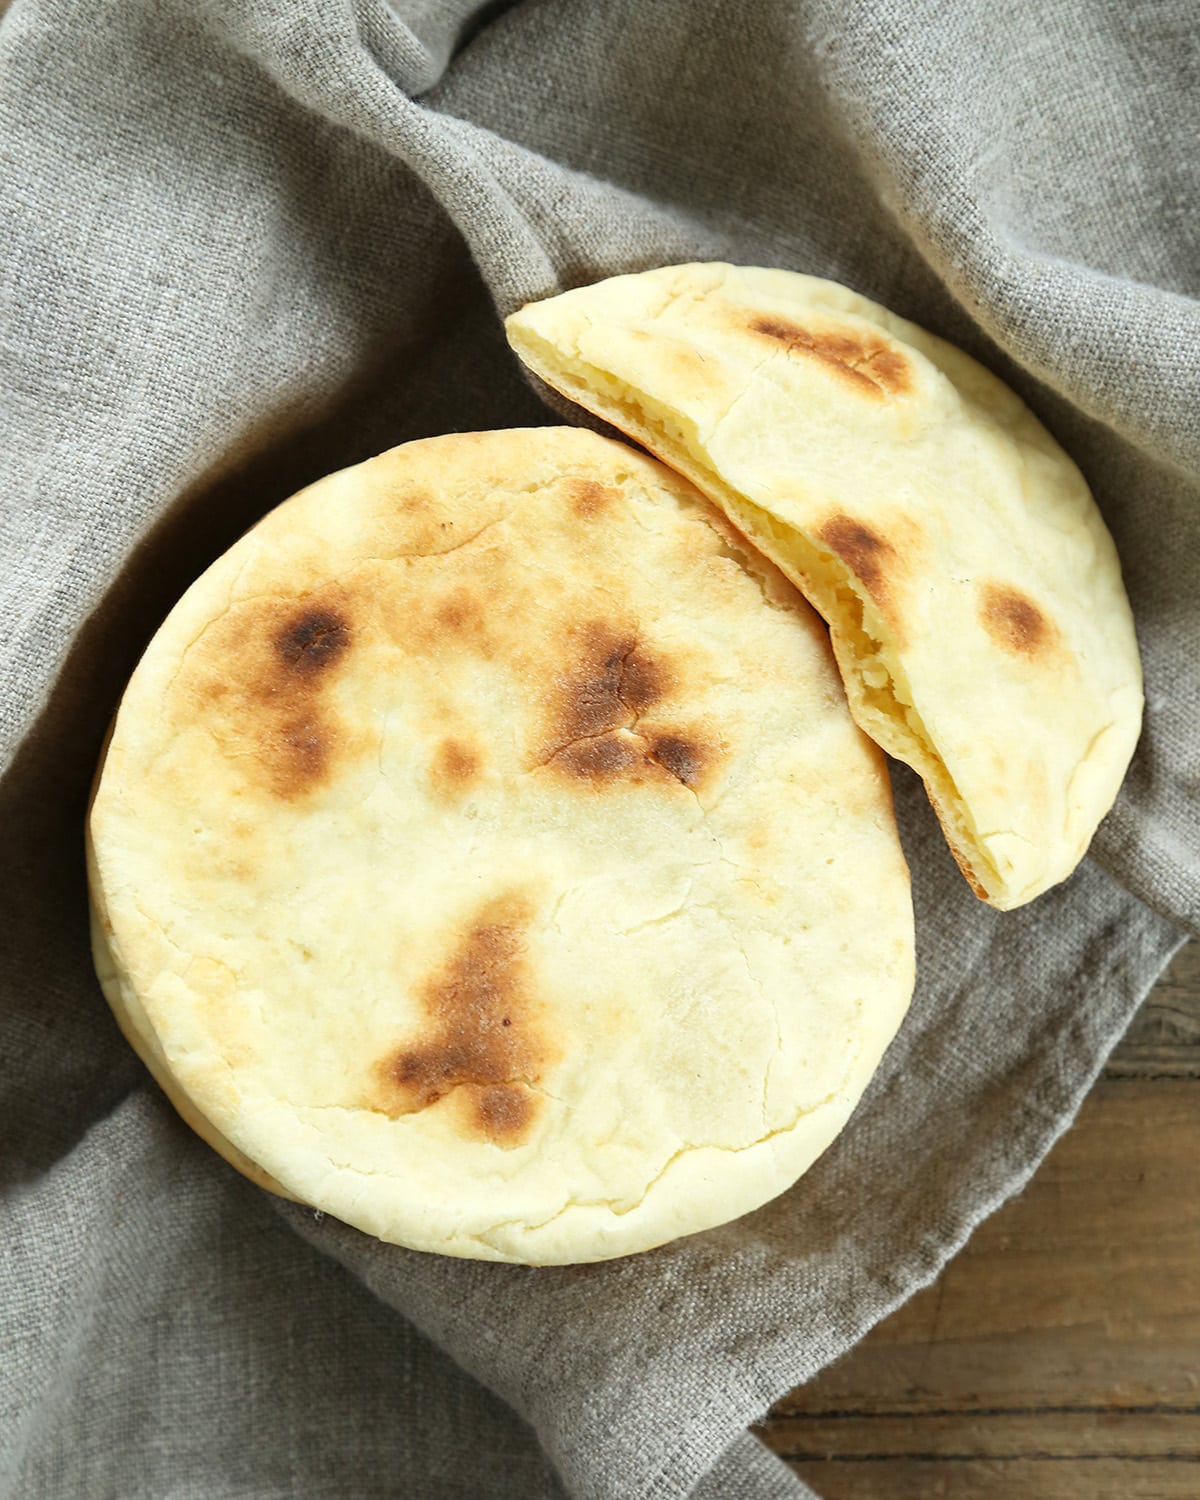
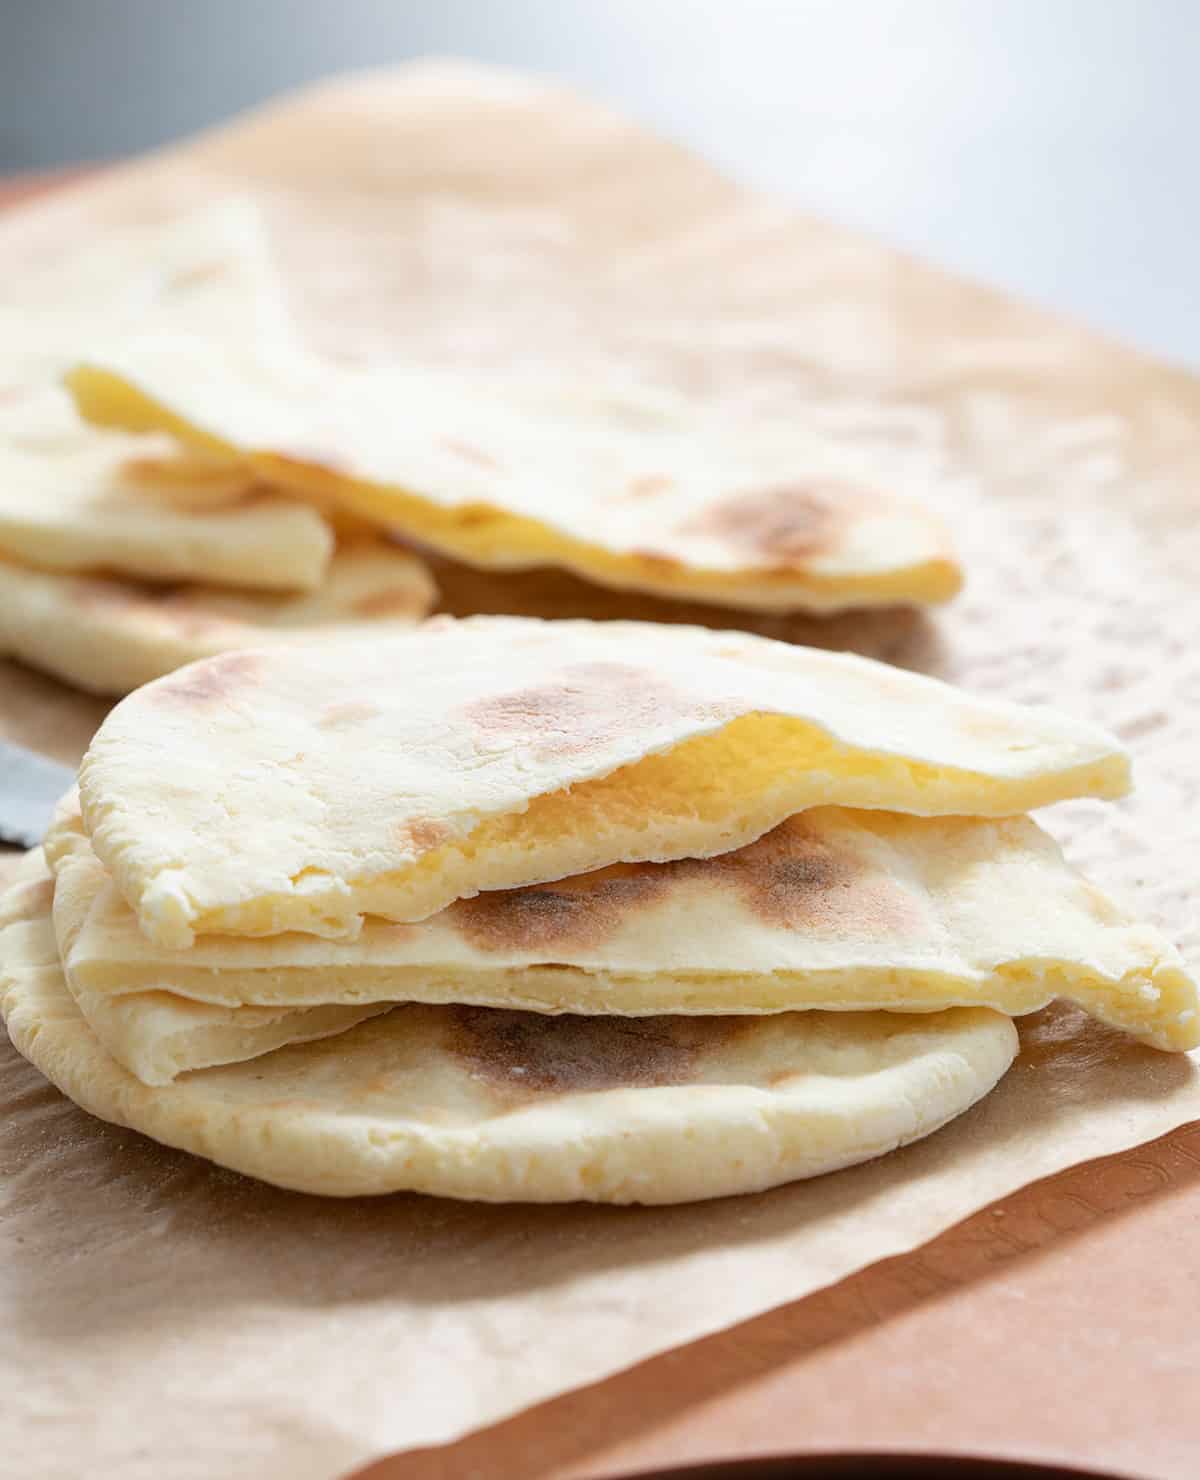
Pitas with a pocket but don't pop
Since it's not made the traditional way, and we aren't using my recipe for gluten free bread flour from my Gluten Free Bread Book (there's a recipe for traditional pita bread in there), these pitas don't “pop” to create a perfect pocket.
They do, however, puff up quite a bit, enough that we can coax open a gluten free pita pocket with a sharp knife. They're soft and tender, and almost buttery tasting—even without any butter.
Expect them to crack a bit along the edges as they puff, since only our gluten free bread flour will give you an even enough rise and a strong enough shell to prevent that cracking. It doesn't hurt them one bit, though.
Expert tips
Roll the dough thinly and evenly
If you roll the dough thicker than ¼-inch, they'll be too thick and are much less likely to puff up at all. You'll have to bake them too long to get any browning at all, and they'll be a bit stiff. If they're not rolled rather evenly, they are likely to burn in very thin spots and make a pocket impossible.
Don't worry about shape
Your pita bread won't be perfectly round, but you only need it to be of even thickness so it bakes evenly. Roundness is not essential. Ovals work just as well!
Keep an eye out for the puffing
Be sure to flip your pitas relatively quickly, so both sides make proper contact with the hot baking surface, and then watch them carefully to remove them when they've puffed as much as they are going to. Overbaking your pitas will cook them too much in the center, which will make them less tender.
Storage instructions
Place the warm pitas in a tortilla warmer or seal them, along with a moistened paper towel, in a zip-top bag on the counter for a few hours and they'll stay that way.
For longer storage, cool them completely, wrap tightly and freeze. Defrost at room temperature and refresh in a hot, cast iron skillet or in the microwave wrapped in a moistened paper towel.
But they're so quick and easy, just make them fresh each time. I promise it doesn't take more than 20 minutes, start to finish!
Ingredient substitutions
Dairy free
The only dairy in this recipe is in cow’s milk. It can easily be replaced with an unsweetened nondairy milk. My favorite is almond milk, since it still has richness. Avoid anything without fat.
Egg free
There is one egg and one egg white in this recipe. The egg yolk adds richness, and the egg whites help balance the moisture and help the bread rise.
You may be able to replace the whole egg in this recipe with a “chia egg” (1 tablespoon ground white chia seeds + 1 tablespoon lukewarm water, mixed and allowed to gel).
For the egg white, try aquafaba (the liquid from a can of chickpeas).
Expandex modified tapioca starch
Expandex modified tapioca starch is a chemically-modified form of tapioca starch (not genetically modified!) It is not interchangeable with regular tapioca starch/flour.
It’s an amazing addition to this recipe as it provides stability and pliability. If you don’t have Expandex or just don’t want to use it, you can replace it with more all purpose gluten free flour and increase the liquid amount to 1 cup.
Note that if you go this route, the dough will be much wetter and less formed. Handle this dough with wet hands, divide it into 8 portions, and roll each into an approximate ball with wet hands.
Place the dough on a piece of parchment paper, and spread it into a round about 1/4-inch thick by pressing wet fingers down in a circular motion on the dough, and then continue with the recipe instructions as written.
Easy Gluten Free Pita Bread Recipe
Equipment
- Stand mixer (or food processor)
Ingredients
- 1 ¾ cups (245 g) all purpose gluten free flour blend, (I used Better Batter; click thru for info on appropriate blends), plus more for sprinkling
- 1 teaspoon xanthan gum, omit if your blend already contains it
- ¼ cup (35 g) Expandex modified tapioca starch, (See Recipe Notes)
- 1 ½ teaspoons baking powder
- 1 teaspoon kosher salt
- 1 tablespoon (14 g) neutral oil, (like vegetable, canola or grapeseed)
- 1 (50 g (weighed out of shell)) egg, at room temperature
- 1 (25 g) egg white, at room temperature
- ¾ cup (6 fluid ounces) milk, at room temperature
Instructions
- Preheat your oven to 400°F. If you have a pizza stone, place it in the oven while the oven preheats. If not, use an overturned rimmed baking sheet
- In the bowl of your stand mixer fitted with the paddle attachment (or the bowl of your food processor fitted with the steel blade), place the flour, xanthan gum, Expandex, baking powder and salt. Mix (or pulse) to combine.
- To the dry ingredients, add the oil and then the eggs and milk and beat (or process) the dough until it is very well-combined and parts begin to pull away from the sides of the bowl (about 2 minutes). The dough should be thick and tacky to the touch.
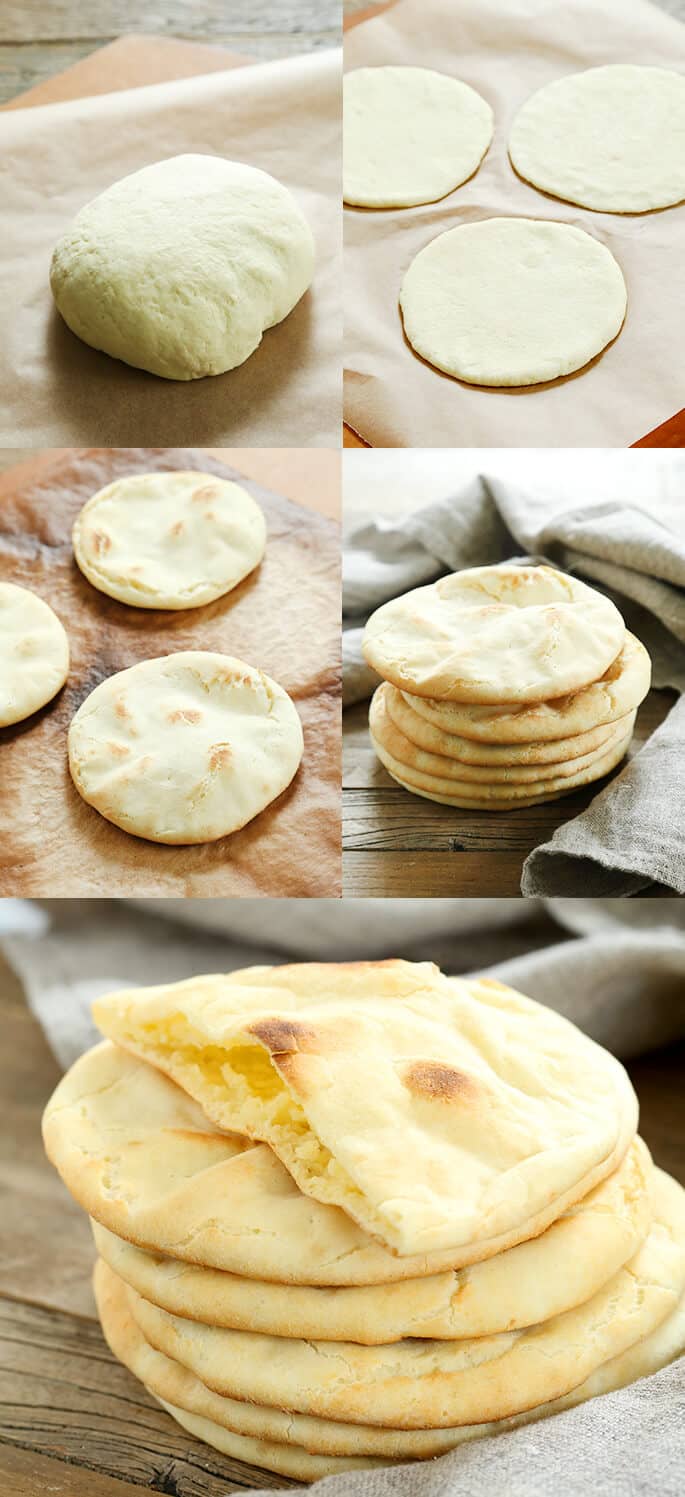
- Turn the dough out onto a very lightly floured surface, and sprinkle it very lightly with more flour. Using a bench scraper or sharp knife, divide the dough into 8 equal parts.
- Roll each into a ball by rotating it in a circular motion on a very lightly floured flat surface. Pat each ball into a disk and then, using a rolling pin and flouring the round very lightly to prevent sticking, roll it out into a round a bit less than 1/4-inch thick.
- Place the disks about 1-inch apart on a piece of unbleached parchment paper. Place the disks on the parchment in the oven (on top of the baking stone or overturned baking sheet) and allow to bake for 2 minutes.
- Working quickly, open the oven and invert the pitas. Allow them to bake for 1 minute and then re-invert and bake until puffed and very pale golden on top (another minute).
- Remove the pitas from the oven, and allow to cool for about 3 minutes, or until they can be handled. Slice each round in half through the center. With a very sharp knife, gently coax open the center of each pita half. Serve warm or at room temperature.
Video
Notes
Nutrition
Nutrition information is automatically calculated, so should only be used as an approximation.
Serving suggestions
- Try stuffing your pita pockets gluten free falafel or chicken salad.
- If you have any pitas that are no longer fresh and weren't stored properly, they're a great candidate for making gluten free pita chips! Just slice into triangles, toss very lightly with some extra virgin olive oil and kosher salt, and bake in a very hot oven, about 425°F until lightly golden all over (about 7 minutes, depending on the thickness of your pita pieces).
- Do you have any pitas that simply wouldn't allow you to create a pocket? Try using them as gf flatbread, add toppings, and place in the toaster oven until melted for a flatbread pizza!
- Try them as a yeast free alternative to gf hamburger buns.
FAQs
No, pita bread is different from naan. Gluten free naan bread is more tender and richer, made with yogurt, and generally isn't made to separate from itself to create a pocket, like this type of pita.
No, I don't recommend making this bread in a skillet. I've tried making this recipe on the stovetop instead of in the oven, and it just doesn't work well. Even when the skillet is covered, the air in the pan just doesn't get hot enough.
The gluten free flour blend that I highly recommend using to make pita bread is Better Batter's classic blend, which is a blend of brown rice flour, white rice flour, potato starch, potato flour, tapioca flour, xanthan gum, and pure powdered pectin.
Pitas that don't swell at all may have been too dry (did you overmeasure your flour? use a different blend?), your oven may not have been hot enough (do you use a standalone analog oven thermometer to check the temperature?), or you may not have rolled them thin enough or evenly enough. Be sure not to work too much extra flour into them as you shape them, either!


Very successful Pita baking day yesterday. I made two batches, felt like I could have baked the first batch a bit longer, both both tasted yummy! Now onto the French Bread! Anneke
You did it, Anneke!
You’re ridin’ high in St. Paul!
Step x steps rule! Hear hear!
So happy for you. :)
xoxo Nicole
AWESOME!
Hey, for those of us outside the USA, could you tell us what kind of gluten-free blend Better Batter is? Sometimes they’re based on potato flour, sometimes on rice… what would you use if you had to mix your own alternitave? Thanks! You’re a legend, I always love reading your posts!
Theresa-I have in the past used a blend of 2 parts rice flour, 1 part tapioca flour, 1 part potato starch. It works pretty well. It has a very neutral flour and bakes up nicely.
Thank you, Sarah!
xoxo Nicole
Hi, Theresa,
Looks like Sarah D did you one better than me! And Sarah is a Better Batter user, so she has a good benchmark to which she can compare her blend. I never make my own blend, so it’s so hard for me to know what to say to readers outside the U.S. I will ask Naomi Poe, the founder of Better Batter, if she can make a suggestion for non-U.S. readers. I wish she sold her blend your way! Here are the ingredients in Better Batter’s all purpose GF flour, if it helps: rice flour, brown rice flour, tapioca starch, potato starch, potato flour, xanthan gum, pectin.
Have you used a GF flour blend in the past? Every GF person should be able to make quickbread pita bread! Don’t worry. We’ll figure it out.
xoxo Nicole
Hi. I’m in Belgium and I used ORGRAN gluten free flour. It works pretty well (but I had to add the xantham gum).
Nicely done! Pics look great and easy to follow. First, I’ll try the French Bread from yesterday. If that works out, I’ll go for the pita…I’ll have to let you all know how it goes!
Love this recipe. But how much oil? It’s not listed in the recipe.
Hi, Karen,
Thank you so much for pointing that out! It’s 1 tablespoon of oil. I have revised the recipe. Good thing for the step-by-step photos, or you wouldn’t have known to ask – and I might have missed it entirely! Please accept my apologies.
xoxo Nicole
Thank you, Nicole!!
Love,
Me too
Hi, Darlene,
Thank you for making me giggle. I love a good giggle.
Love,
Me
These look fabulous! Should be perfect for school lunches. “Sad and pitiable” just sounds depressing, so I don’t want to be that. My Better Batter won’t get here until Tuesday, which is sad, so I am off to buy more of my other APGF flour. Hugs from, Sad but not Pitiable (or maybe the other way around!) in St. Paul
Dear Sad But Not Pitiable in St. Paul,
So perfect for school lunches! Why didn’t I think of that? So glad you’re here.
Sadly (and pitiably), inferior GF flours make for inferior GF baking results. It’s a fact. There are others, but Better Batter makes for Best Batter. :)
xoxo Nicole
Pitas here I come! Nikki–I made the corn muffins last weekend—best I ever made, thanks to you. The fresh sweet corn and ricotta made all the difference in texture. Moist and delicious. Sending hugs of gratitude! xoxLinda
Hi, Linda,
Fresh sweet late summer corn + ricotta cheese = surprisingly fab corn muffins. Who knew? Now we know!
You are so welcome. Thank you for telling me!
xoxo Nikki
Mmmmm….falafel. I LOVE falafel. You MUST have a good recipe. Share? I can’t wait to make these! Our favorite is Shish Tawouk over rice, quinoa, or pita. Yum!
So, does that falafel recipe work with just subbing the flour with gf flour or do I have to do something more to it?
Shish Tawouk is super yummy. I just brown cubed chicken, cook up some carrot coins, onions and mushrooms with salt and pepper, make a chicken gravy with it and add spices (Turmeric and Shwarma mostly) then add thickner if you want it thicker. Ladle over rice, quinoa, or grilled pita and enjoy!
We also like to fill our pita with Kofta and Lebeney. Mmmmm….pita. :)
Hi, Sarah,
I actually modify a few things here and there to suit my personal tastes (and those of my family), but the one sort of major thing I do (that totally breaks all the falafel rules, but I find it makes for a really perfect texture) is to stream in a bit of olive oil toward the end, before the chickpeas are completely chopped. That way, you can still get a creaminess without having to fully puree the chickpeas. Other than that, I tweak it quite a bit, but it is great as is.
Enjoy!
xoxo Nicole
Ooo! Or Tahini Chicken. :) Wow, too many choices for this pita…..we could even go non-traditional and fill with tomato sauce, cheese and pepperoni. What to choose, what to choose?!
Hi, Sarah,
Pita Pizza!
Wow, you really do love your pita bread.
I say you don’t choose. I say you make a double batch of quickbread pitas, & line ’em all up, then fill ’em one by one with everything you can think of. Invite the neighbors!
xoxo Nicole
Thanks a million! The recipe is great! I just tried it and actually I’m eating one pita right now and it’s really good! :) It really works!
Hi, there,
So glad you were successful. You sound surprised that it worked. Of course it works! ;)
xoxo Nicole
I must make these! =D Do you know if these freeze well being GF and all?
SO making these this weekend!!!
Thanks, Nicole!