
This post may contain affiliate links. Please read our disclosure policy.
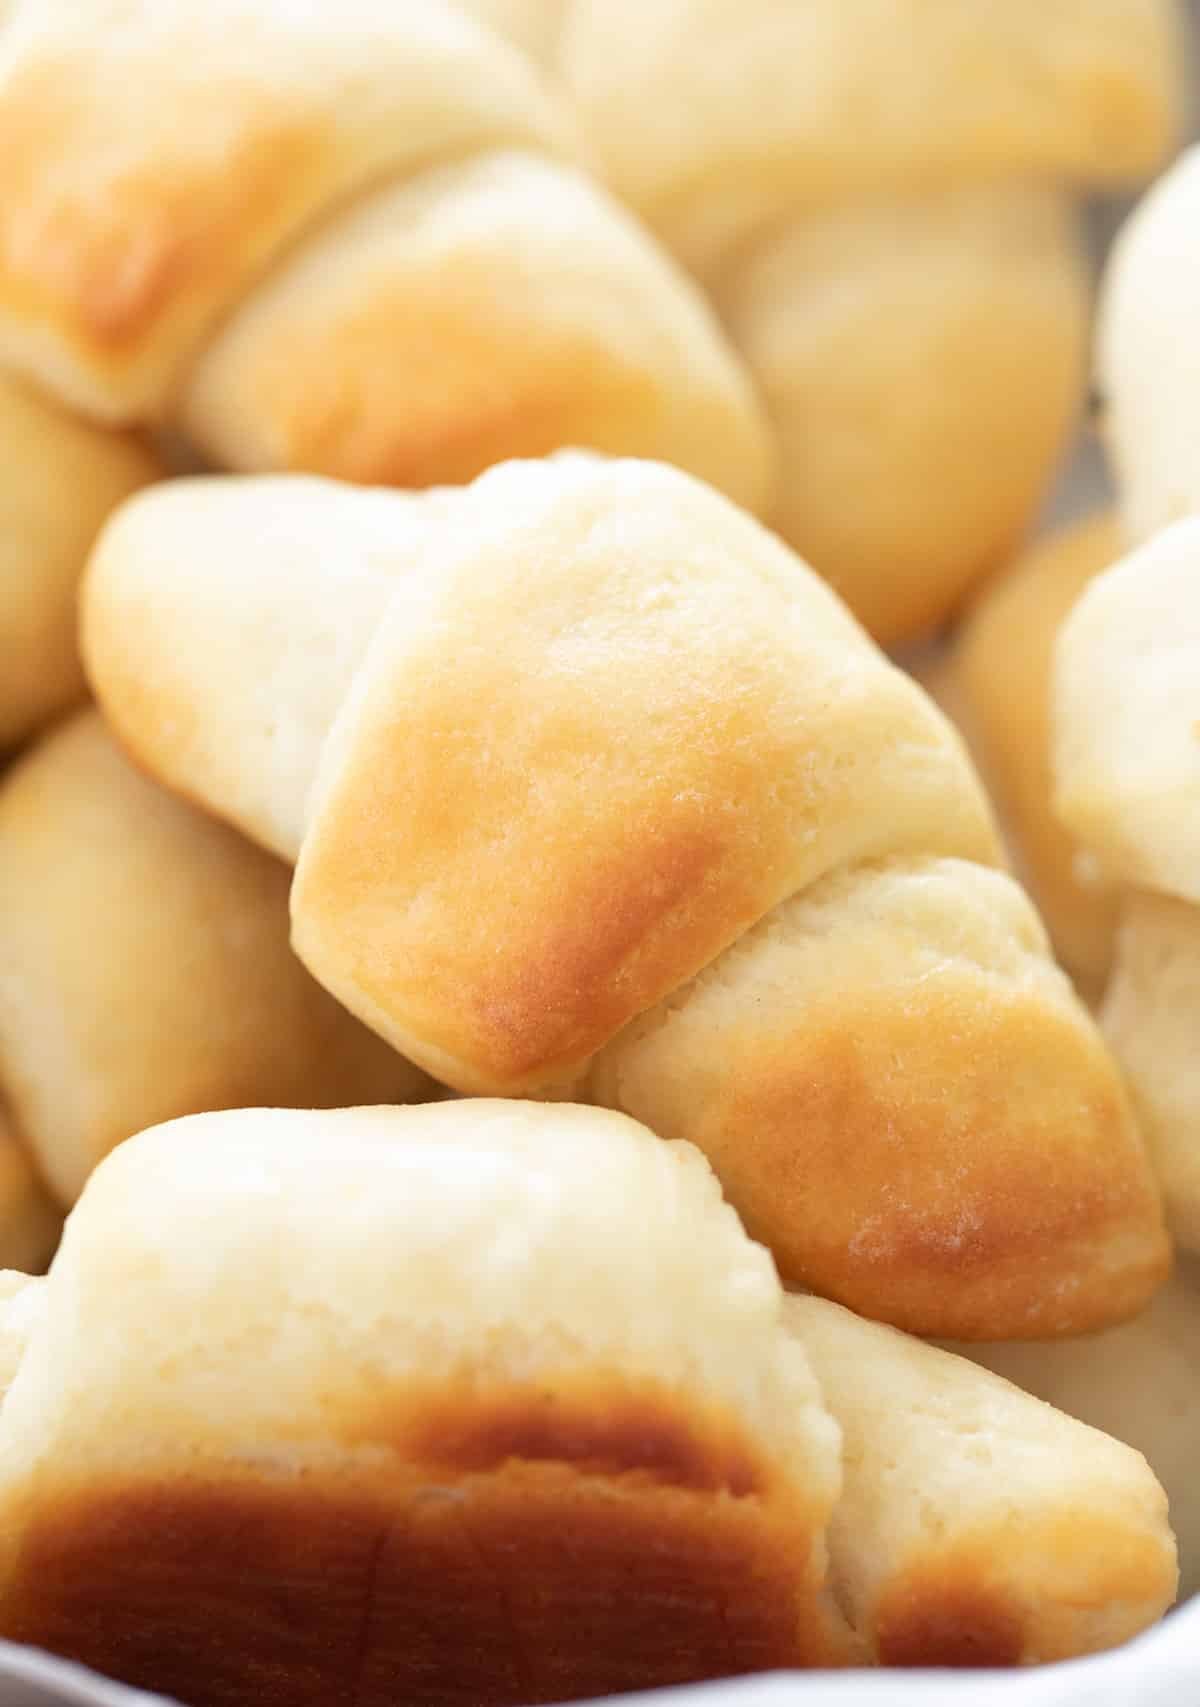
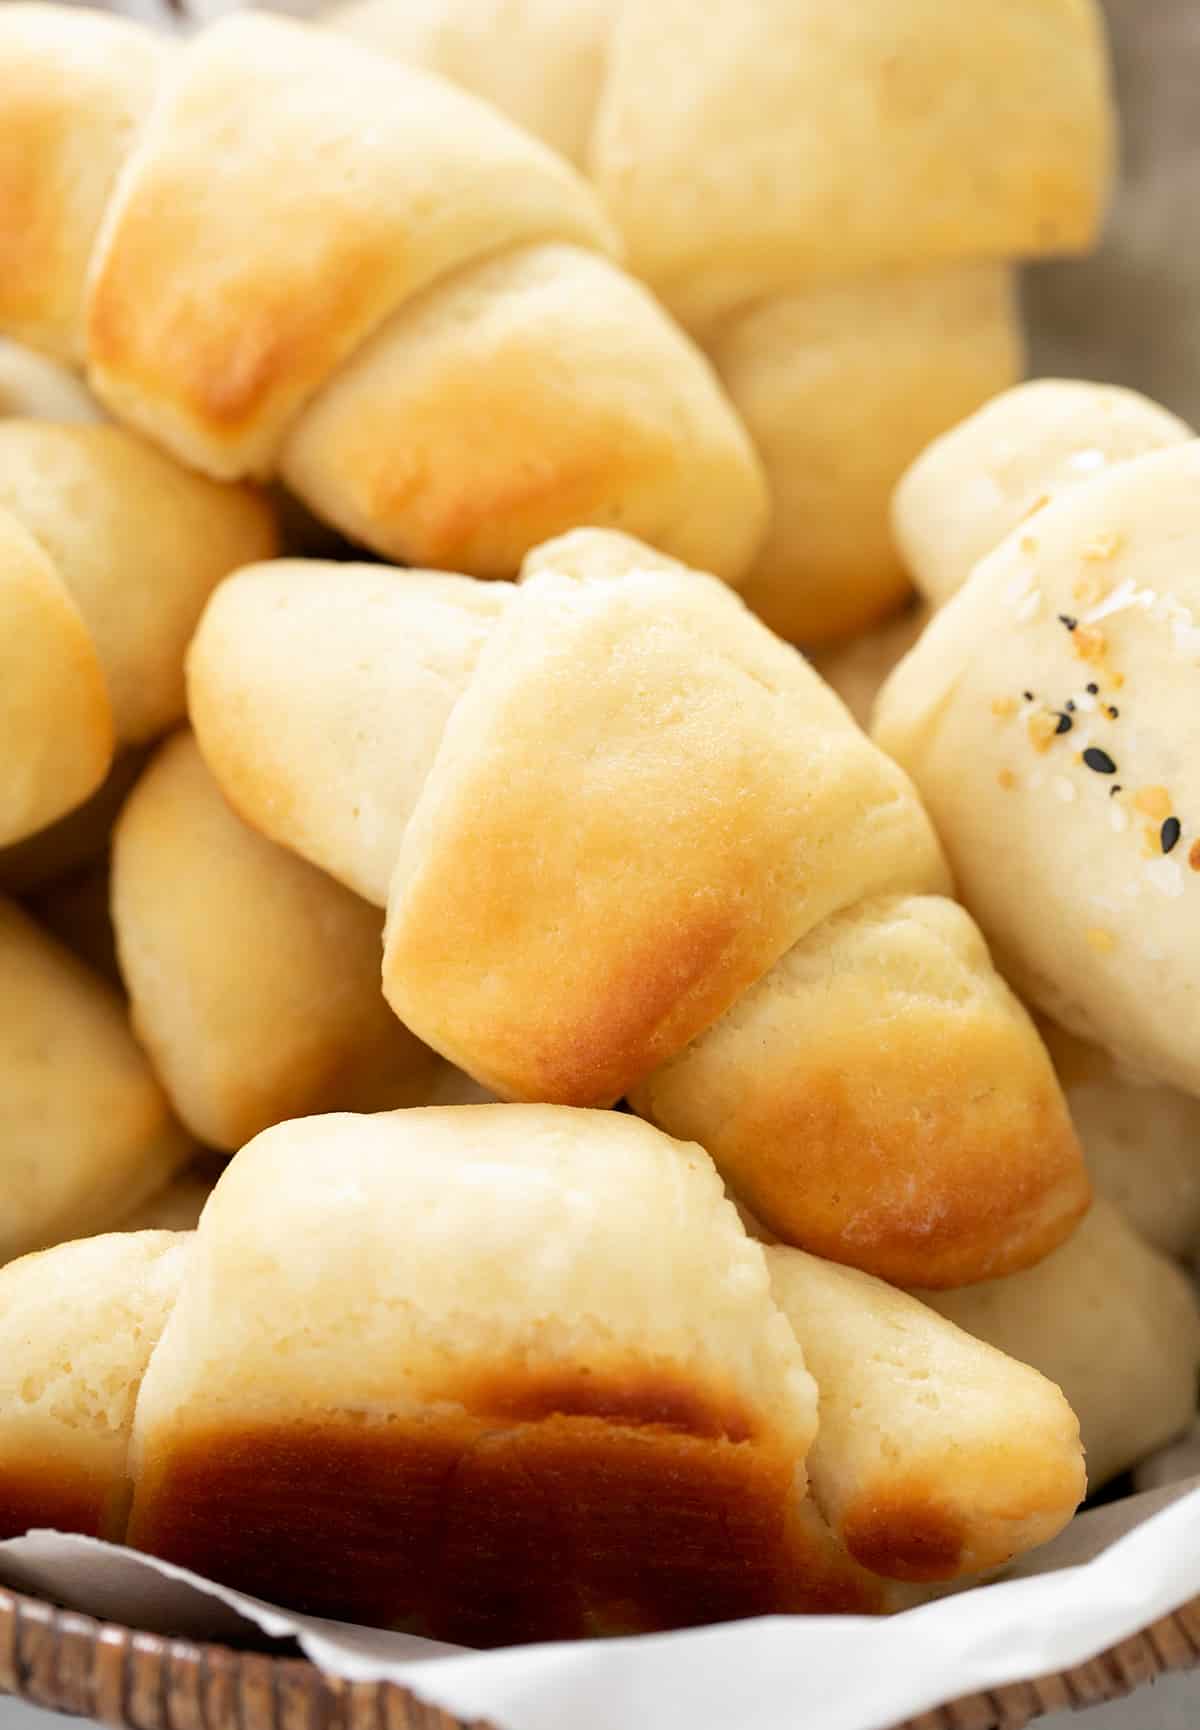
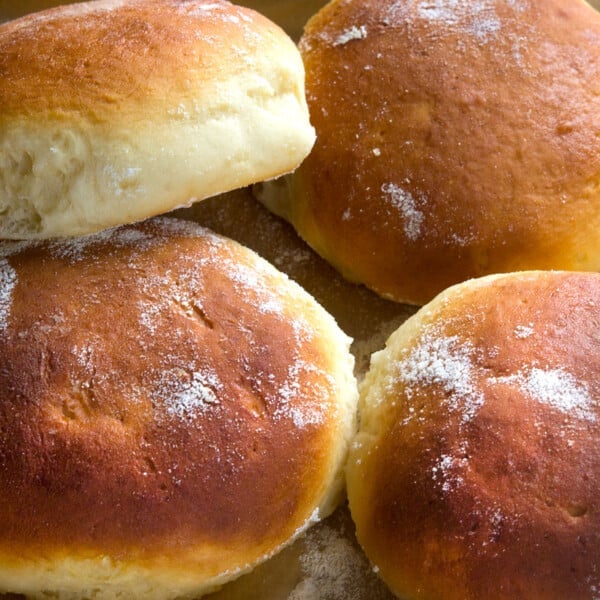
These tender, buttery gluten free crescent rolls are just as fluffy and soft as the ready-made can of rolls at the grocery store.
I've tested this beloved recipe with the gluten free bread flour options available to purchase, and am thrilled to report that it works just as well. Baking these Pillsbury copycat rolls just got a lot easier!
My take
Nicole's Recipe Notes
- Classic dough: I really miss refrigerated canned Pillsbury dough in a can, but you can't buy a gluten free version of it.
- Versatile: Use it to make these classic soft, fluffy buttery rolls, plus a crescent ring, baked brie, pizza rolls, pigs in blankets, and anything else you want to roll inside or bake on top.
- Make ahead: The raw dough keeps in the refrigerator in a tightly sealed container for up to 5 days. Use the dough to make some fresh rolls tonight, and for apple hand pies in a few days.
- Easy to make: This recipe can be made with my specialized gluten free bread flour blend, and also with King Arthur Flour gluten free bread flour or Caputo Fioreglut gluten free flour.
How to make gluten free crescent rolls
Make the starter: We begin with a “starter” or pre-ferment to give the crescent dough a head start in rising, and to make the dough easier to handle. With all the yeast in the recipe, and doubles in size.


Make the dough: Add all of the wet ingredients (buttermilk, egg, honey, softened butter, and the risen starter) to the bowl of a stand mixer (or a large bowl). Whisk together the gluten free bread flour and salt, add to the wet ingredients, and knead well with the dough hook (works for a handheld mixer with the hook). Transfer the dough to a sealed container, and refrigerate for up to 5 days.


Shape the dough: On baking day, turn the dough out onto a shaping surface, smooth out with a bit of extra flour, and roll into a round. Slice the round into 4 quarters, then each quarter into 3 pieces for 12 triangles. Brush or spread softened butter on top.


Finish and bake: Separate the triangles and roll each from base to tip. Place on a baking sheet, brush with melted butter (and an egg wash, if using Caputo Fioreglut or KAF bread flour), and bake.


My Pro Tip
Expert tips
Shape chilled dough
Avoid overflouring the dough during shaping by working with cold dough. It's naturally much less sticky that way. And use a light touch during shaping.
Brush with barely-melted butter
We brush the inside and the outside of the rolls with butter before baking. Butter that has just started to melt is soft enough to spread and brush, but less likely to leak out during baking.
Double the recipe
The original recipe was written to make 24 rolls. To test other bread flours, I cut it in half to make 12, and preferred the smaller batch.
If you plan to use it for crescent roll appetizers and snacks from the past, just double the yield to 24 or click the [2X] button in the full recipe below.
Brush with an egg wash
If you're using Caputo Fioreglut gluten free flour or King Arthur Flour gluten free bread flour, the rolls need help browning in the oven. Brush them first with melted butter, then an egg wash.
Choose your flour blend carefully
This recipe needs gluten free bread flour in one form or another to work. An all purpose gluten free flour blend like Better Batter's classic blend or Nicole's Best won't work properly. But there are more bread flour options than ever!
Ingredient substitutions
Dairy free
In place of buttermilk, use half nondairy sour cream, half nondairy milk. In place of regular butter, use block vegan butter (Miyoko's Creamery is my favorite brand, but Earth Balance sticks should work, too).
Avoid using my gluten free bread flour blend, which must contain dairy. Instead, use Caputo Fioreglut or KAF gluten free bread flour (keep in mind that they both contain wheat starch, though, which is safe for celiacs but not if you are allergic to wheat).
Egg free
Try replacing the egg with a “chia egg” (1 tablespoon ground white chia seeds + 1 tablespoon lukewarm water, mixed and allowed to gel).
Yeast
If you don't have instant yeast, you can use active dry yeast. Use just under 1 gram more for a total of 4 grams active dry yeast, and dissolve it first in some of the warm water in the starter first.
Gluten Free Crescent Rolls Recipe

Equipment
- Stand mixer with dough hook (or handheld mixer with dough hook attachments)
- 1 2 liter proofing bucket or other sealed container
- Pizza or pastry wheel or sharp knife, for slicing the dough
Ingredients
For the starter
- ⅝ cup (88 g) gluten free bread flour blend, (see Recipe Notes)
- 1 ½ teaspoons (6 g) granulated sugar
- 1 teaspoon (3 g) instant yeast, (see Recipe Notes)
- ½ cup (4 ounces) warm water, (about 95°F)
For the dough
- 1 ¾ cups (245 g) gluten free bread flour blend, (see Recipe Notes), plus more for sprinkling
- 1 ½ teaspoons (9 g) kosher salt
- 1 teaspoon (6 g) honey
- ⅜ cup (3 fluid ounces) buttermilk or plain whole milk yogurt, at room temperature
- 1 (50 g (weighed out of shell)) egg, at room temperature
- 2 tablespoons (28 g) unsalted butter, softened
- Risen Starter
- 3 tablespoons (42 g) unsalted butter, just barely melted
- Egg wash, (1 egg beaten with 1 tablespoon milk, cream, or water) optional
Instructions
Make the starter.
- In a medium-size bowl, place the bread flour, granulated sugar, and instant yeast, and whisk to combine well. Add the warm water, and mix until smooth and well-combined. (If using Caputo Fioreglut flour, add the water to the bowl first, followed by the flour, sugar, and instant yeast.)
- The mixture will be thick and shapeless. Cover and set the bowl aside in a warm, draft-free location to rise until doubled in size (about 45 minutes).
Make the dough.
- In a stand mixer bowl (or a large bowl with a handheld mixer with dough hooks), add the honey, yogurt or buttermilk, egg, room temperature butter, and risen starter to the bowl.
- In a separate bowl, whisk together the bread flour and salt, and whisk to combine. Add to the mixing bowl on top of the wet ingredietns.
- Place the bowl in your stand mixer fitted with the dough hook and knead for about 5 minutes on medium-high speed or until the dough is smooth and stretchy, and appears to have lightened a bit in color.
- Spray a silicone spatula with cooking oil spray, and scrape down the sides of the bowl to make sure all the dry ingredients are incorporated.
- Transfer the dough to a bowl or proofing bucket large enough for the dough to rise, and cover tightly with plastic wrap or the top of your proofing bucket.
- Place the dough in the refrigerator for at least 1 hour and up to 5 days.
Shape the rolls.
- On baking day, line a rimmed baking sheet with unbleached parchment paper and set it aside.
- Turn the dough out onto a lightly floured surface, and sprinkle it very lightly with more flour. Handling the dough very gently so you don’t incorporate too much flour into the dough, turn the dough over a few times until it’s smoother.
- Roll the dough into a 10-inch to 12-inch circle, turning the dough over frequently, sprinkling very lightly with more flour as necessary, and moving it around to prevent sticking.
- With a pizza wheel or sharp knife, slice the round of dough into 4 equal pieces, each a very wide triangle. Slice each quarter into 3 equal triangles, making 12 triangles total.
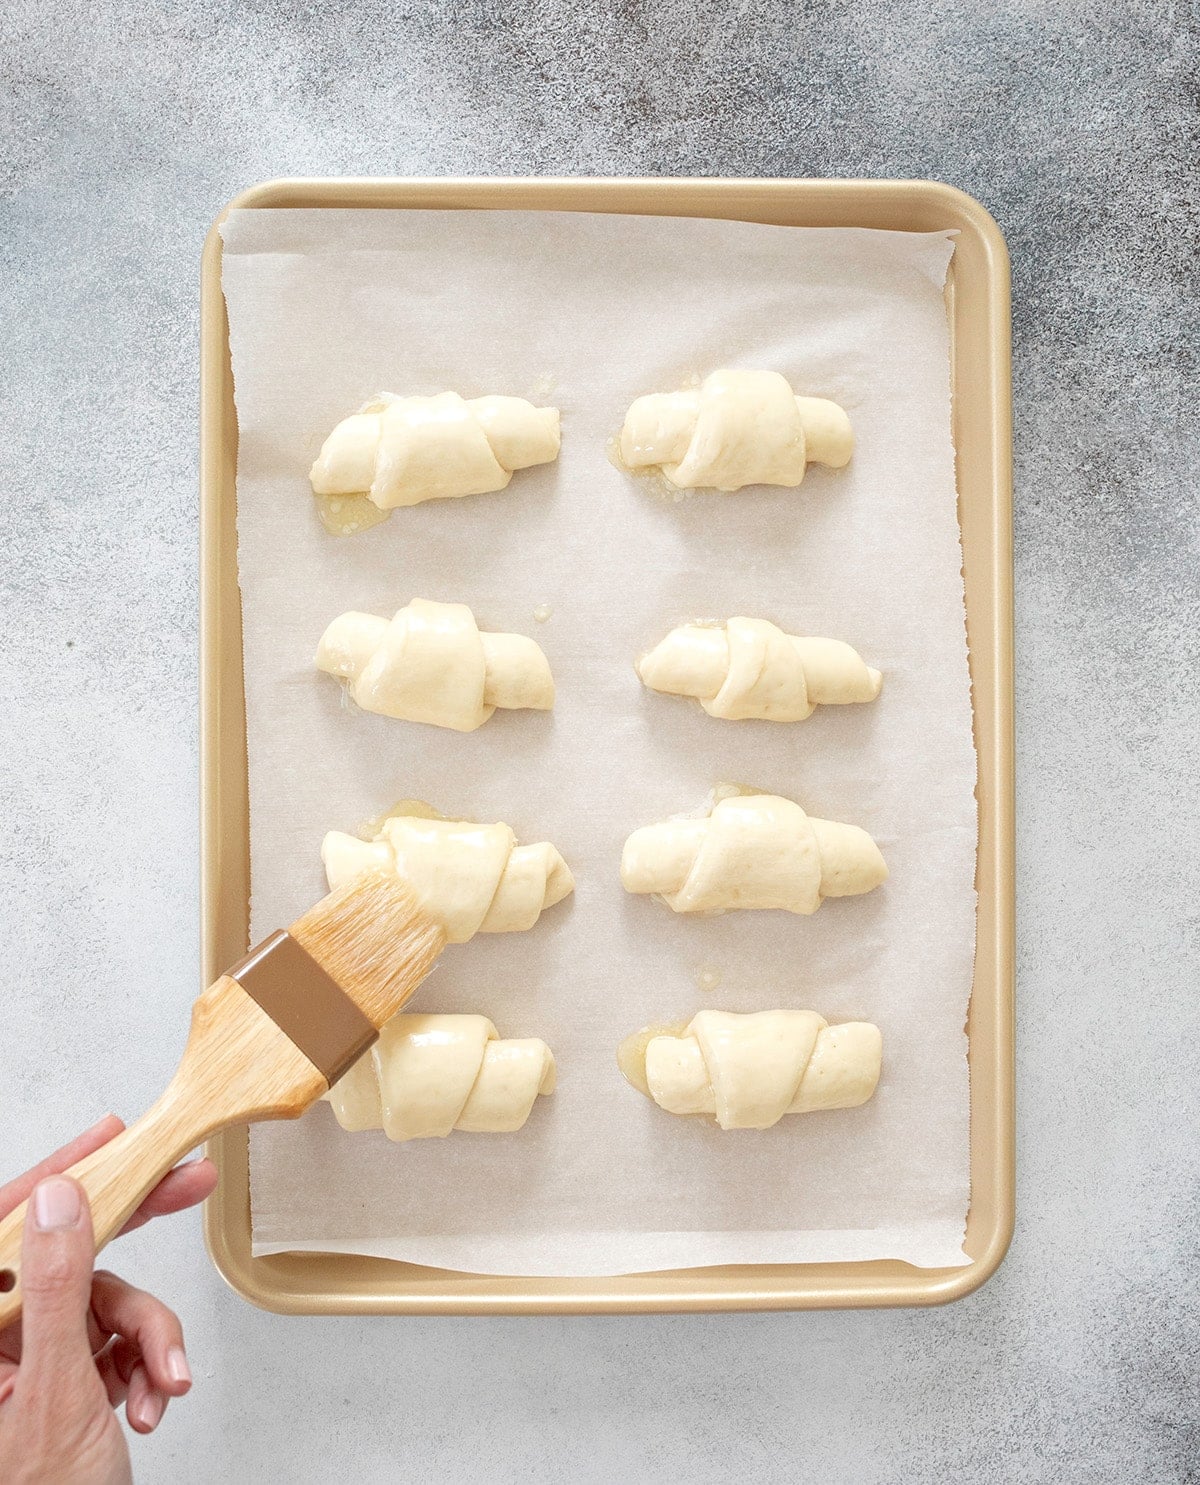
- Brush the dough liberally with about half of the 3 tablespoons of barely melted butter, then allow the dough to sit briefly to allow the butter to set.
- Separate one triangle from the circle, and roll it gently but securely from base to tip. Place the shaped raw crescent roll on the prepared baking sheet, with the tip of the triangle secured on the bottom.
- Repeat with the remaining pieces of dough. Space the rolls about 1 1/2 inches apart on the prepared baking sheet.
Let the rolls rise.
- Cover the baking sheet with lightly oiled plastic wrap, and place it in a draft-free location to rise until about 150% of its original size, or 50% more than the size it started (about 45 minutes).
- The rolls will not double, so do not overproof. If the dough starts to look less smooth on top or break, stop the rising right away.
Bake the rolls.
- About 15 minutes before the end of the rolls’ rise, preheat your oven to 350°F. If you've used Caputo Fioreglut or KAF gf bread flour, preheat the oven to 375°F.
- Once the rolls have finished rising, remove the plastic wrap and brush the tops generously with the rest of the barely melted butter. If you've used Caputo Fioreglut or KAF gf bread flour, brush the the tops of the rolls with an egg wash as well.
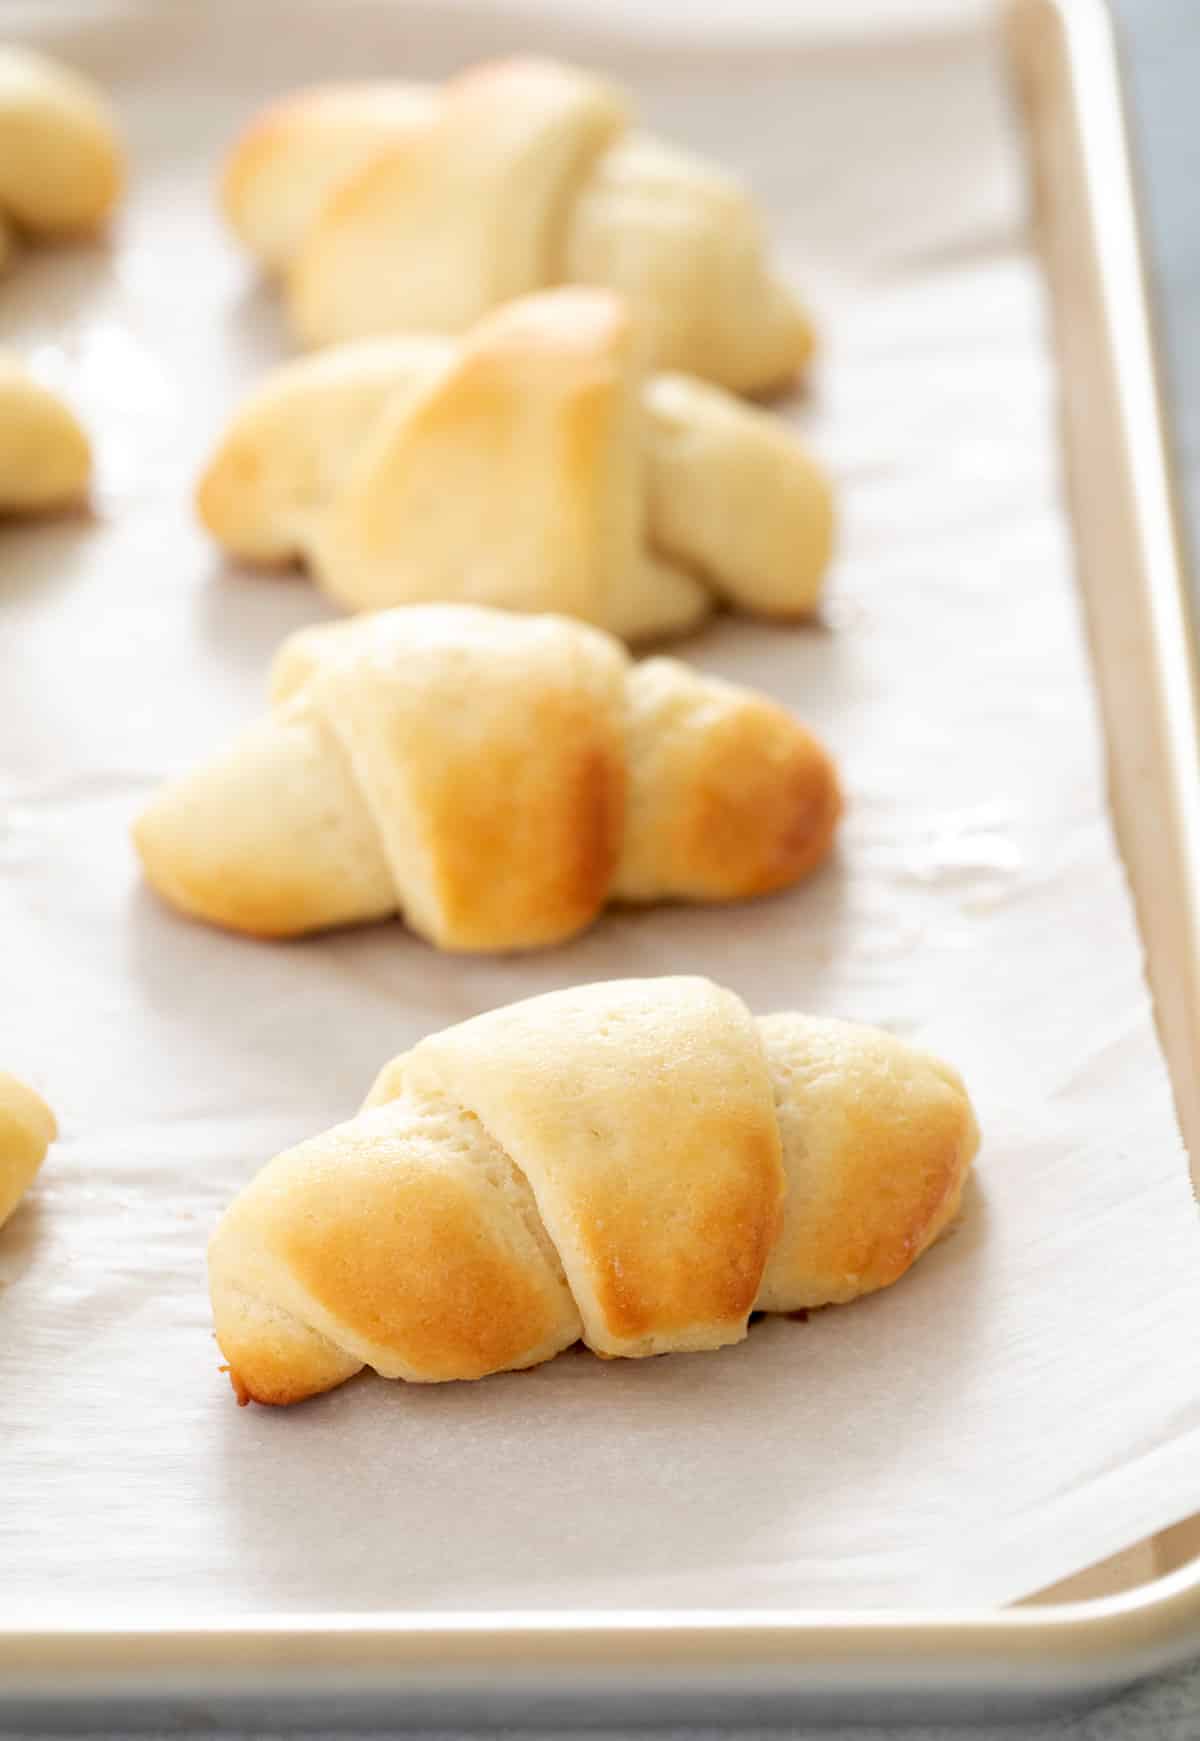
- Place the baking sheets in the center of the preheated oven and bake until the rolls are just browned (about 15 minutes).
- Remove from the oven, and serve warm.
Video
Notes
- 475 grams Better Batter original blend all purpose gluten free flour or my mock Better Batter
- 119 grams whey protein isolate
- 71 grams Expandex modified tapioca starch
Nutrition
Nutrition information is automatically calculated, so should only be used as an approximation.
Serving suggestions
Any way you may have used crescent roll dough before, you can use this dough now. Here are some ideas:
Ham and cheese sandwiches
Roll out the dough and slice the round into 6 or 8 pieces instead of 12. Fold a slice of ham and a slice of cheese to fit on the top of the triangle, then roll from base to tip. Bake as directed.
Cinnamon sugar rolls
Mix 1 teaspoon ground cinnamon, 1/4 cup granulated sugar and 1 teaspoon cornstarch. After brushing the triangles with melted butter, sprinkle with the cinnamon sugar. Continue the recipe as written.
make ahead/leftovers
Storage instructions
Once baked, they will stay fresh covered in plastic or in a sealed container for about 2 days. Sprinkle with warm water and bake in a toaster oven at 300°F for 5 minutes to refresh.
For longer storage, cool the rolls completely, wrap tightly in plastic wrap or in a sealed container and freeze for up to 3 months. Defrost one at a time at room temperature, then refresh as described above.
To parbake or partially bake any dough you don't plan to serve right away, bake at 300°F until they are just set but not browned at all (about 10 minutes).
Let them cool, then freeze in a single layer before piling them into a sealed freezer-safe container. To finish baking, defrost almost fully at room temperature, brush with an egg wash or melted butter, then bake at 350°F for 10 minutes or until just browned.
FAQs
No, crescent rolls are not the same as croissants. They are similar in shape, but a crescent roll is bread, and a croissant is pastry. Gluten free croissants are like a cross between crescent rolls and flaky layered buttermilk biscuits.
Depending on what you place inside the rolls, and how much of it, before baking, baking may take a bit longer. Just watch the rolls after about 15 minutes to see when they're beginning to brown. And don't pull the dough tight around the filling or it may break.
Yes! You can roll this dough out into a round or rectangle, bake it until it begins to brown, then top and bake until the toppings melt and bubble.
I'm afraid not! You need a “gluten free bread flour” like KAF gluten free bread flour or Caputo Fioreglut.


Pillsbury Pop and Serve Crescent Rolls have always been my go to. My young daughter and I recently got diagnosed with Celiac, so I’m on a mission to find amazing recipes to replace some of our favorite things. I have never been a homade roll maker-so I feel completely out of my element without even adding the gluten free element. I’ve tried your recipe many times, and can tell it is amazing, because even with it not turning out right, the flavor has been heavenly! I’m having a serious issue with my dough being way too dry/crumbly. I even tried 1/4 cup less flour to see if that would fix it. I’m using King Arthur Gluten Free Bread Flour. Any suggestions as to why it could be lumpy/dry/crumbly? The rolls are still really yummy, but are super dense and cracked from the dry dough. I’ve tried it SO many times, and I can’t get it to be smooth and beautiful like in your video. I would be interested if you have any recommendations. Thanks!
Hi, Lacey, are you measuring your ingredients by weight? It does sound like you’re overmeasuring your flour and/or working too much extra flour into the dough during shaping, both of which will lead to dry dough that doesn’t roll out cleanly, doesn’t rise properly (dough needs enough hydration to rise), and leads to a dense result.
I will try doing it by weight. I’ve always just done recipes from cup measurements, but I will test out weight! Thanks for the idea!
Oh, you really can’t bake yeast bread effectively, particularly gluten free yeast bread, without measuring by weight. That’s almost certainly leading to your result. To illustrate a bit, watch this Instagram video of mine.
if I use the King Arthur gluten free bread flour, do I still need to add the whey and the modified starch?
Hi, RC, nope. The King Arthur gluten free bread flour is the bread flour here, so you wouldn’t be building your own gluten free bread flour using the additional ingredients.
Would you have any tips for freezing the raw dough? I’d love to make this in advance and have it on hand
Hi, Emily, I’m afraid I don’t recommend freezing the raw dough at all. Unless it’s formulated specifically for that purpose, like commercial crescent roll dough is, it’s really risky to freeze raw yeast dough, especially once it’s been shaped. I think parbaking would suit your needs better. Please see the text of the post under the recipe card under the heading “Storage instructions” for details.
Oh my gosh, this recipe is so good! Hands on time is minimal and the dough is a dream to work with. I didn’t make the rolls yet, but I used the dough to make chicken and mushroom hand pies. Delicious! Off to make the rolls….
Oh that’s awesome that you used the dough for other purposes like those delicious sounding hand pies, Gail! Thank you so much for sharing that. It really is such a versatile dough!
What is Risen Starter?
The starter from the first part of the recipe, Valerie, after it’s already risen.
If I have starter going all the time, how much of my regular gf starter do I add to the recipe?
This is not a sourdough starter, Heidi, it’s only the commercial yeast starter from this particular recipe. To make this recipe successfully, you must make it exactly as written. You can’t substitute a sourdough starter for the first part of this recipe.
Hi! I don’t have a stand mixer. Can I knead this dough by hand? Thanks!
You definitely cannot knead it by hand. This dough requires dough hooks, for sure. If you don’t have a stand mixer, you can use a handheld mixer with dough hook attachments.
do you let the dough rise and double before you put in the fridge or do you let it rise in the fridge?
The first rise is in the refrigerator, Kathleen. I try to be very, very precise in the instructions, and would never not mention it if I expected you to let it rise first. I promise!
I made these last night and they are the first GF bread that I have made that turned out and I am SO excited! I did need a quick clarification in the instructions though…do you let the dough rise and double before you put in the fridge or do you let it rise in the fridge. I put it in the fridge to chill after mixing, but was wondering if I missed a step. Also, I used Cup4Cup flour and they turned out great! This was my trial run before Thanksgiving!
Thanks so much. It’s time to use all the ingredients I’ve acquired during COVID.
Can you recommend any other whey isolate aside from opportuniteas as its $95 per pound on Amazon Canada. Will any unflavored GF whey isolate work for bread flour? Thanks.
Whoa, Barb, that’s crazy! As long as the product is unflavored whey protein isolate, not concentrate, so around about 90% or more of each gram is milk protein, it will work fine.