
This post may contain affiliate links. Please read our disclosure policy.
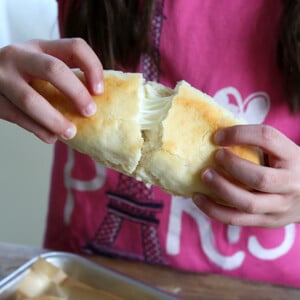
If you're looking for easy finger food for dinner, or just an on-the-go snack, these gluten free stuffed soft breadsticks are just the thing. Stuff them with whatever you like!

Table of Contents
Today, I bring you … stuffed gluten free soft breadsticks. Stuffed with what, you ask? Well, with whatever you like!

So far, I've stuffed these gluten free soft breadsticks with hot dogs, and with cheese. One big win followed by another.
Followed by some very happy children, most of which have already decided that THIS is what they would like to eat for their respective birthdays.

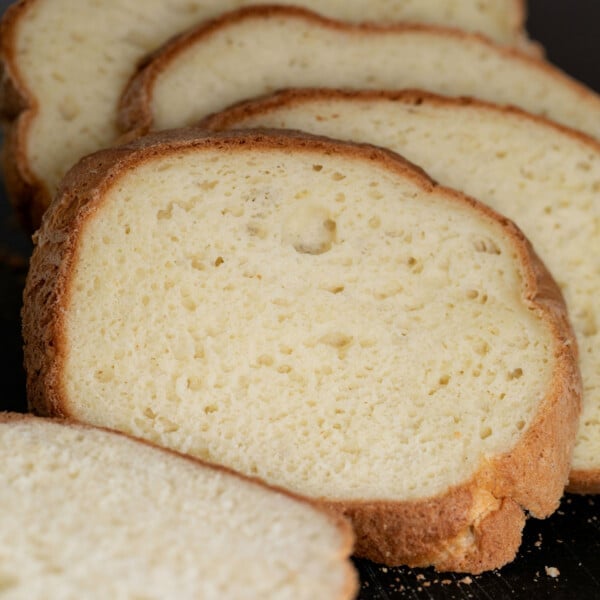
This super versatile dough is based upon the Soft Olive Garden-Style Gluten Free Garlic Butter Breadsticks from page 177 of Bakes Bread. It has no starter, and has only one rise so if you have about an hour and change for the dough to rise while you take care of other things around the house, you can have it tonight.
There has been quite a bit of grumbling about how most of the doughs in the book require at least an overnight refrigerator rise before you can work with them. I figure a lot of that comes from unfamiliarity with the slow rise that most yeast bread dough benefits from to develop real, artisan bread yeasty flavor.
No mind, though. Once you get into the swing of it, you can fill buckets with dough on Sunday, and eat fresh gluten free bread all week long. You'll get the hang of it. But for now, these gluten free soft breadsticks are a nice way to begin.

They rise beautifully, but rising times for all yeast bread will vary depending upon the environment in your kitchen/home. Overproofing does not refer to the amount of time it takes to rise, but to how much the dough has risen.
You can't overproof if the dough is rising more slowly than you expect and you're just being patient in allowing it to double. Patience is a virtue in yeast baking as in life, after all.

This dough is quite easy to work with, but like all the doughs in the book they are easiest to shape when they're cold. If you'd like to make things even easier on yourself, make the dough tonight and use it tomorrow.
Or make it tonight, give it a spin in a sealed container in the refrigerator for 30 minutes and then shape it. You absolutely don't have to do that, though.

Either way, you'll be rewarded with soft, doughy stuffed soft gluten free breadsticks just waiting for you to dig in. Finger food for dinner!
Gluten Free Stuffed Soft Breadsticks
Equipment
- Stand mixer fitted with dough hook
Ingredients
- 4 ¼ cups (595 g) gluten free bread flour, plus more for sprinkling (you must use this blend; please click thru for full details)
- 2 teaspoons (6 g) instant yeast
- 2 tablespoons (24 g) granulated sugar
- 2 teaspoons (12 g) kosher salt
- 6 tablespoons (84 g) unsalted butter, at room temperature
- 1 ⅜ cups (11 fluid ounces) warm water, (about 95°F)
- 10 hot dogs or cheese sticks, for stuffing
Instructions
Make the bread dough.
- Place the bread flour, yeast, and sugar in the bowl of your stand mixer, and use a handheld whisk to combine well. Add the salt, and whisk to combine. Add the butter and water, and mix on low speed with the dough hook until combined.
- Raise the mixer speed to medium and knead for about 5 minutes. The dough will be quite sticky, but should be smooth and stretchy. Spray a silicone spatula lightly with cooking oil spray, and scrape down the sides of the bowl.
Shape the dough.
- Line a rimmed baking sheet with unbleached parchment paper and set it aside. Turn the dough onto a lightly floured surface. Knead until smooth by scraping and folding it over on itself with a bench scraper or cake turner, sprayed lightly with cooking oil spray.
- Divide the dough into 10 pieces of equal size (each about 4 ounces). With each piece (covering the other pieces with a moist tea towel when you’re not working with them), pat into a rectangle about 1/2 inch thick, and about 6 inches long.
- Place a cheese stick (or hot dog) lengthwise on the dough, and press gently into the dough. Roll the dough tightly over the cheese stick and press the seam to seal, making sure to cinch the ends. Roll the dough back and forth on the lightly floured surface to seal the edges well, and to elongate it slightly until the dough is about 7 inches long. Place the, shaped and stuffed breadsticks on the prepared baking sheet, about 2 inches apart from one another.
Let the breadsticks rise.
- Once all of the breadsticks are shaped, cover the baking sheet with oiled plastic wrap and set in a warm, draft-free location to rise until the breadsticks are nearly doubled in size (about 1 1/2 hours, depending upon the environment).
- About 25 minutes before the dough has finished rising, remove the plastic and preheat your oven to 375°F.
Bake.
- Once the breadsticks have finished rising, remove the plastic, place the baking sheet in the center of the preheated oven and bake for 10 minutes, or until the rolls are very lightly golden brown all over.
- You can brush the rolls with melted butter and sprinkle lightly with kosher salt in the last few minutes of baking, if you like. Serve immediately.
- Any leftover breadsticks should be wrapped well and frozen as soon as they are cool. Defrost in the toaster oven before serving.
Nutrition information is automatically calculated, so should only be used as an approximation.


Hi Nicole,
We are going to be enjoying these tonight! I made the dough and popped it in the fridge to cool- I’m amazed at the rise already (2 hrs) I guess practice makes perfect in gluten free bread making- that and having your cookbook and guidance! Going on Amazon to order your other cookbooks, I have a feeling I’m missing out on some great food. My husband is going to flip for these “breadsticks” :)
Exciting, isn’t it, Kelly?! I really love this dough. So simple, and really very versatile and fast! And yes, yeast bread baking does take practice–gluten free or not. :)
When you announced the bread book about a year ago I ordered a New England hot dog pan figuring you would certainly use it. Guess I was wrong. What recipe dough would you recommend for that pan?
Am making the cheese and hot dog sticks for the weekend when the grandkids come out. They’ll love them.
Carole, I have that pan from back when USA Pans was a sponsor of my site, and I don’t really find that it makes much of a hot dog bun shape so I don’t use it (in fact, I gave it to Goodwill). You could try the recipe for Soft Hot Dog Buns in Bakes Bread, though.
Bummer last year I gradually started buying all there bread pans so I would be ready to go when the cookbook arrived.
I wish it did not take 3 plus hours for a rise in my house because I would make these tonight with some grilled eggplant slices, roma tomatoes, and mozzarella cheese!
Do you ever try putting on the oven and setting the dough to rise on the stovetop, Mare? If I don’t feel like using my proofer or can’t fit everything in it, that’s what I do. I’ve even heard of people turning on a clothes dryer for a few minutes, then turning it off and setting the covered dough + a bowl of warm water in there and closing the door to get the bread to rise. Sounds like it might be worth a shot!
Yes, I always have oven on and the dough on the stove top to rise. Yesterday I used the drawer below the oven because I had 3 pans rising at same time (pretzel dogs, pretzel rolls, and pretzel bites) and the drawer sped up the rise a bit.
You don’t happen to have an electric oven, do you? Because I do, and when the oven is turned on, the stovetop is still cool. Very, very different than a gas oven. Also, if your hood vents to the outside and it is cold out, you can also be getting a big draft right on your stovetop. So, I’ve discovered the hard way that on my stovetop is about the COLDEST spot in my kitchen!! What I usually end up doing is turning on my oven very briefly (while sticking my hand in), and then turning it off when it gets a tiny bit warm. Then I proof in there.
Yes Donia, it is electric with the fan right above. Never thought about the fan above before. What temp do you put oven on and for how long before shutting off to proof?
I just turn it to 200 and stay right there while it starts warming up. When I stick my hand in and it feels warm, I turn it off. It’s only a few minutes. But it will stay warmer than room temperature for a quite a while then (proof with the door closed).
When you first have the oven on, if you let it warm up too much, just turn it off and leave it open for a while to let some of the heat out before you start proofing. Good luck! Err on the side of too cool, so you don’t start baking the items you’re trying to proof. I’ve had good luck with this method.
Where do you buy unflavored whey protein isolate and Expandex modified tapioca starch?
You can get Expandex at http://www.mtgfnakedoat.com and you can find unflavored whey protein isolate at most health food stores. Now brand works really well.
Thank you!
Hi Nicole! You mind reader you!!
THANK YOU SO MUCH for reminding us – again – that rising is about the dough getting to the desired size and that sometimes patience is needed!
I’m letting dough rise RIGHT NOW for my lean white crusty bread (first time making it), and it’s much colder in the house today than it has been – sudden temperature dip outside. So my dough is going on 2.5 hours and STILL not doubled in size. I’ve been lamenting it since this morning, wondering how long to let it go for, and what would Nicole say…and here arrives your post. I know you’ve written this tip before, and that I’ve read it before, but some things just are good to read again and again :). I feel reassured and will continue to give it more time! Thanks!!!
So I am new to all this GF baking. I am wondering what Expandex modified tapioca starch is. I live in a smaller town in Canada and my 2 health food stores have no idea what Expandex is.
Please see this link on the blog for Expandex resources, Shannon (https://glutenfreeonashoestring.com/gluten-free-resources/) and the Bread FAQs link in the post for more information on the recipes in my new gluten free bread book.
We love you, we love you, we love you, we love you!!!!! My kids have been begging for this – completely begging. They will be thrilled when I make these!!!
One tip, for the bread sticks, for me anyways, was to make sure they do not touch. For some reason, I liked it better when they were cooked completely on their own and they were not a pull apart type of bread stick.
They get browned all around that way, Jennifer. I like them like that, too. And so glad I could make you and your family so happy. :)
I can hear Jennifer S. cheering these breadsticks from here!
YOU BETCHA!!!! :)
Me too! For you, Jennifer, with love!
So Ultrex 3 could save you some over Expandex, On your blog you have the difference in grams and not percentages. I usually make up a big batch premade and the percentages help me to do that. I even put it in my book :) Do you have the percentages vs grams? Thanks
Anna, I responded to you on Facebook: “It should be an easy conversion. Just divide the number of grams of each ingredient by the total number of grams in the whole. Multiply by 10 and that is the percentage.”
Oh my word, I just realized that I was using Ultratex 8 instead of 3 and not even with the new modifications you’ve made to the percentages! It’s like a light bulb went off in my head – duh! After a couple of failures, I honestly couldn’t figure out what the problem was. I can’t wait to try this recipe with the new %s! I honestly appreciate your dedication to GF baking/cooking and oh yes, I made the cinnamon roll cupcakes for a party and they were amazing. Thank you!
Oh, boy, Brandy, Ultratex 8 is GLUE! Glad you figured it out. :)
Me too! And I made a call over to Montana and the incredibly helpful Larry :) Problem solved!