
This post may contain affiliate links. Please read our disclosure policy.
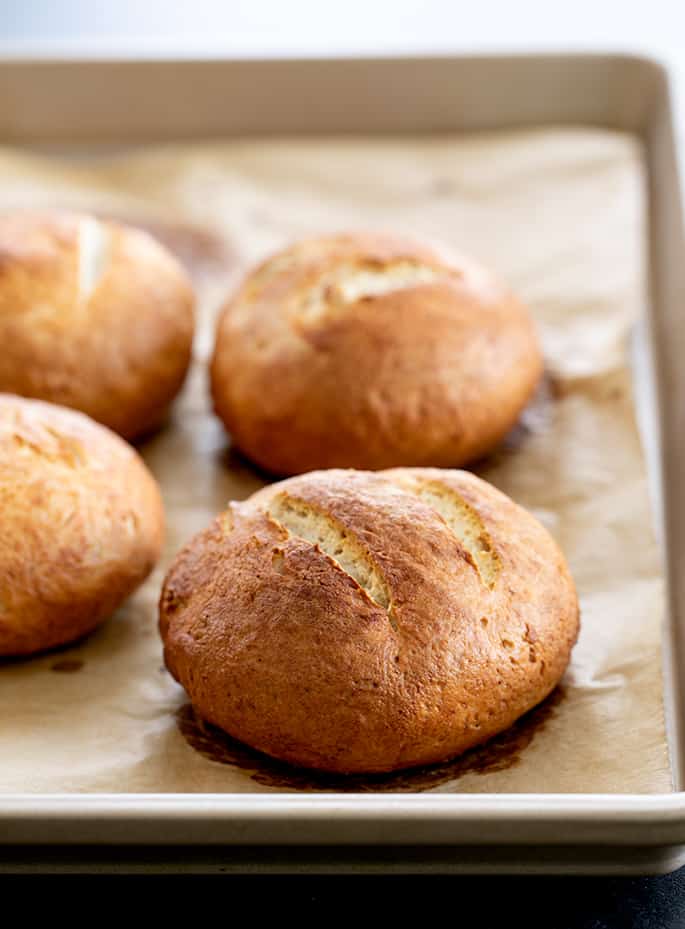
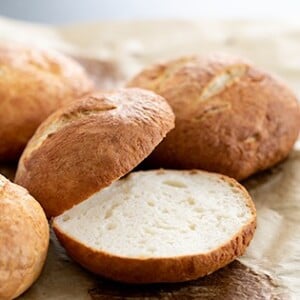
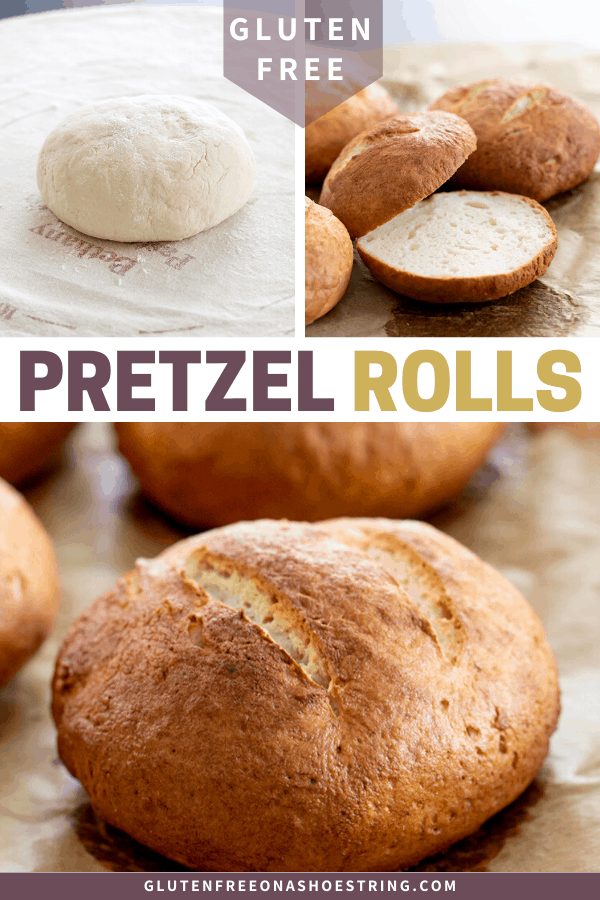
Gluten free pretzel rolls, with their crisp and chewy crust and super fluffy crumb, will quickly become your favorite sandwich roll.
How are these gluten free pretzel rolls are different?
Why would anyone call these “bretzels”? Pretzel is a perfectly fine name. These rolls are so nice and crunchy-chewy on the outside, tender and almost tangy-sweet on the inside.
This yeast bread dough is in the batter dough style of gluten free bread, so it's a wet dough. But there's something about the combination of enrichments like butter and buttermilk powder, plus egg whites, that makes it nearly as easy to shape as gluten free dough made with our gluten free bread flour.
How to make and shape the dough
The method is simple. Make the dough in a stand mixer fitted with the paddle attachment. If you don't have a stand mixer but you do have a food processor, I think the dough would work pulsed in a food processor as well.
Then chill the raw dough in the refrigerator for at least 30 minutes, and up to 3 days. Be sure it's in a well-sealed container, though, or it will dry out.
Tips for getting your yeast roll and bread dough to rise
On the day you're planning to bake the rolls, be sure you have enough time to allow them to rise, and then bake. You'll divide the dough into 8 portions, roll each into a ball, then flatten a bit into a disk, which will create a shape that's perfect for sandwiches.
If you struggle to get your yeasted bread dough to rise, here are a few tips. Be sure you're using a proper gluten free flour blend, first and foremost, and measuring by weight, not volume (even water!).
Moisture is key
Your dough must have the right amount of moisture—and better to have it too wet than too dry. If it's too dry, the yeast will not be able to activate and create a rise.
Don't add any more flour than necessary to the dough during shaping, which will dry out your dough. Too much flour is essentially serving to reduce the relative amount of water in the recipe, which is called its hydration ratio. Too low, and your dough won't rise.
Chilling the dough prior to working with it will make it easier to handle. That should make it easier to avoid adding too much flour during shaping.
So is patience and a keen eye
If you're impatient for your yeast bread dough to rise, you might run into trouble. Yeast is alive. We can't control it. All we can do is create an environment that encourages it to grow. Kind of like raising a child?
Rising will take longer in a dry, cool environment, and less time in a warm, humid environment. Do not place it in a heated oven, to any temperature, to rise or you risk killing the yeast.
“Overproofing” is possible, though, so you must keep an eye on your dough. But it's a matter of rising too much, not rising for too long.
If the rise begins to break through the surface, and creates a cratered or pock-marked appearance on the outside, it's gone too far and will be fragile. That will make it difficult to boil.
Why boil pretzels and pretzel rolls?
After they finish rising, you'll boil the rolls in a baking soda bath, which is just water with some baking soda. The “right” way to boil bagels is in lye, but that's just a bridge too far. It's dangerous and scary and totally not necessary for our purposes!
Boiling them in a baking soda bath will help the rolls brown in the oven, create that crisp-tender crust, and reduce the “oven spring,” or amount the rolls rise in the oven. That keeps the inside from becoming too airy.
If you've overproofed your raw dough, the rolls will be quite difficult to boil. You might consider only boiling the ones that don't seem too fragile, brush the rest with melted butter or an egg wash, and hope for the best!

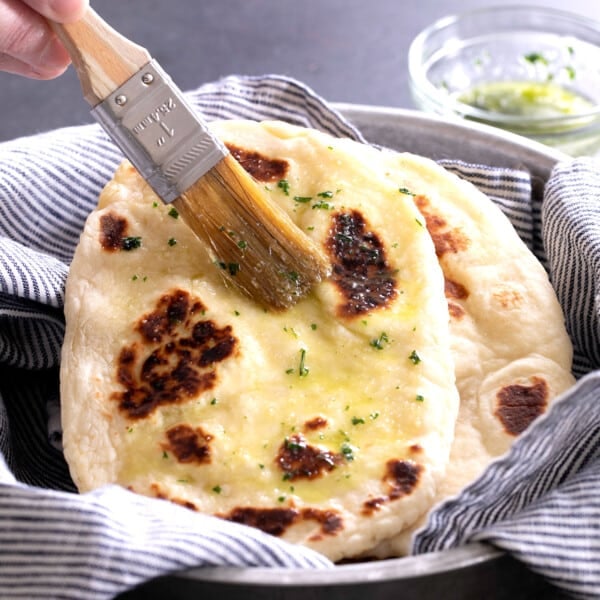
Should you salt the tops of your rolls?
I don't usually salt the tops of the rolls until soon before serving. Adding salt to the outside of the rolls draws moisture out of the rolls, which causes them to go stale more quickly.
Instead of salting the rolls when they're still raw, I prefer to brush them with a tiny bit of water and salt them soon before serving. But if you plan to eat the rolls within a short time of their coming out of the oven, salt them when they're still raw.

Ingredients and substitutions
Dairy
There is only a bit of dairy in this recipe, and it should be relatively easy to replace. For the butter, my favorite vegan butters (Melt or Miyoko's Kitchen brand) would likely work just fine. Even Earth Balance buttery sticks should work, but cut back on the salt by half since they're quite salty.
Buttermilk powder really helps add richness to the rolls, similar to the butter. In its place, you can try using coconut milk powder.
Eggs
The two egg whites called for this in this recipe help provide structure to the rolls. If you can't have eggs, you can try replacing the egg whites with an equal amount, by weight, of aquafaba, which is the brine from a can of chickpeas.
I haven't tried this swap, though, so I honestly don't know how well it would work, if at all. If you do try it, I recommend beating the aquafaba until foamy with a whisk before adding it.
Instant yeast
Instant yeast is also called bread maker or rapid-rise yeast. If you only have active dry yeast, you can use it but you'll need to use more of it since active dry yeast has a thicker inactive coating than instant yeast.
To replace instant yeast with active dry yeast, multiply the amount of instant yeast called for in the recipe (here, 9 grams) by 125%, and proof the yeast in about 1/4 cup of the water called for in the recipe before adding it to the dough. Here, that would mean using a bit more than 11 grams of active dry yeast.
There is no substitute for yeast in this recipe. If you can't use yeast for any reason, you'll need a yeast-free recipe, like our yeast free gluten free rolls.
Cream of tartar and apple cider vinegar
I always get a lot of questions about cream of tartar and apple cider vinegar, since they seem like unusual ingredients to some. They both help activate the baking soda in the rolls, and are useful especially in gluten free bread baking.
Cream of tartar is available in the spice aisle of most grocery stores, and is worth purchasing when you see it. If you don't have it, you can try using 1 teaspoonful of freshly squeezed lemon juice.
In fact, you can try using more lemon juice in place of the apple cider vinegar as well. Otherwise, another white vinegar is fine.
Gluten Free Pretzel Rolls
Ingredients
- 3 ¼ cups (455 g) all purpose gluten free flour blend, plus more for sprinkling (click thru for full info on appropriate blends)
- 1 ½ teaspoons xanthan gum, (omit if your blend already contains it)
- ½ cup (43 g) Scant 1/2 cup (43 g) cultured buttermilk blend powder, You can replace this with 1/3 cup (40 g) dry milk powder
- 1 tablespoon (9 g) instant yeast
- ¼ teaspoon cream of tartar
- ¼ teaspoon baking soda
- 1 tablespoon (13 g) packed light brown sugar
- 1 teaspoon kosher salt
- 1 teaspoon apple cider vinegar
- 2 tablespoons (28 g) unsalted butter, at room temperature
- 2 (50 g) egg whites, at room temperature
- 1 ½ cups (12 fluid ounces) warm water, (about 95°F)
- Baking soda bath for boiling, (6 cups water + 1 tablespoon baking soda + 1 teaspoon salt)
- Coarse salt for sprinkling, (optional)
Instructions
Make the dough.
- Place the flour, xanthan gum, buttermilk powder, yeast, cream of tartar, baking soda and sugar in the bowl of your stand mixer fitted with the paddle attachment.
- Whisk to combine well with a handheld whisk. Add the salt, and whisk again to combine well.
- Add the cider vinegar, butter, and egg whites, and beat to combine well.
- With the mixer on low speed, add the water in a slow but steady stream.
- Once you have added all the water, turn the mixer up to high and beat for about 3 minutes or until the dough takes on a whipped appearance.
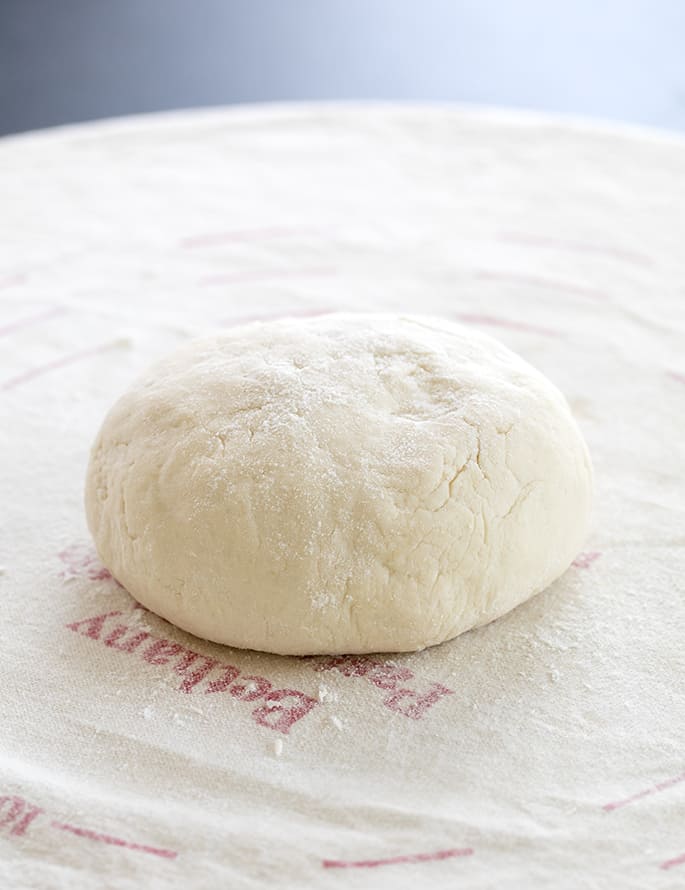
Chill the dough.
- Transfer the dough to a lightly greased bucket with a tight-fitting lid, cover, and place in the refrigerator for at least 30 minutes and up to 3 days.
Shape the dough.
- Turn the chilled dough out onto a piece of lightly floured flat surface. Dust the top with flour, and divide into 8 equal portions.
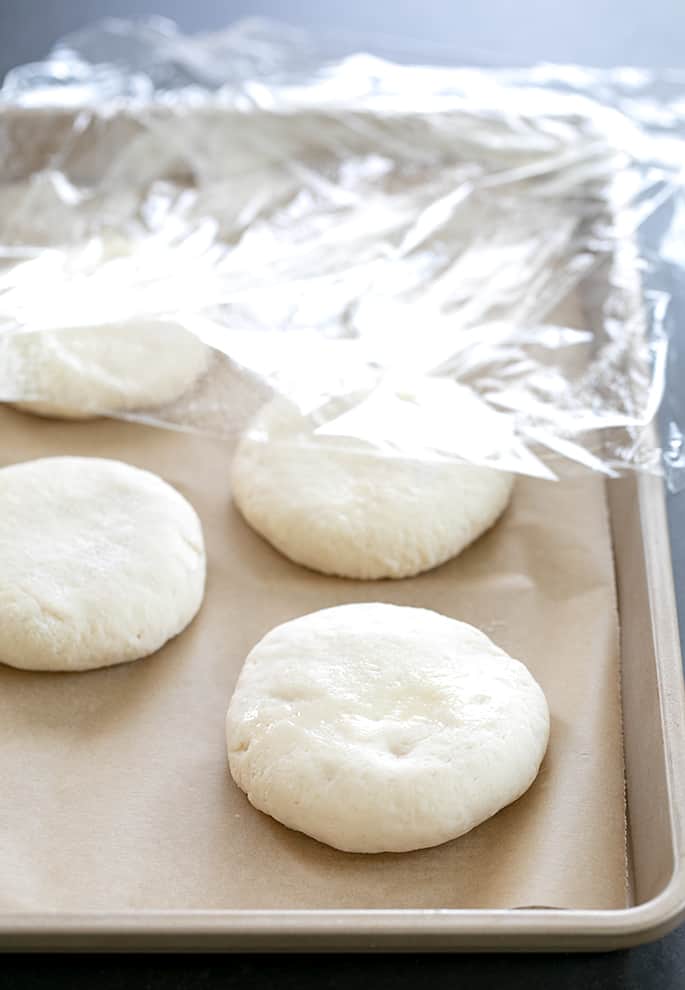
- Work with one piece of dough at a time, dusting lightly with more flour as necessary to prevent sticking. Form each into a round.
- Using the palm of your hand, press the ball down into a flat disk about 1/2-inch thick.
- Place a couple inches apart on a parchment lined baking sheet.
Let the rolls rise.
- Cover with lightly greased plastic wrap and place in a warm, draft-free environment and allow to rise until risen to about 150% of its original size.
- Rising will take longer in a dry, cool environment, and less time in a warm, humid environment. Do not place it in a heated oven, to any temperature, to rise or you risk killing the yeast.
Boil the rolls.
- While the dough is nearing the end of its rise, preheat your oven to 375°F and place the baking soda bath in a large heavy-bottom pot on the stovetop to boil over high heat.
- Once the dough is done rising, place the rolls one or two at a time into the boiling baking soda bath for less than one minute per side. Do not crowd them; they should move freely in the boiling water.
- Remove the rolls with a strainer and return them to the same baking sheet.
Prepare to bake and bake the rolls.
- Using a small sharp knife or lame, slice 2 parallel lines in the top of each roll at a 45° angle, about 1/4-inch deep.
- If you plan to serve the rolls soon after baking, sprinkle the tops with coarse salt to taste. If you don’t plan to serve the rolls soon after baking, don’t add the salt as it will draw moisture out of the rolls as they cool.
- Place the rolls in the center of the preheated oven and bake until golden brown all over, about 30 minutes. Allow to cool on the pan before slicing and serving.
- If you haven’t salted the rolls before baking, brush the tops lightly with water and sprinkle with coarse salt before serving.
Store any leftover rolls.
- Slice and place any leftover, cooled rolls in a tightly sealed bag, eliminating as much air as possible.
- Place in the freezer. Defrost in the microwave briefly, or at room temperature. To crisp the rolls, wet the outside with about 1 tablespoon of water for each roll and refresh in a 300°F toaster oven before serving.
Video
Notes
Nutrition information is automatically calculated, so should only be used as an approximation.


Hi, Nicole. I have been making some of your breads from this site and liked them so much that I bought your book on breads, etc. Before I attempt the pretzel roll recipe in the book, which one (book or website) is the most recent. I had a disaster with the plain bagels out of the book, and I noticed that the ingredients are slightly different in the online version and that published in the book for the pretzel rolls. Just checking.
All of the recipes that I have published in cookbooks and online work when made as written, Elizabeth. You’re welcome to focus on any of them where the interface and ingredients feel most comfortable to you. The bread book uses my gluten free bread flour blend, and it won’t work if you don’t use that specific blend of flours, including using Better Batter as a base. This recipe here on the blog doesn’t rely on the bread flour blend, so if you’re using one of my all purpose gluten free flour blends, and not interested in the bread flour blend and its highly specific extra ingredients, then I’d use this recipe, no question. I learned over the years that blog readers aren’t generally very interested in making the bread flour blend, and a book appeals to a much more specific, targeted audience.
Thank you for the recipe, what can I use instead of yeast?
You can’t replace yeast in a yeast bread recipe, Nurit. Please search “yeast free” on the blog and find the recipes I’ve specifically developed to be yeast free.
Hi, Thank you for all your amazing recipes! I was about to try these but do not have any buttermilk powder. Would regular buttermilk work or are there any other substitutes you would recommend?
You can always have a look at the ingredients and substitutions section of (almost) every post on the blog, Lauren! I recommend trying to buy some buttermilk powder, actually, since it’s very useful as an ingredient—but no, you cannot replace it with liquid buttermilk. You can try using dry milk powder in its place.
When I boiled the rolls, the water became VERY frothy! Is this normal? I did 6 cups of water, 1 tablespoon baking soda, and 1 teaspoon of salt. I used the exact same ingredients (even better batter) and measured everything by weight just as suggested. Do I need a bigger pot with shallower bath? Thanks!
The baking soda bath does tend to froth, and will do that even more if you put too many rolls in the bath to boil at once or if your pot is on the smaller side. You can try using a bigger pot, and boiling fewer rolls at a time. But as long as the rolls boiled properly, then it’s not very important.
Is it ok to use whey protein instead of whey protein isolate? If not, what will happen if I don’t use whey protein isolate?
Hi, Kara, there is no whey protein isolate called for in this recipe. If you’re referring to my gluten free bread flour blend, you must use whey protein isolate, which is nearly pure protein. Whey protein has too many fillers, and simply won’t work. I go into more detail in my book.
Cyndie,
If you read Nicoles’s other posts here on the blog about gf flour you will see that Cup 4 Cup flour is very starchy and should not be used as an all purpose flour. If you need to use it up it works great in her cream biscuit recipe.
These look amazing! I haven’t had pretzels since being diagnosed nearly ten years ago! Making pretzels or pretzel rolls is next on my list for sure. By the way, “bretzel” comes from German. Here in Switzerland I often walk past a shop called “Bretzelkönig”—“pretzel king”—in the train stations and it makes my mouth water every time. Kind of like Auntie Anne’s back home, though totally different styles!
That’s so interesting, Sophie! It sounded like a cutesy name like “brookies” or something to me. I’m actually kind of glad it’s one of those German words that we use in English because we don’t have anything better, like schadenfreude. :)