This post may contain affiliate links. Please read our disclosure policy.
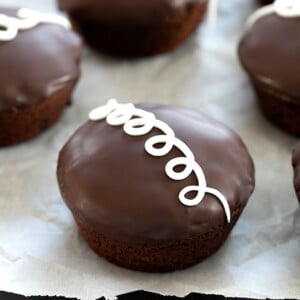
These Hostess-style gluten free chocolate cupcakes are rich chocolate cupcakes with cream filling and a simple chocolate topping. The swirl is optional!

Why I love these gluten free Hostess chocolate cupcakes
This recipe for Hostess-Style Gluten Free Chocolate Cupcakes is straight from page 131 of one of my traditionally-published cookbooks, Gluten Free Classic Snacks. As far as I'm concerned, it's the recipe that legitimizes the entire cookbook, since these are the most classic of “classic snacks.”
The chocolate cakes are dense chocolate cakes, not devil's food cake like the Drake's Style Gluten Free Ring Dings on page 155. All due respect to Ring Dings, of course, an all-time favorite snack cake of mine through all my growing up years, straight to the present day.
The combination of very rich chocolate cake with a smooth, creamy filling and an indulgent chocolate topping is just something that you have to experience. Maybe you remember the Hostess ones, and want to bring them back. Or maybe you have a gluten free child with whom you're longing to share that goodness.
The iconic swirl here is made with royal icing, which is clearly gilding the lily. By all means, leave it out entirely. It's just nice to be able to complete the experience, at least once!

Truly an easy recipe, just with a few components
Please don't be put off by the number of steps in the recipe! If you know me already, you know that I am just thorough, because I want you to be successful.
The recipe is not complicated. Plus, there are recipes for the filling, glaze and royal icing for the swirl incorporated directly into the recipe, for ease of reference. You can omit any of the steps you like.
I do have a quicker recipe for classic gluten free chocolate cupcakes, and that is the one to use if you want something lighter and more cake-like. Or if you just don't feel like melting chocolate for the batter, quite honestly.

How to fill the cupcakes easily
It may seem daunting to fill the cupcakes, especially when the filling isn't baked into the center. To combat feeling overwhelmed by a multiple-step recipe is the number 1 reason the how-to videos I do are useful. Once you watch me do it, you have the concept down so that reading the recipe just clarifies the process without being your first (overwhelming) introduction.
To create space for filling in the center of the cupcake, I used to make a hole through the top of the cupcake. I've found more recently that I prefer making the hole in the bottom of the cupcake, since the top remains clean and gorgeous that way.
To make the hole, I find that a simple metal apple corer is easiest. But a small round cookie cutter works really well, too. You're taking some cake out, replacing it with a stabilized whipped cream, then replacing just the very bottom of the disk from the cake you removed.

Ingredients and substitutions
Dairy: If you are dairy-free, to make the cupcakes, you'll need to replace both the butter and the sour cream. For the filling, try coconut cream in place of heavy whipping cream. And make sure that your chocolate is dairy-free.
In place of the butter, I'd try Melt or Miyoko's Kitchen brand vegan butter, or even Earth Balance buttery sticks (but decrease the salt) which is not usually my favorite but should work here. Virgin coconut oil might even work.
In place of sour cream, your favorite nondairy sour cream alternative should work, as long as the consistency is right. You can also try nondairy plain yogurt, strained of liquid to the proper consistency.
Eggs: There are two eggs in these cupcakes, which is my limit for recommending that you try an egg-replacement if you need that. Try replacing each with 1 “chia egg” (1 tablespoon ground white chia seeds + 1 tablespoon lukewarm water, mixed and allowed to gel).
To make the royal icing, you will need meringue powder, which is necessarily egg-white containing. Instead, you can make a much less stable white icing, without meringue powder.
Corn: If you can't have corn, keep in mind that most confectioners' sugar is made with cornstarch. Just source a corn-free brand, which can be found online.
Hostess-Style Gluten Free Chocolate Cupcakes
Ingredients
For the cupcakes
- 4 ½ ounces dark chocolate, chopped
- 6 tablespoons (84 g) unsalted butter, chopped
- 1 cup (200 g) granulated sugar
- ⅔ cup (160 g) sour cream, at room temperature
- 2 (100 g (weighed out of shell)) eggs, at room temperature, beaten
- 1 tablespoon pure vanilla extract
- 1 ½ cups (210 g) all purpose gluten free flour blend, (I used Better Batter; please click thru for full information on appropriate blends)
- ¾ teaspoon xanthan gum, (omit if your blend already contains it)
- ¼ cup (20 g) unsweetened cocoa powder
- ½ teaspoon baking powder
- ½ teaspoon baking soda
- ¼ teaspoon kosher salt
For the filling
- 1 tablespoon (7 g) unflavored powdered gelatin
- ¼ cup (2 fluid ounces) water
- 2 cups (16 fluid ounces) heavy whipping cream, chilled
- 2 tablespoons (14 g) confectioners’ sugar
For the glaze
- 10 ounces semisweet chocolate, chopped
- 4 tablespoons (56 g) virgin coconut oil
Royal icing, for the swirl
- 2 ¼ teaspoons meringue powder, (LorAnn brand is gluten free and available on amazon)
- 1 cup (115 g) confectioners’ sugar, plus more if necessary
- 1 tablespoon (0.5 fluid ounce) lukewarm water, plus more if necessary
Instructions
Prepare the cupcake batter.
- Preheat your oven to 350°F. Grease the wells of a standard 12-cup muffin tin well and set it aside.
- In a medium-size, heat-safe bowl, place the chocolate and butter and melt over a double boiler or in 30-second bursts at 60% power in the microwave.
- To the bowl of melted chocolate and butter, add the sugar, sour cream, eggs, and vanilla, beating to combine after each addition.
- In a separate large bowl, place the flour, cocoa powder, baking powder, baking soda and salt, and whisk to combine well.
- Create a well in the center of the dry ingredients, add the wet ingredients and mix to combine. The batter will be thick.
- Bake and cool the cupcakes.
- Fill the prepared muffin cups two-thirds full and shake the batter into an even layer in each well.
- Place the pan in the center of the preheated oven and bake for about 18 minutes, or until the cupcakes are just firm to the touch.
- Allow the cupcakes to cool in the muffin tin for 10 minutes before transferring to a wire rack to cool completely. Repeat with the remaining batter.
Make the filling.
- If you are using heat-soluble powdered gelatin, bloom it by placing it and the water in a small, heat-safe bowl, and stirring it gently to combine.
- Allow the mixture to sit at room temperature until the gelatin swells.
- Place the gelatin mixture in the microwave and melt at 60% power for 20 seconds until melted. Set the gelatin aside to cool briefly.
- For cold-water soluble gelatin, simply place the same amount of gelatin and the water together in a small bowl, and stir gently to combine.
- In the bowl of a stand mixer fitted with the whisk attachment, or a large bowl with a hand mixer, place the chilled cream and whisk on medium speed until soft peaks form.
- Add the confectioners’ sugar, and beat until stiff, glossy peaks form. Add the cooled gelatin, and beat until thickened, about 3 minutes. Makes about 4 cups of whipped cream.
Fill the cupcakes.
- Once the cupcakes have cooled, create a well in the center of the bottom of each with an apple corer or 3/4-inch round cookie cutter, cutting off the bottom with a knife (reserved the removed cake pieces).
- Transfer the filling to a pastry bag fitted with a 1/4-inch plain piping tip and pipe about 1 1/2 tablespoons of the prepared filling into the open well in each cake.
- Cover the filling in each cake with a previously removed cake piece and press down to secure.
- Place the cakes back on the wire rack over a piece of parchment or waxed paper.
Glaze the cupcakes.
- Place the chocolate and coconut oil in a medium-size heat-safe bowl and melt over a double boiler or in 30-second bursts at 60% power in the microwave.
- Dip the top of each cooled and filled cupcake carefully into the glaze, bob it up and down a few times to ensure that the entire top of each cake is covered in glaze, and invert back onto the wire rack.
- Allow the glaze to set at room temperature.
Make the royal icing.
- In the bowl of a stand mixer fitted with the paddle attachment, or a large bowl with a hand mixer, place all of the ingredients and mix on low speed until the sugar is absorbed.
- Raise the mixer speed to medium, and beat until the beater leaves a visible trail in the icing, about 10 minutes.
- To thicken, beat at a higher speed and for more time, and/or add more confectioners’ sugar. To thin, add more water by the quarter-teaspoonful and beat to combine.
- Add the swirl once the glaze is set.
- Place the royal icing in a pastry bag with a very small (#1 or #2) piping tip, and pipe a swirl across the top of the chocolate glaze.
- Allow to set once again at room temperature.
Storing instructions.
- These snack cakes are best enjoyed within 2 days of being glazed, but they will keep for up to a month wrapped individually in freezer-safe wrap and frozen. Defrost at room temperature. The chocolate glaze may bloom a bit over time, but it won’t affect the taste at all.
Video
Nutrition information is automatically calculated, so should only be used as an approximation.




Can plain greek yogurt be used instead of sour cream?
That should work just fine, Liz!
Can I use almond flour?
You can’t, no, Maryellen. Almond flour is not an all purpose gluten free flour, and can’t be used to substitute for one.
Nicole, these look amazing. I’ve been gluten free for just under 2 years and still miss Hostess CupCakes. These are now on my list to make. I already have your bread cookbook (and made many of them……THANK YOU!!) I will now have to buy this one (just when I had decided to lose some weight, facepalm).
can i leave the gelatin out of the filling?
I don’t think the filling would set up without the gelatin. It would probably be rather runny and end up making the snack cake soggy.
Oh my…I want to make these right now! I only have chocolate chips (no dark chocolate unless I go to the store) – do you think that would work?
I need pastry bag/tips – pronto – for this and for Devil Dogs!
I left my book at my parents house over Easter and wont be able to get it back until the middle of May :( These were one of the first things that I wanted to make, and now I don’t have to wait! :)
Oh Anna, I would ask them to mail it to you — that is just way too long to wait for it!
Wow, my favorite too growing up!
Now I don’t have to wait until May to bake these lovely treasures. I’m baking treats for the school band trip, have brownies in mind but I think these would be better! Thank you Nicole! HUGS :)