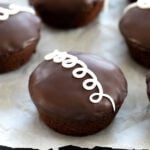
Hostess-Style Gluten Free Chocolate Cupcakes
These gluten free Hostess chocolate cupcakes are rich chocolate cupcakes with cream filling and a simple chocolate topping.
Servings: 18 cupcakes
Ingredients
For the cupcakes
- 4 ½ ounces dark chocolate chopped
- 6 tablespoons (84 g) unsalted butter chopped
- 1 cup (200 g) granulated sugar
- ⅔ cup (160 g) sour cream at room temperature
- 2 (100 g (weighed out of shell)) eggs at room temperature, beaten
- 1 tablespoon pure vanilla extract
- 1 ½ cups (210 g) all purpose gluten free flour blend (I used Better Batter; please click thru for full information on appropriate blends)
- ¾ teaspoon xanthan gum (omit if your blend already contains it)
- ¼ cup (20 g) unsweetened cocoa powder
- ½ teaspoon baking powder
- ½ teaspoon baking soda
- ¼ teaspoon kosher salt
For the filling
- 1 tablespoon (7 g) unflavored powdered gelatin
- ¼ cup (2 fluid ounces) water
- 2 cups (16 fluid ounces) heavy whipping cream chilled
- 2 tablespoons (14 g) confectioners’ sugar
For the glaze
- 10 ounces semisweet chocolate chopped
- 4 tablespoons (56 g) virgin coconut oil
Royal icing, for the swirl
- 2 ¼ teaspoons meringue powder (LorAnn brand is gluten free and available on amazon)
- 1 cup (115 g) confectioners’ sugar plus more if necessary
- 1 tablespoon (0.5 fluid ounce) lukewarm water plus more if necessary
Instructions
Prepare the cupcake batter.
- Preheat your oven to 350°F. Grease the wells of a standard 12-cup muffin tin well and set it aside.
- In a medium-size, heat-safe bowl, place the chocolate and butter and melt over a double boiler or in 30-second bursts at 60% power in the microwave.
- To the bowl of melted chocolate and butter, add the sugar, sour cream, eggs, and vanilla, beating to combine after each addition.
- In a separate large bowl, place the flour, cocoa powder, baking powder, baking soda and salt, and whisk to combine well.
- Create a well in the center of the dry ingredients, add the wet ingredients and mix to combine. The batter will be thick.
- Bake and cool the cupcakes.
- Fill the prepared muffin cups two-thirds full and shake the batter into an even layer in each well.
- Place the pan in the center of the preheated oven and bake for about 18 minutes, or until the cupcakes are just firm to the touch.
- Allow the cupcakes to cool in the muffin tin for 10 minutes before transferring to a wire rack to cool completely. Repeat with the remaining batter.
Make the filling.
- If you are using heat-soluble powdered gelatin, bloom it by placing it and the water in a small, heat-safe bowl, and stirring it gently to combine.
- Allow the mixture to sit at room temperature until the gelatin swells.
- Place the gelatin mixture in the microwave and melt at 60% power for 20 seconds until melted. Set the gelatin aside to cool briefly.
- For cold-water soluble gelatin, simply place the same amount of gelatin and the water together in a small bowl, and stir gently to combine.
- In the bowl of a stand mixer fitted with the whisk attachment, or a large bowl with a hand mixer, place the chilled cream and whisk on medium speed until soft peaks form.
- Add the confectioners’ sugar, and beat until stiff, glossy peaks form. Add the cooled gelatin, and beat until thickened, about 3 minutes. Makes about 4 cups of whipped cream.
Fill the cupcakes.
- Once the cupcakes have cooled, create a well in the center of the bottom of each with an apple corer or 3/4-inch round cookie cutter, cutting off the bottom with a knife (reserved the removed cake pieces).
- Transfer the filling to a pastry bag fitted with a 1/4-inch plain piping tip and pipe about 1 1/2 tablespoons of the prepared filling into the open well in each cake.
- Cover the filling in each cake with a previously removed cake piece and press down to secure.
- Place the cakes back on the wire rack over a piece of parchment or waxed paper.
Glaze the cupcakes.
- Place the chocolate and coconut oil in a medium-size heat-safe bowl and melt over a double boiler or in 30-second bursts at 60% power in the microwave.
- Dip the top of each cooled and filled cupcake carefully into the glaze, bob it up and down a few times to ensure that the entire top of each cake is covered in glaze, and invert back onto the wire rack.
- Allow the glaze to set at room temperature.
Make the royal icing.
- In the bowl of a stand mixer fitted with the paddle attachment, or a large bowl with a hand mixer, place all of the ingredients and mix on low speed until the sugar is absorbed.
- Raise the mixer speed to medium, and beat until the beater leaves a visible trail in the icing, about 10 minutes.
- To thicken, beat at a higher speed and for more time, and/or add more confectioners’ sugar. To thin, add more water by the quarter-teaspoonful and beat to combine.
- Add the swirl once the glaze is set.
- Place the royal icing in a pastry bag with a very small (#1 or #2) piping tip, and pipe a swirl across the top of the chocolate glaze.
- Allow to set once again at room temperature.
Storing instructions.
- These snack cakes are best enjoyed within 2 days of being glazed, but they will keep for up to a month wrapped individually in freezer-safe wrap and frozen. Defrost at room temperature. The chocolate glaze may bloom a bit over time, but it won’t affect the taste at all.
Video
