
This post may contain affiliate links. Please read our disclosure policy.
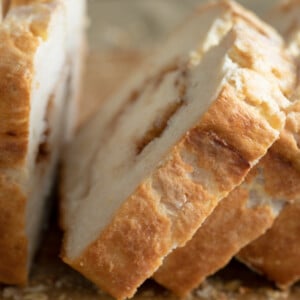
Nothing compares to the flavor and aroma of freshly baked gluten free cinnamon swirl bread coming out of your oven. It even keeps and reheats well!

If you like cinnamon rolls, you're going to love the taste and smell of fresh gluten free cinnamon swirl bread baking in your house. Unlike most gluten free yeast bread recipes, this dough rises twice, giving it more flavor and better texture. Add the cinnamon sugar filling, and you're halfway to heaven.
This bread dough has plenty of enrichments to make it soft and tender, but it's most certainly yeast bread—not cake. In fact, almost all of the sugar is in the filling, not in the bread itself.
How does this compare to quickbread?
We already have a recipe for gluten free cinnamon swirl quick bread, and it's amazing for a special breakfast or brunch with a big cup of coffee. ☕️ Most quickbreads are, basically, cake and that recipe is no exception.
It tastes like a dressed up coffee cake, complete with a simple sugary drizzle. The only real difference is that you bake it in a loaf pan and slice it by the cross-section. It's made without any yeast, and has a really nice open crumb.
This recipe for cinnamon swirl bread is a yeast bread, more like our gluten free bread recipe than any quickbread could ever be. The cinnamon swirl running through the center of the bread makes it less appropriate for sandwich-making, but it's not out of the question.
In fact, years ago, there were a few times that I packed my children's lunches on cinnamon swirl bread. They still speak longingly about how they would take out the sandwich filling and eat it separately, then eat around the cinnamon-sugar filling, saving it for last.

How to make this cinnamon swirl yeast bread
Using a stand mixer
The only way that I know how to make this yeast bread dough is by using the paddle attachment of a stand mixer. All of my instructions will assume that you're using a stand mixer, which I find essential.
You may be able to use a food processor to make the dough, especially if you have a plastic attachment, rather than the metal blade. If you try that method, please let us know how it goes!
All you do, essentially, is dump the ingredients, in the order listed in the recipe, into the bowl, and let the mixer process it fully. It couldn't be easier!
What is the bread dough like?
Like our white sandwich bread recipe and all of our original-style gluten free yeast bread recipes, this is a batter-style bread recipe. That means that the dough is very soft and wet, and has the consistency more of cookie dough than what you might expect from conventional yeast bread dough.
However, unlike most batter-style gluten free yeast bread recipes, this bread dough is allowed to rise twice. The first rise is in a tightly-sealed container, in the refrigerator. Yeast will grow in a refrigerator, just more slowly.
Placing the dough in the refrigerator for its first rise allows the dough to develop some light yeast flavor and gives the dough some more time to absorb moisture. That way, the dough is fully hydrated but easier to shape.
You'll notice that this recipe calls for one of my recommended all purpose gluten free flour blends, but not our gluten free bread flour, made with whey protein isolate and Expandex modified tapioca starch.
Recipes made with the bread flour blend from GFOAS Bakes Bread behave much more like conventional yeast bread, but those ingredients can be harder to source. This a bread recipe for all—but it won't be exactly like it would if it were made with our bread flour blend.
Shaping the dough
To shape the dough, all that is necessary is to knead the risen dough lightly on a very lightly floured surface, sprinkling it lightly with more flour in any spots that are very wet. Then, roll it into a rectangle and cover the rectangle with a thin layer of softened butter.
Then, sprinkle the cinnamon sugar filling on top and press it down to help it adhere to the dough. Roll the dough tightly, tucking the ends under and squeezing lightly as you go.
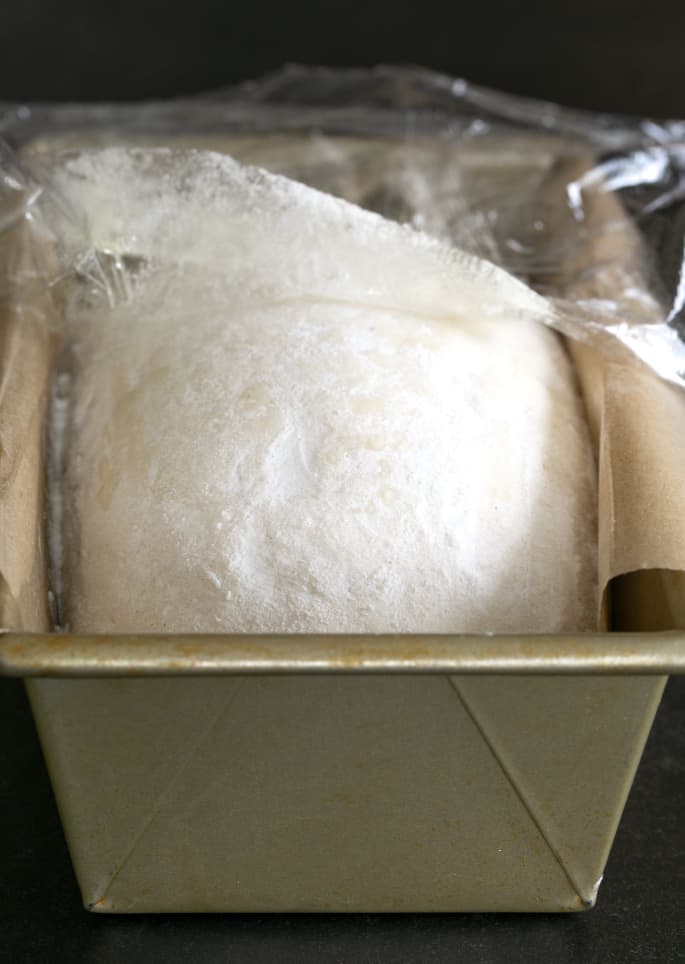
The final rise
With the seam side down, lift the dough into a loaf pan, cover it with oiled plastic wrap, and set the pan in a warm, draft-free spot to allow it to rise. It won't double in size, as it might in the refrigerator, but should be about 150% of its original size, as it was shaped in the loaf pan.
Keep in mind that yeast will double and dough will rise on its own timetable. If your environment is on the cooler side, it will take longer to rise. If it's warmer, it will rise more quickly.
Overproofing, where the dough rises too much, is not caused by too much time. It's caused by too much rise. If your dough needs more time, don't argue! Respect its process. :)
Slash and bake
Once the dough has risen, uncover it and slash it down the center with a lame or sharp knife, which will allow the dough to split where you want it to during baking. Otherwise, it will decide where to split, and it might not be very pretty.
Brush the top of the risen and slashed dough with an egg wash, and bake. We use a relatively low oven (325°F) so that the bread can bake all the way to the center and the bottom without burning. After 45 minutes of baking, we'll transfer the bread out of the pan and onto a baking sheet for its final minutes in the oven. That will allow the oven air to circulate around the sides of the dough. Then, cool and slice.

Ingredients and substitutions
Buttermilk powder: I really like using buttermilk powder in baking, since I find that it adds richness and tenderness to baked goods. The brand I use is Saco. It comes in a little round paper container with a lid and can be found in the baking section of most grocery stores, at least in my part of the U.S.
If you can't find buttermilk powder, you can use nonfat dry milk powder in its place. It doesn't add as much richness, but the recipe will still work.
Dairy-free: If you need to make this recipe dairy-free, you'll have to replace the buttermilk powder in the dough, and the butter in both the dough and the filling. In place of the buttermilk powder, you can try using powdered coconut milk.
In place of the butter in the bread dough, try using Earth Balance buttery sticks or virgin coconut oil. In place of the butter in the filling, you will need to use something that doesn't have too much moisture or the filling will leak a ton. Try using virgin coconut oil or Spectrum nonhydrogenated vegetable shortening.
Egg-free: There are two egg whites in the bread dough recipe. I haven't tried replacing them, and I'm afraid I'm really not sure what, if anything, would work in their place. In the past I've suggested trying aquafaba (the brine from a can of chickpeas), but readers have reported poor results overall. The egg in the egg wash can easily be replaced with cream alone.
Tapioca starch/flour: The addition of tapioca starch/flour to the bread dough helps make it stretchy and tender. In its place, you can try using another starch, or just more all purpose gluten free flour, but neither will give the same results.
Gluten Free Cinnamon Swirl Bread
Ingredients
For the bread dough
- 3 cups (420 g) all purpose gluten free flour blend, plus more for sprinkling (I used Better Batter; please click thru for full info on appropriate blends)
- 1 ½ teaspoons xanthan gum, (omit if your blend already contains it)
- ¼ cup (36 g) tapioca starch/flour
- ⅝ cup (43 g) cultured buttermilk blend powder, (or nonfat dry milk)
- 1 tablespoon (9 g) instant yeast
- ¼ teaspoon cream of tartar
- ¼ teaspoon baking soda
- 1 tablespoon (13 g) packed light brown sugar
- 1 teaspoon kosher salt
- 1 teaspoon apple cider vinegar
- 2 tablespoons (28 g) unsalted butter, at room temperature
- 2 (50 g) egg whites, at room temperature
- 1 ⅝ cups (13 fluid ounces) warm water, (about 95°F)
For the filling
- 3 tablespoons (36 g) granulated sugar
- 3 tablespoons (40 g) packed light brown sugar
- 2 teaspoons ground cinnamon
- 1 tablespoon (9 g) tapioca starch/flour
- 2 tablespoons (28 g) unsalted butter, at very soft room temperature
- For the egg wash
- 1 egg, any size, beaten with 1 tablespoon milk (any kind) or cream
Instructions
- First, make the bread dough.
- In the bowl of a stand mixer fitted with the paddle attachment, place the flour, xanthan gum, tapioca starch/flour, buttermilk blend, yeast, cream of tartar, baking soda, and brown sugar, and whisk to combine well, breaking up any lumps in the brown sugar. Add the salt, and whisk again to combine.
- Add the apple cider vinegar, butter, egg whites, and water, and mix to combine well. Turn the mixer speed up to medium-high and then high speed and beat until the dough almost seems whipped. The dough should pull away easily from the sides of the bowl when you use a silicone spatula to scrape it down.
- Transfer the dough to a lightly oiled bowl or proofing bucket large enough for the dough to rise to nearly double its size.
- Spray the top of the dough very lightly with cooking oil spray. Cover the bowl very tightly with an oiled piece of plastic wrap or the oiled top of your proofing bucket.
- Place the dough in the refrigerator for at least an hour and up to 24 hours.
- When you are ready to shape and bake the bread, grease an 8 1/2-inch x 4 1/2-inch loaf pan and set it aside.
- Place all the filling ingredients except the butter in a small bowl, mix well, and set aside. Remove the dough from the refrigerator and turn it out onto a lightly flour surface.
- Turn the dough over on itself, sprinkling it lightly with more flour as necessary to prevent it from sticking. Use a large rolling pin to roll the dough into a thick 7-inch x 12-inch rectangle, still sprinkling very lightly with more flour as necessary in sticky spots.
- Dust any excess flour off the top of the rectangle and, using a small offset spatula or a large wide knife, spread the softened butter into an even layer across the top of the dough, leaving a small clean edge (about 1/2-inch) all around. Sprinkle the cinnamon-sugar mixture evenly over the top of the butter and press down to help the mixture adhere.
- Starting on a short side of the dough, roll it tightly away from your body, pressing the seam to seal as you go, and finishing the with seam side down. Lift the loaf carefully, trying to prevent any filling from falling out, and place it in the center of the prepared loaf pan. Cover the pan with a lightly greased piece of plastic wrap and place it in a warm, draft-free location to rise until about 150% of its original size (about 1 hour).
- Once the dough is nearly at the end of its rise, preheat your oven to 325°F.
- Once it has finished rising, remove the plastic wrap and, using a lame or small, sharp knife, slash down the center of the loaf, lengthwise, at a 45° angle and about 1/3-inch deep. Brush the top of the loaf, including inside the slash, generously with the egg wash.
- Place the pan in the center of the preheated oven and bake for 45 minutes. Remove the loaf from the pan, place it in a lined baking sheet, and place it back in the oven.
- Continue to bake until the loaf is lightly golden brown, feels firm when pressed down lightly in the center, and the internal temperature reaches about 195°F on an instant-read thermometer (about 15 minutes more).
- Remove the loaf from the oven and place on a wire rack to cool for at least 20 minutes before slicing and serving.
Video
Nutrition information is automatically calculated, so should only be used as an approximation.


Would my cuisinart food processor work? I do not have a stand mixer. I have several of your cookbooks and they are wonderful!
Hi, Jess, Please see the section of the post under the heading “Using a stand mixer.” That’s all the information I have! Thank you so much for your support in buying the cookbooks. I’m so glad you’re enjoying them. ?
THis looks amazing. Do you have any thoughts about making it vegan (sub vegan butter yes but what about the milk powder?) THANK YOU!
Hi, Maria, please see the ingredients and substitutions section for my thoughts about replacing eggs and dairy!
Can the unbaked loaf be sliced to make cinnamon rolls instead of a loaf bread?
I definitely wouldn’t do that, Debby! I have multiple recipes for cinnamon rolls on the blog. Just use the search function!
Instead of using Buttermilk Powder, could you use buttermilk (the liquid)? would you reduce the water?
how much would you recommend in this substitution?
thanks
I’m afraid you can’t do that, no, Christine. You need either that powder or nonfat dry milk. Please see the ingredients and substitutions section!
I’m probably missing it or mis-reading this, but I can’t seem to locate the link for the video. I am using a smaller screen laptop and maybe that’s the problem.
If you’re using an ad blocker, Jayne, you won’t be able to see the video. You must disable the ad blocker to see it. Otherwise, it’s there! There’s no link it’s just included along with the photos.
Hi!
Could you add plumped raisins?
Anxious to make this.
Love all your help to those of us that gluten intolerant and have family that is also.
Please see my response to Linda about raisins, Jules!
Hi ?, Nicole. The cinnamon swirl bread sounds wonderful! I was wondering, though, would there be any problems with adding raisins? If no problems, should the raisins be briefly plumped (by soaking) so as not to draw any moisture out of the bread?
Thanks, Linda
Hi, Linda ??! You can definitely add a few raisins! I wouldn’t add too many, since they’ll create more space between the bread dough and the filling, but I’m sure a few would be fine. Definitely don’t soak them, though, which will upset the bread’s moisture balance. Just use them as is, wrinkles and all. :)
just discovered I.am gluten free xx