This post may contain affiliate links. Please read our disclosure policy.
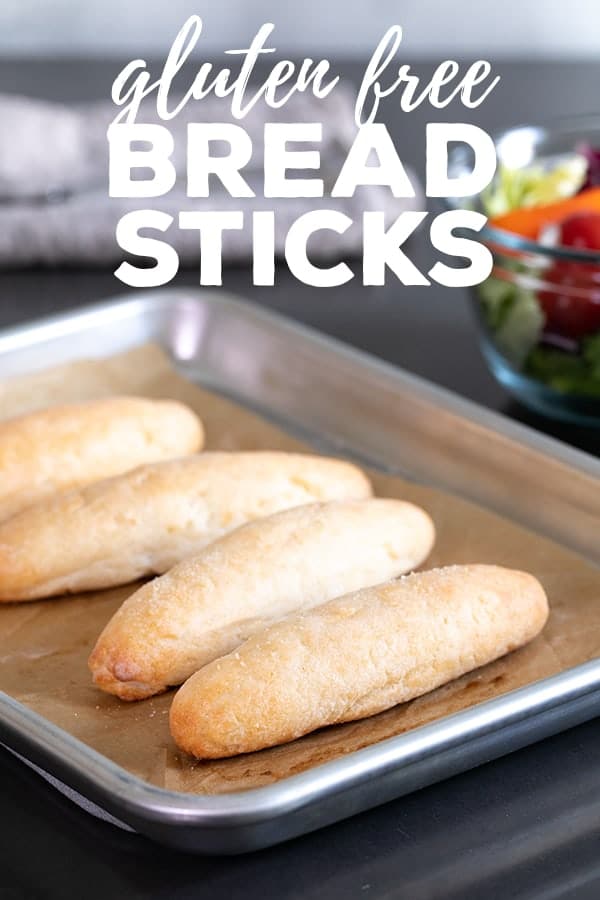
This recipe for soft and tender gluten free Weight Watchers breadsticks is made with gluten free flour, baking powder, salt, and Greek yogurt, but tastes like yeast bread.
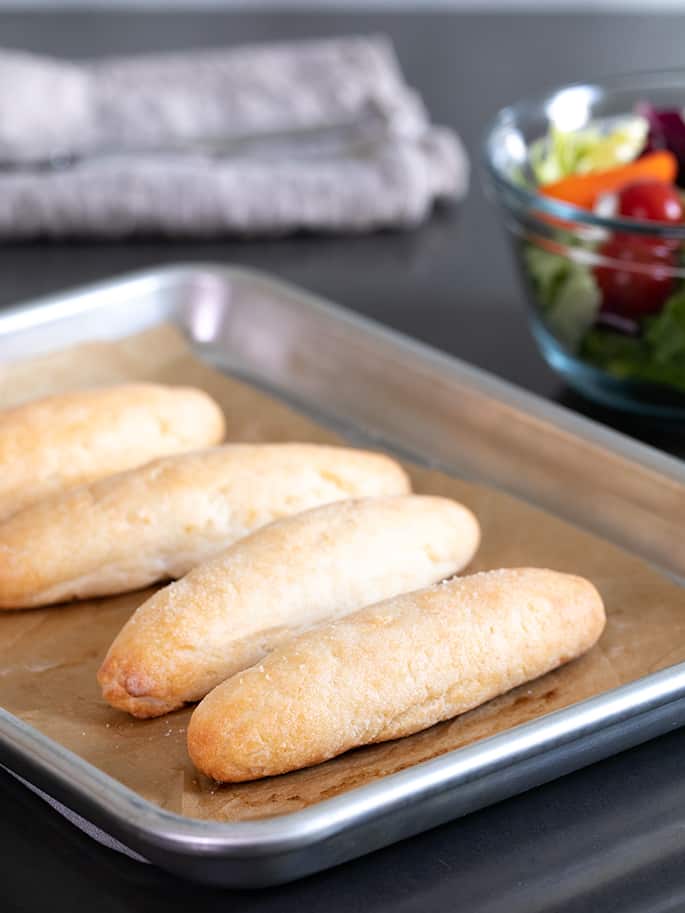
Why we love these gluten free Weight Watchers breadsticks
I guess Weight Watchers is now WW? Whether you care about the “program” or not, you have to try these soft gluten free Weight Watchers breadsticks. It's my third recipe in the “2-ingredient dough” style, and at this point it's just a great super quick backpocket recipe to have. Weight Watchers who?
If you haven't heard of this dough, it's called “2-ingredient” dough because it was originally developed to be made with self-rising flour (which is just all purpose flour + baking powder + salt) and 0% fat (nonfat) Greek-style plain yogurt. The plain Greek yogurt creates an amazing yeasty-tasting tang, and magically tender bread of many kinds.
I started out with “2-ingredient” gluten free bagels and had to tweak the conventional recipe quite a bit to get it to work properly gluten free. Ever since then, my family and I have been hooked. I even made those bagels for my kids' friends, and they just thought they were eating “regular” mini bagels.
Next came WW-style gluten free pizza, and I quickly learned that the recipe had to be rebalanced for that endeavor because you needed a drier, less puffy dough. But when I tried using that pizza recipe to make these breadsticks, it was dry and hard as a rock.

Tips for working with this “2-ingredient” dough
This dough is quite easy to work with, and happily quite difficult to ruin. Even when you're working with conventional gluten-containing flour to make a similar recipe to this, you'll see on other blogs that the raw dough isn't smooth.
During shaping, the dough does tend to separate a bit from itself, creating cracks. I recommend kneading the dough to integrate it well after mixing, and then pinching the cracks together if they do form during shaping. Then, continue rolling and shaping it.
You really don't need a lot of additional flour to shape these rolls, though. If you do add way too much flour during shaping, you will end up with tough bread. That's always the case when working with bread dough.
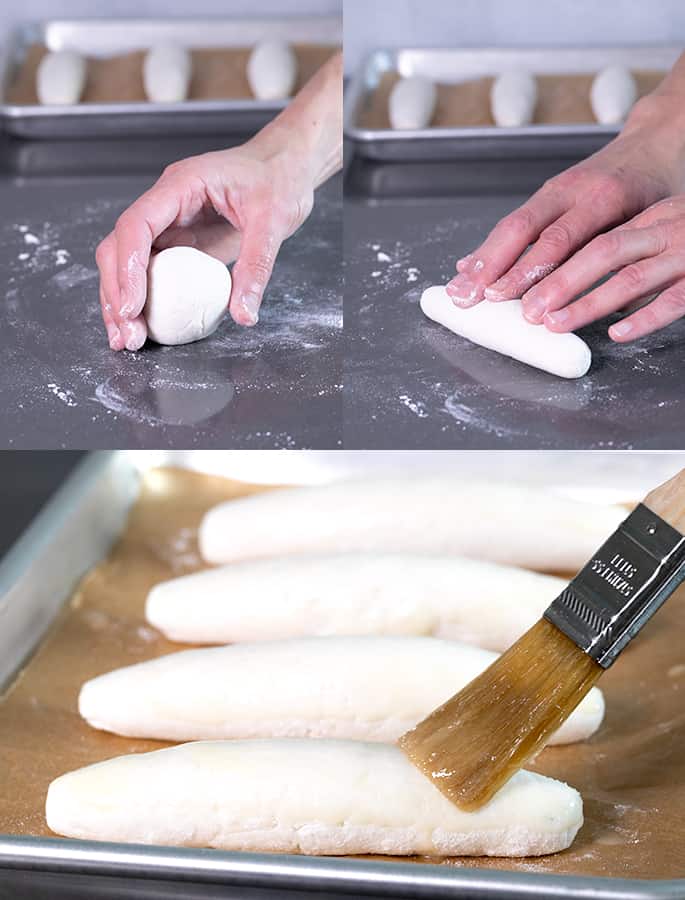
As you might have guessed, the garlic butter you see me brushing on top isn't really Weight Watchers-friendly. But only 2 melted tablespoons are plenty to cover all 8 breadsticks.
Add some garlic salt and you'll swear you were eating my yeasted Olive Garden-style gluten free soft breadsticks. Those are the stuff that dreams are made of! ?

Ingredients and substitutions
As with the other “2-ingredient bread” dough WW-style recipes, there are so few ingredients this recipe that substitutions can make a big difference (and often not for the better). But here's what I know (or am willing to guess):
Dairy-free: I haven't tried this recipe with nondairy plain yogurt, such as So Delicious brand, but I have tried the other 2-ingredient WW-style bread recipes on the blog with it and was successful.
Take a look at the ingredients and substitutions section of my recipe for Weight Watchers Gluten Free bagel recipe for all the information I have about making these sort of recipes with nondairy (non-Greek-style) plain yogurt.
The butter in this recipe is truly optional and can either be replaced with Earth Balance buttery sticks (melted) or just omitted entirely.
Egg-free: When I was developing this recipe, I originally tried it without egg whites (and used water help bring the dough together). Even though egg whites are typically drying in baking, the breadsticks were significantly drier when I used water instead of eggs—because I had to bake the rolls longer before they were baked through.
When I added the egg whites, the bread had more lift (egg whites add a lot of structure), and baked more quickly, resulting in a much better texture. You can try replacing the egg whites with aquafaba (the liquid in the bottom of a can of chickpeas), but I would not replace them with water. If you decide to try, please report back about how it went!
WW Points: Each of these rolls has a bit over 3 SmartPoints each, as I calculated it using Better Batter gluten free flour ingredients—if you omit the melted butter (sorry! WW hates fat). That's about 1 point more than the bagels.
If you're just sort of eating WW-style, or you just love the idea of a yeast-free gluten free breadstick, add the butter. It makes everything better.
Sugar: I like to add a tiny bit of granulated sugar to this recipe. It does not make the breadsticks taste sweet. It just cuts the tang of the yogurt taste a bit and balances everything. It is truly optional.
Gluten Free Weight Watchers Breadsticks
Ingredients
- 2 cups (280 g) all purpose gluten free flour blend, plus more for sprinkling (I used Better Batter; please click thru for full info on appropriate blends)
- 1 teaspoon xanthan gum, (omit if your blend already contains it)
- 2 teaspoon baking powder
- 1 teaspoon kosher salt
- 1 teaspoon (4 g) granulated sugar, (optional)
- 1 ½ cups (340 g) nonfat Greek-style plain yogurt, (Fage brand seems to work best)
- 2 (50 g) egg whites
- 2 tablespoons (28 g) unsalted butter, melted (optional)
- 1 teaspoon garlic salt, (optional)
Instructions
- Preheat your oven to 375°F. Line a large rimmed baking sheet with unbleached parchment paper and set it aside.
- In a large bowl, place the flour blend, xanthan gum, baking powder, salt, and optional sugar, and whisk to combine.
- Add the yogurt and egg whites, and mix until the dough begins to hold together.
- Knead the dough with clean hands to bring together fully.
- Turn the dough out onto a very lightly floured surface and knead it with clean hands until it’s a bit smoother.
- Divide the dough into 8 equal portions (each a bit more than 3 ounces in weight) and roll each into a ball between your cupped palms and/or by rolling on the lightly floured surface.
- Using the fingers of both hands, begin to roll the round into a cylinder by pressing outward from the center (see the video in the post for a visual), tapering the dough toward each end.
- During shaping, pinch together any portion of the dough that appears to have separated or cracked, and then continue shaping. Place the shaped pieces of dough about 2 inches apart on the prepared baking sheet.
- Place the optional melted butter and the optional garlic salt in a small bowl and mix to combine. Use a pastry brush to brush each of the breadsticks with the optional mixture.
- Place the baking sheet in the center of the preheated oven and bake until the breadsticks are puffed, firm to a light touch, and lightly golden brown all over, about 25 minutes.
- Allow the breadsticks to cool briefly on the baking sheet before serving warm.
- Leftovers can be sliced and stored in a sealed container at room temperature for up to 2 days (to maintain moisture, add a moistened paper towel to the bag) or sealed in a freezer-safe container for longer storage.
Video
Nutrition information is automatically calculated, so should only be used as an approximation.

