
This post may contain affiliate links. Please read our disclosure policy.
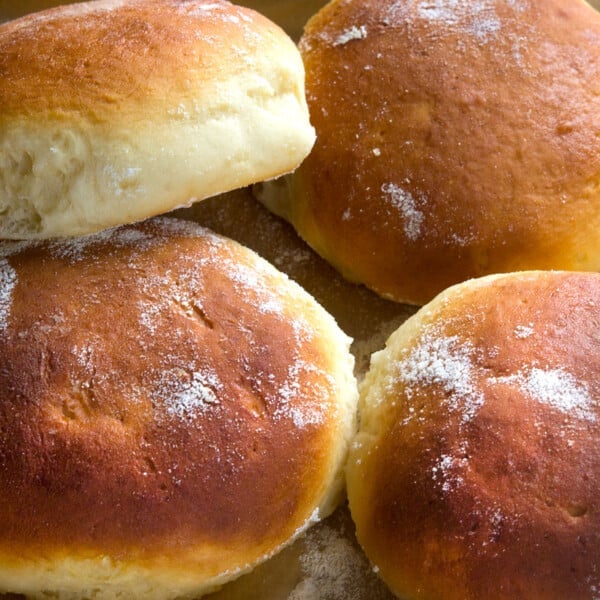
You know those super squishy, soft-crusted rolls from Subway? Well, I made gluten free Subway-style sandwich rolls, and they're fantastic.

Table of Contents
These are maybe the softest sub rolls I have ever made (although the Hoagie Rolls from page 135 of Gluten-Free on a Shoestring Bakes Bread are still a big-time favorite of mine and I will make them again and again this summer, no doubt).
Believe it or not, I've been working on this recipe for weeks. Who knows if they really do have ground up yoga mats in their sandwich bread or not (urban myth?), but Subway rolls are just so, so soft and (frankly) delicious in their own way.
They're not the super crusty artisan bread that I do know and love (hello No Rye Rye Bread (page 101) for the perfect reuben (page 263)!). But I do adore them for what they are.
Other than the perfect balance of ingredients including our gluten free bread flour blend, the secret to the super soft crust of these gluten free sandwich rolls? Covering the warm rolls with a tea towel for 30 minutes right out of the oven. Steam heat!

Even though I finally settled on the perfect recipe for these rolls, I actually had something else planned to post today (I'm gonna be a brat and not tell you what it was, but I do love you still). And then?
Then I woke up to the New York Times Dining Section today. They're calling it “The Bread Issue.” I'm not gonna link to it because I'm too angry (don't worry—I know the Times does not need my referral pageviews, but somehow, I just can't … link).
They wax poetic all about the glory of slow-fermented yeast breads, including all kinds of lovely tidbits about flours. But do they mention artisan-style gluten free bread at ALL?? I won't keep you in mock-suspense. They do not.

In fact, the only mention of gluten free (okay I haven't read every single word of the whole section, but this is the only one I've found) is of the new “Wholesome Cup4Cup” all purpose gluten free flour blend (with ground flaxseed and rice bran—I'll give it a try when it comes out and let you know what I think).
But the real zinger?: “With the addition of cream of tartar, egg whites and more xanthan gum, you can also use it in yeast baking, but don't expect it to mimic wheat flour.” That's what they said. But that is not the best we can do…
Gluten Free Subway Rolls

Equipment
- Stand mixer fitted with the dough hook attachment
Ingredients
- 3 ½ cups (490 g) gluten free bread flour, plus more for sprinkling (you must use this blend; please click thru for full info)
- 2 teaspoons (6 g) instant yeast
- ¼ teaspoon cream of tartar
- 3 tablespoons (42 g) packed light brown sugar
- 1 teaspoon (6 g) kosher salt
- 1 ⅜ cups (11 fluid ounces) warm milk, (about 95°F)
- 4 tablespoons (56 g) unsalted butter, melted and cooled
Instructions
- In the bowl of your stand mixer, place the flour blend, instant yeast, cream of tartar and brown sugar, and use a handheld whisk to combine well (working out any lumps in the brown sugar).
- Add the salt and whisk again to combine well. Add the milk and butter, and mix on low speed with the dough hook until combined. Raise the mixer speed to medium and knead for about 5 minutes.
- This is a lovely, smooth, enriched dough. It climbs up the dough hook during kneading but remains intact and smooth. Spray a silicone spatula lightly with cooking oil spray, and scrape down the sides of the bowl.
- Transfer the dough to a lightly oiled bowl or proofing bucket large enough for the dough to rise to double its size, spray the top of the dough with cooking oil spray, and cover with an oiled piece of plastic wrap (or the oiled top to your proofing bucket).
- Place the dough in the refrigerator for at least 12 hours and up to 3 days. (See Recipe Notes)
Prepare the dough for shaping.
- On baking day, line a large rimmed baking sheet with unbleached parchment paper, and set it aside.
- Turn out the chilled dough onto a lightly floured surface and, using the scrape and fold kneading method and a very light touch, sprinkle the dough with more flour and knead it lightly, sprinkling with flour when necessary to prevent it from sticking, scraping the dough off the floured surface with a floured bench scraper, then folding it over on itself.
- Repeat scraping and folding until the dough has become smoother. Do not overwork the dough or you will incorporate too much flour and it will not rise properly.
Shape the rolls + the final rise.
- On a lightly floured surface, divide the dough into 4 equal pieces, each about 8 ounces.
- Working with one piece of dough at a time (covering the rest loosely with a moist tea towel to prevent it from drying out), pat into a rectangle about 1/2-inch thick and about 5-inches long.
- Fold the rectangle along the length from bottom to top, each fold halfway up the width of the rectangle. Fold the now smaller rectangle in half, each side just folded over one another.
- Roll the dough back and forth to seal the edges and to elongate it slightly until the dough is about 6-inches long.
- Place the shaped rolls about 2 inches apart on the prepared baking sheet, and dust lightly with flour to give the dough a “cloak” to rise into.
- Cover the baking sheet with oiled plastic wrap (be sure to leave the dough room to rise under the plastic), and place in warm, draft-free location to rise only until about 1 1/2 times its original size (about 40 minutes). You don’t want a full doubling here.
Bake.
- As the dough is in its final rise, preheat your oven to 350°F.
- Once the dough has finished rising, uncover it, and slash each roll in 3 places with a lame or very sharp knife at a 45° angle, and about 1/2-inch deep (you want deep slashes).
- Place in the center of the preheated oven and bake for about 15 minutes, or until the dough is very puffy, just beginning to brown and a toothpick inserted in the center comes out clean (the toothpick test is actually more useful here than an internal temperature test).
- Remove from the oven and immediately cover the entire baking sheet with a clean tea towel, tucking the ends of the towel under the baking sheet to create a loose seal.
- Allow the bread to cool for at least 30 minutes under the towel. This will soften the crust to the squishy, Subway-like texture we are looking for.
- Uncover, slice and serve with your favorite sandwich fillings.
Make the bread dough.
Notes
Nutrition information is automatically calculated, so should only be used as an approximation.


Nicole – I prepared the dough a couple of days ago and shaped and baked these buns this morning. I followed your recipe exactly using all the recommended ingredients. The buns did’t get much of a rise even though I left them to proof for 65 minutes. After they cooled I cut into one and they are very dense but they are tasty. Any thought on how I could get more risen and airy results? Thanks
Hi, Martin, did you measure your ingredients by weight, not volume? Did you use my gluten free bread flour, using one of my recommended all purpose gluten free flour blends with added Expandex modified tapioca starch and whey protein isolate as directed? Did you add more a minimal amount of added flour for shaping? That would lower the hydration ratio and inhibit rise. In addition, it doesn’t matter how long something has risen, but only whether it’s risen fully. It sounds like your dough didn’t rise enough, which alone could account for your results.
Everything was measured by weight and I used the exact ingredients in your recipe. I used your recipe for “make it simpler” gluten free flour and your recipe for bread flour that included the whey protein isolate and expandex. I’m wondering if the mixer with dough hook overworked the dough when kneading? Maybe 5 minutes at medium speed was too long? Maybe I needed to let the dough rise longer? I have a proofing box, should I use that? Thanks for your help Nicole. By the way I purchased your bread book and it helped me understand how to shape these buns.
No, it sounds like it’s just a matter of not letting the dough rise enough, then. You also need to make sure you’re not adding too much flour during shaping (it should be minimal) and covering the dough fully during the rise or the dough will dry out. Yeast needs sufficient moisture to be active. I’m glad the bread book was helpful. These blog recipes that use the bread flour blend will never substitute for the book itself, which is a deep dive.
Nicole – is there a video or some photos that show this step of your recipe? I’m not understanding the steps. Also is there a description of the scrape and fold kneading method. If it is in one of your books I will buy it. Here is the step I’m having difficulty with:
“Fold the rectangle along the length from bottom to top, each fold halfway up the width of the rectangle. Fold the now smaller rectangle in half, each side just folded over one another”.
Hi, Martin, there’s no video, but there are step by step photos in my bread book, called Gluten Free on a Shoestring Bakes Bread. Traditionally published cookbooks only make me $1 a book, so feel free to take it out of the library!
Hi Nicole, I was wondering if Better Batter bread flour would work for this sandwich roll recipe.
Thanks,
Robin Crandall
I’m afraid I don’t recommend their bread flour, Robin, no. Sorry!
you bread flour recipe has ingredients weighing 140g power cup of flour. this recipe says too use 3½ cups of flour or 420g. 3½ cups of your bread flour recipe should weigh 510g. Which is correct?
Hi, Pete, actually, 140 x 3.5 is 490. Thanks for pointing out the error in transcription, which occurred when this recipe was transferred from another program to the current one. It’s fixed now!
This recipe looks amazing. Just wondering about whether it’s OK to freeze the dough or the bread once it is baked. Any advice would be great, thanks.
Hi, Siobhan, you can definitely freeze the rolls after they’re baked and cooled completely. Refresh by defrosting at room temperature, sprinkling lightly with water and baking in the toaster oven for about 5 to 7 minutes at 300°F. You can’t freeze the raw dough, though. Just please keep in mind that this recipe calls for my gluten free bread flour blend specifically, or I can’t promise results!
could I use harmonized vegan protein instead of whey protein isolate? Not sure if they are the same thing only one being vegan.
No, Mie, you cannot use that successfully as a substitute. They are not at all the same thing. I discuss dairy free protein powder substitutes for whey protein isolate in my book on pages 10-11.