
This post may contain affiliate links. Please read our disclosure policy.
My gluten free pie crust recipe makes dough that is easy to handle, rolls out like a dream and always bakes up tender and flaky. Whether you’re baking a classic fruit pie or a savory pot pie, this crust delivers all the flavor and texture you’ve missed.
This is the gluten free pie crust that changed everything.
With over 1,300 five-star reviews, it’s helped thousands of gluten free bakers rediscover the joy of homemade pie.
“This pie crust is an astonishing achievement. Nicole is able to unlock secrets I didn’t believe possible and I have found a love of baking because of it.”
“I have baked pies most of my life. I thought those days of having anything with pie crust was over. I use this recipe for pies and chicken pot pies. Thank you for such a wonderful recipe!”
Why this recipe works
The texture of this crust stays delicate without turning greasy or tough because we press large pieces of very cold chopped butter into flat shards. This way, the butter stays whole as we roll out and fold the dough to create flaky layers when it expands in the oven.
The crust is also made with sour cream and just enough added ice water to bring the dough together. This adds a gentle tangy flavor and richness that enhance that buttery flavor without adding excess moisture.
Best of all, the crust is easy to make with just a bowl, a whisk and a spoon. Master this crust recipe and you'll always have a go-to base that holds up beautifully with any filling.
Recipe ingredients
Here are the 6 ingredients for this recipe, and a few words about the role each plays in the perfect crust. Full exact amounts of each, please see the recipe card:
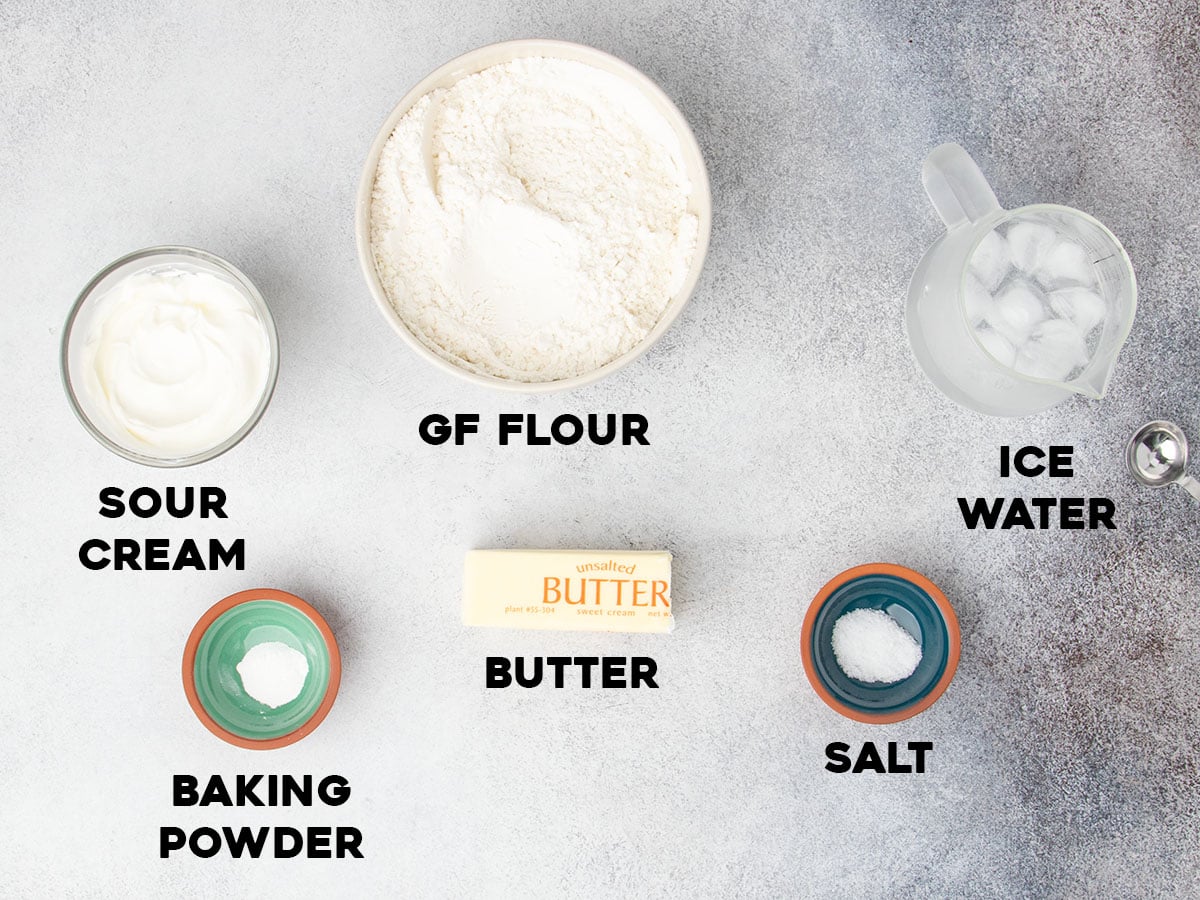
- Gluten free flour blend: Adds most of the structure for the crust. Use a high-quality, properly balanced all purpose blend with finely ground rice flour like Better Batter's original blend or Nicole's Best multipurpose with added xanthan gum. In such a simple recipe, any grittiness in your flour blend will be obvious, and will prevent the crust from rolling out smooth and having proper mouth feel after baking.
- Salt: Brightens the other flavors.
- Baking powder: Adds a touch of lift to help separate the flaky layers.
- Unsalted butter: Cold, flat shards of butter creates flakiness and rich flavor as they release steam that gets trapped in the dough and pushes out the surrounding dough, creating flaky layers.
- Sour cream: Adds tenderness, richness, and tangy depth of flavor without making the dough too wet. You can also use Greek-style plain yogurt in the same amount in its place.
- Ice water: Brings together any remaining dry spots in the the dough without warming the butter. Use just the water, leaving the ice behind.
How to make gluten free pie crust (step by step photos)
Here's an overview of how to make this pie crust in your own kitchen, with an explanation of how each step contributes to the best crust you've ever had. For full ingredient amounts, see the recipe card below.
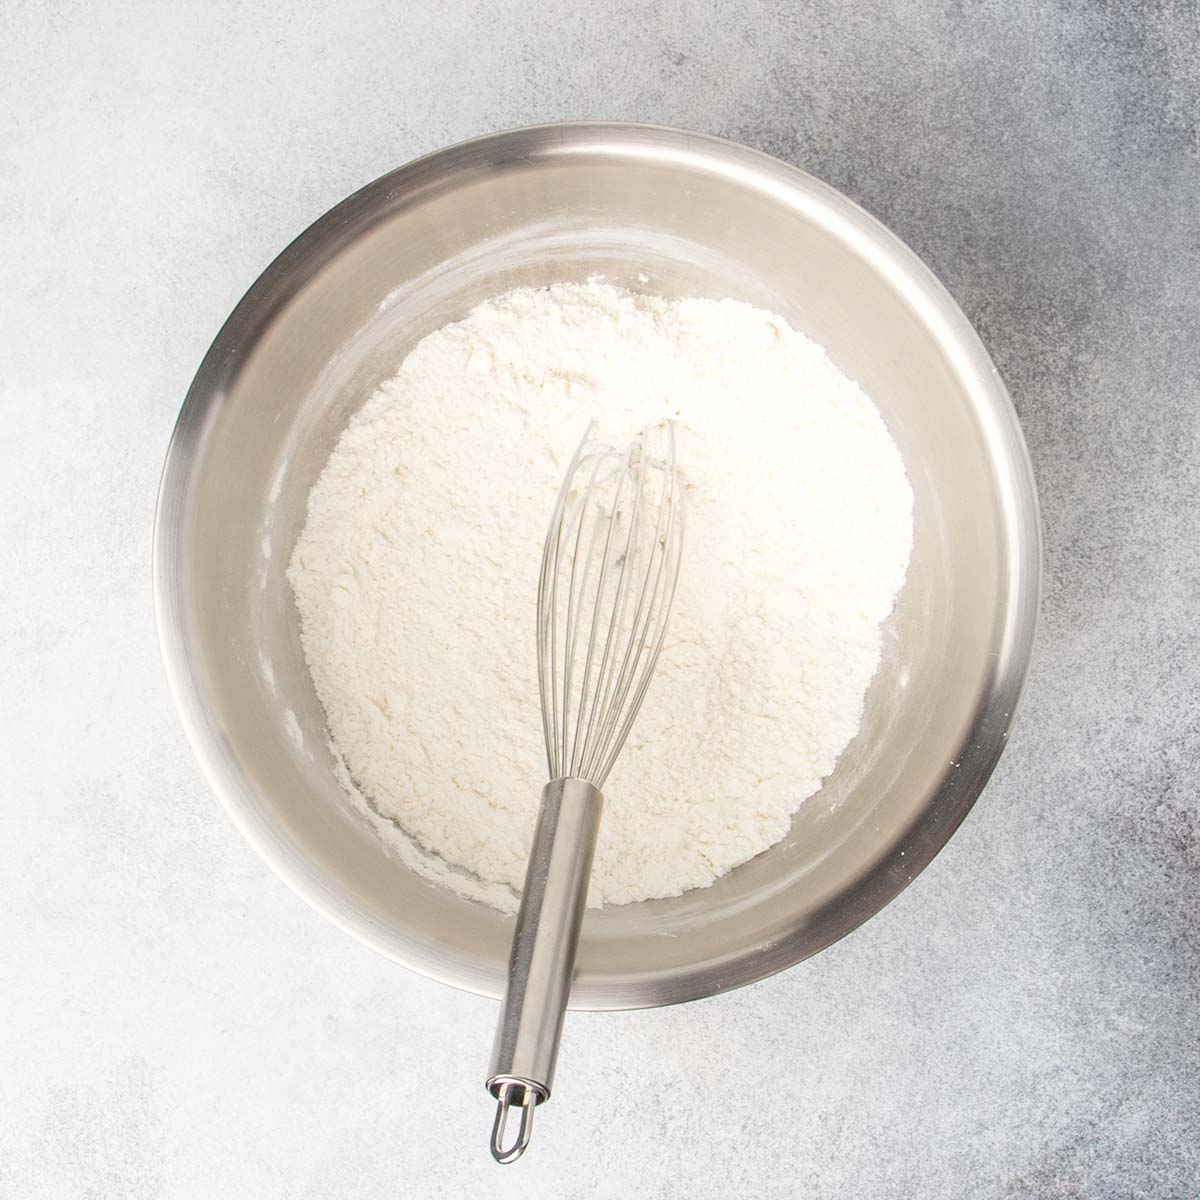
Whisk the dry ingredients
In a large bowl, whisk together your gluten free flour blend, xanthan gum (if needed), salt, and baking powder. This prevents the leavener from clumping which can lead to uneven rising or a bitter taste.
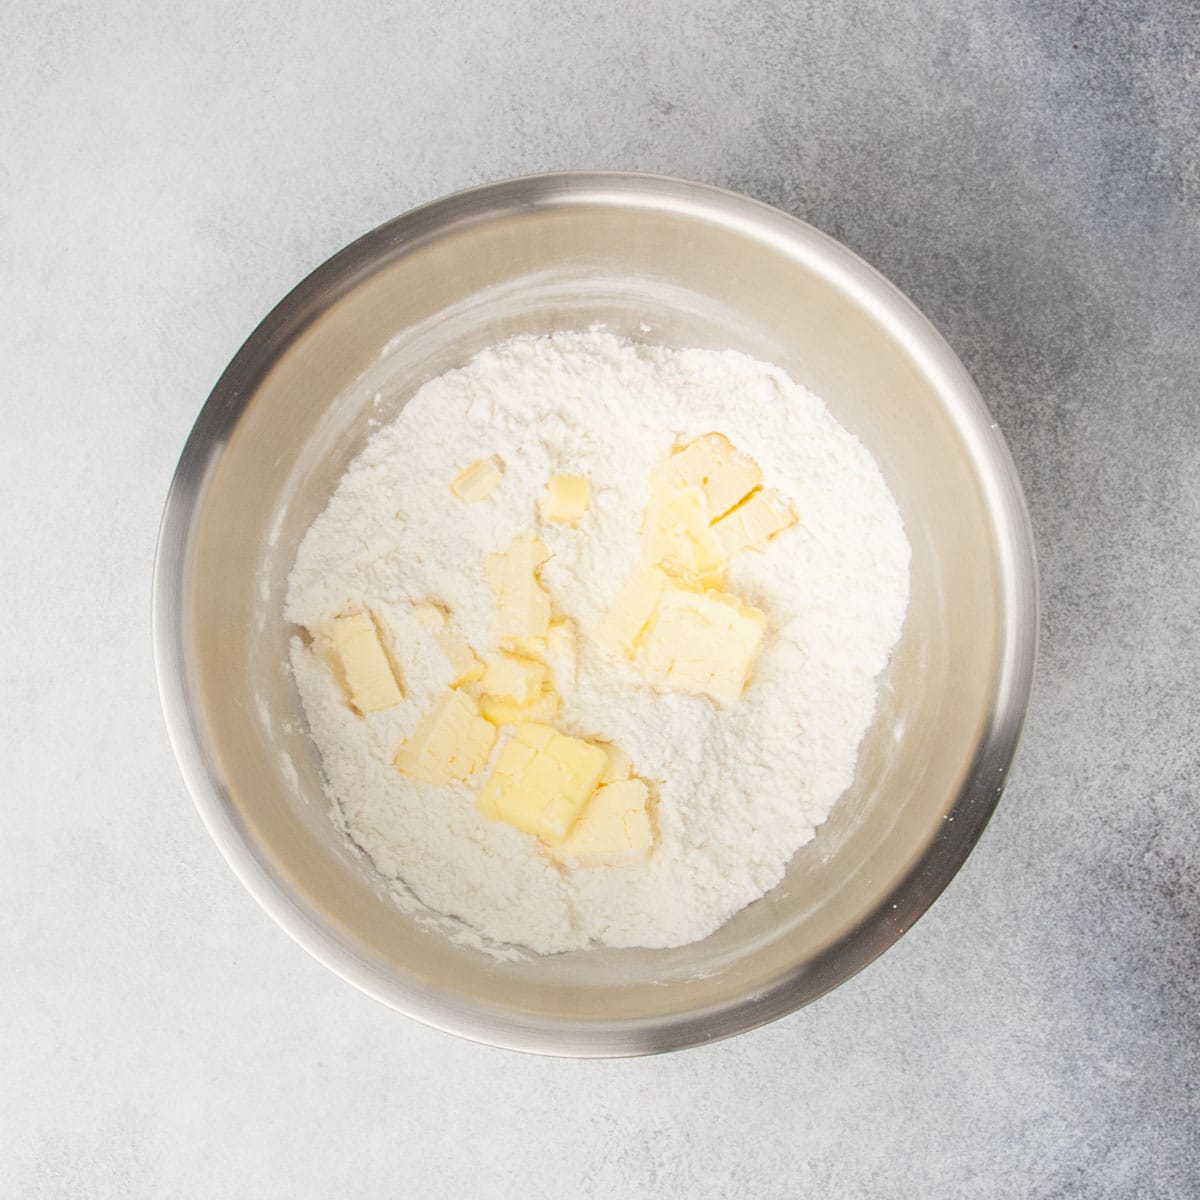
Add the butter
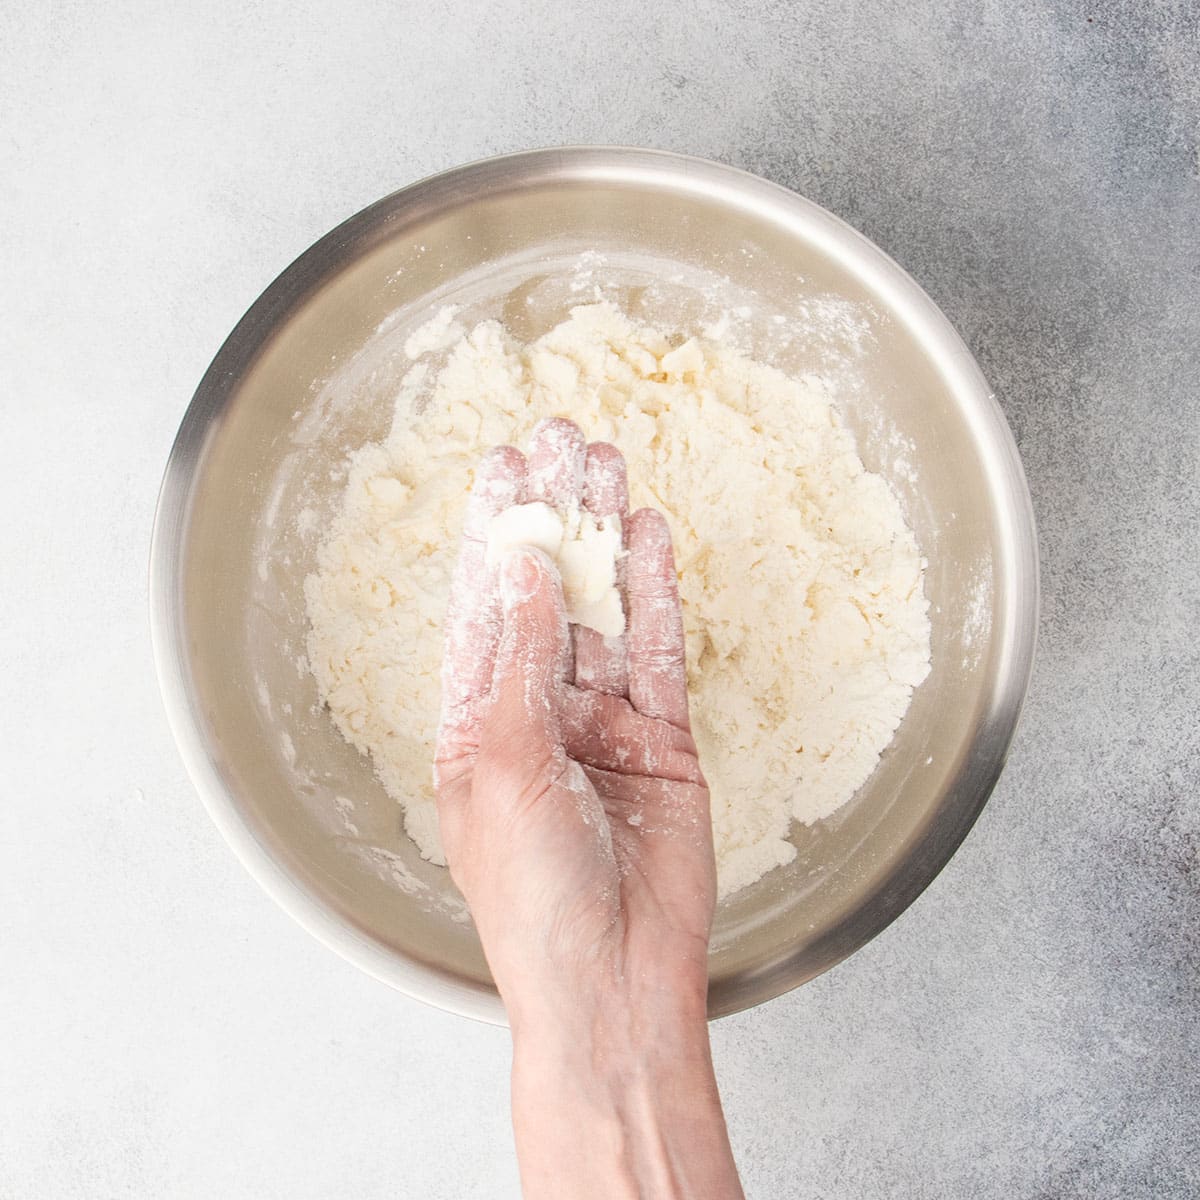
Add cold, chopped butter pieces, and use a spoon to toss them around until each piece is coated in the dry ingredients. Once each piece of butter is coated in flour, it's somewhat protected from the heat of your hands in the next step.
Flatten the butter
Use the tips of your fingers to press each piece of coated butter between your thumb and forefinger to create flat shards of floured butter. This allows you to nestle the butter between layers of the dough without letting sharp edges break through. Those edges would melt too soon and leak out of the dough.
Larger pieces of butter can also be reconstituted by chilling the dough, unlike small pea-sized pieces which quickly melt into the flour, leading to a tough result.
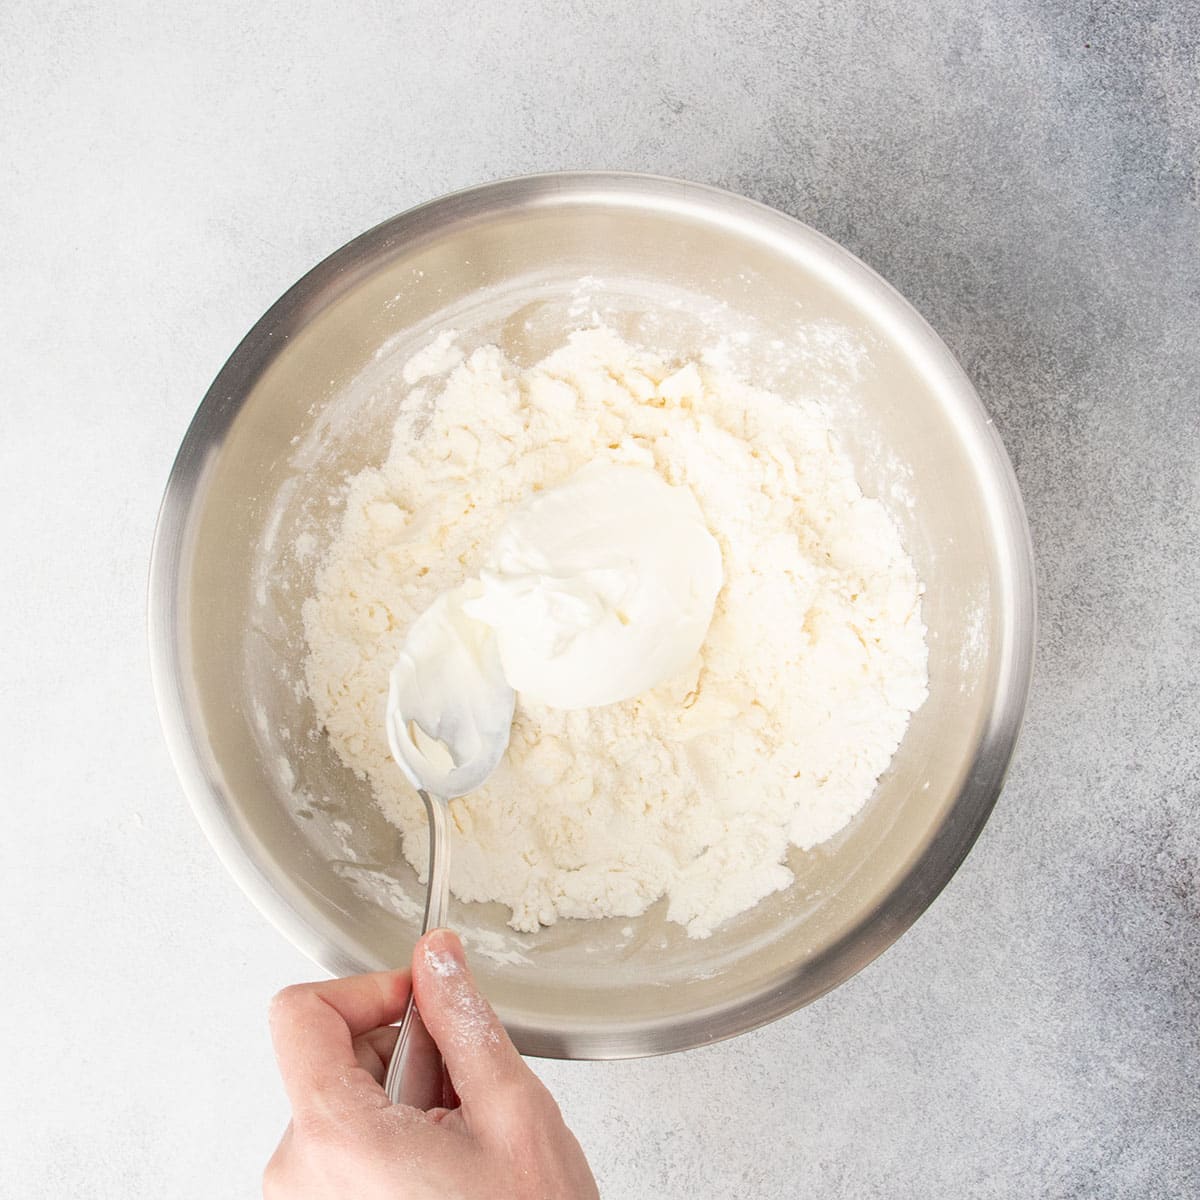
Add the sour cream
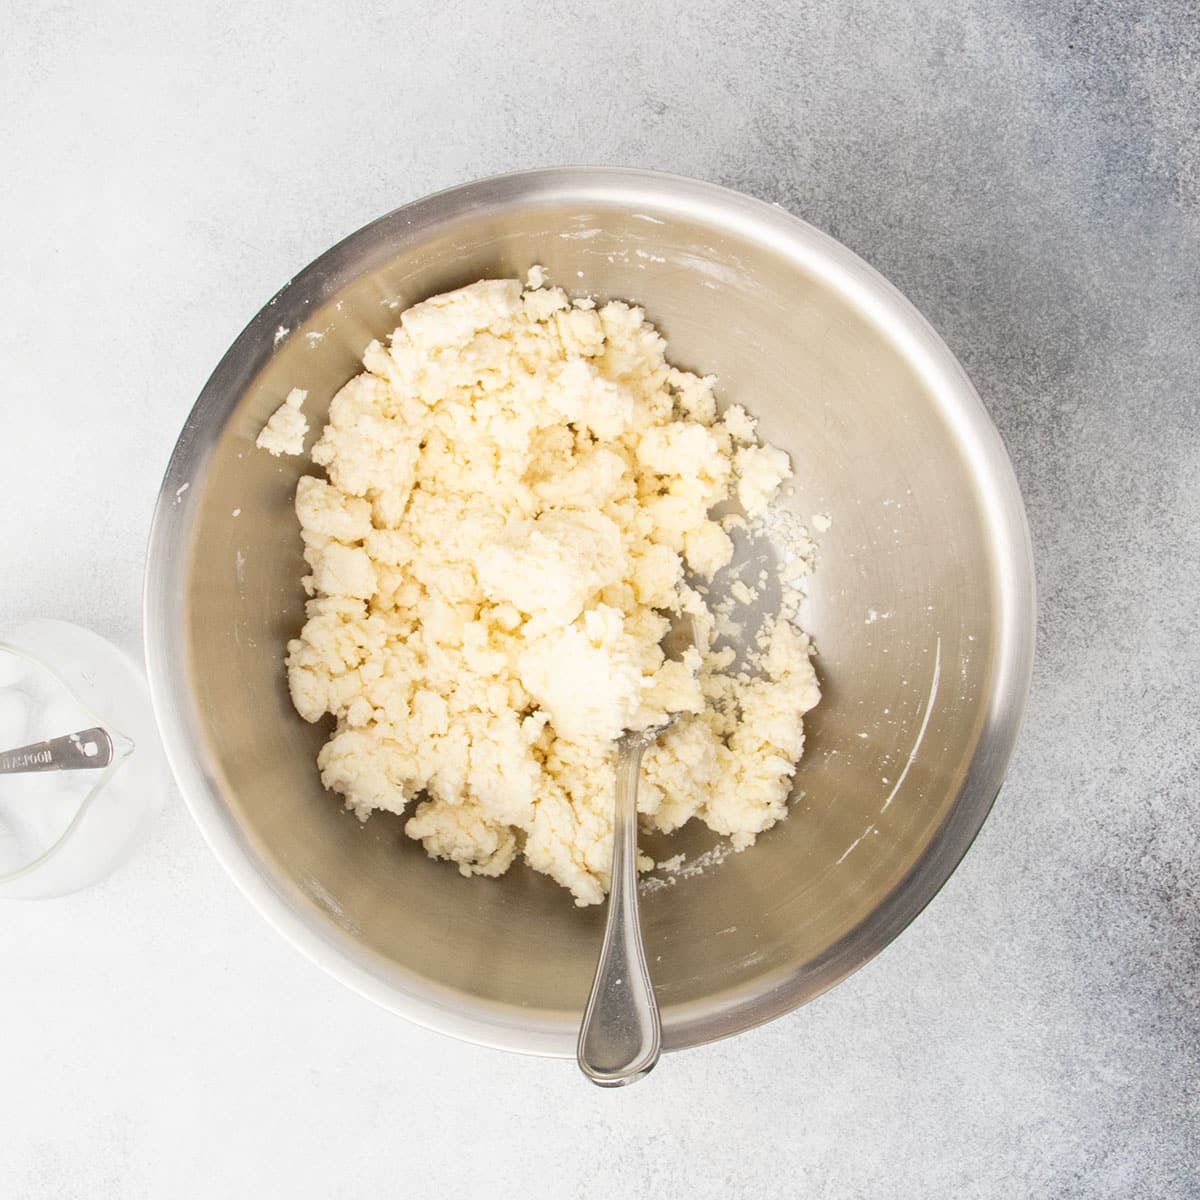
Add cold sour cream to the butter and flour mixture. Mix to bring the dough together into a shaggy, clumpy mixture without melting the chunks of butter.
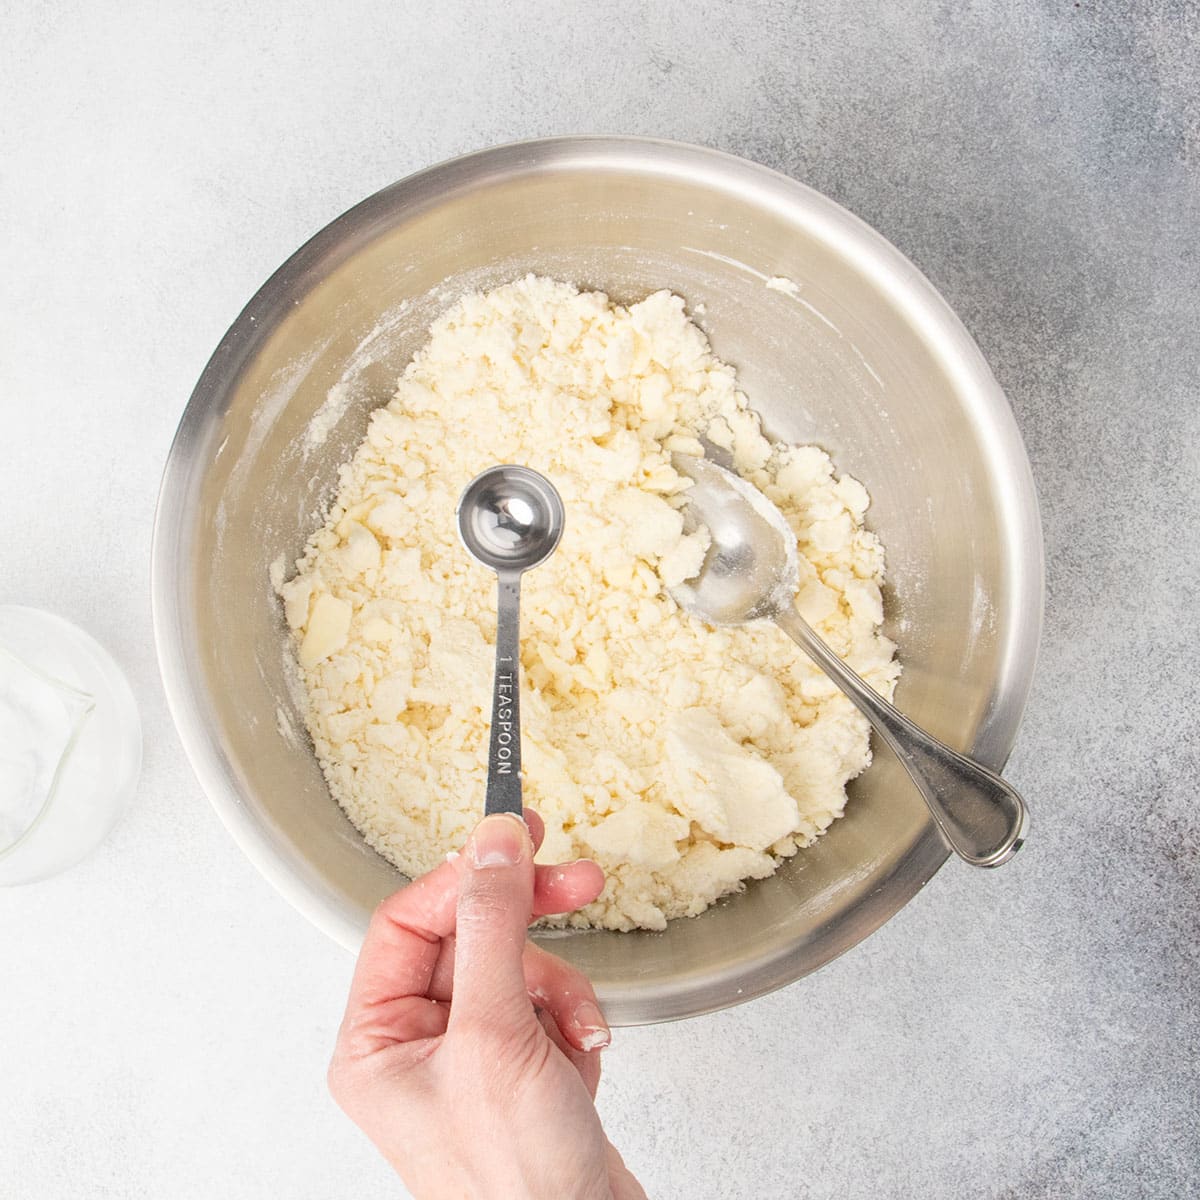
Add just enough water
If dry patches remain, separate them from the rest of the dough and drizzle in ice water to just those dry spots. This allows you to adding just enough water to moisten all the flour without making the dough sticky wet, leading to adding more flour that would dry out the dough, making it stiff and hard.
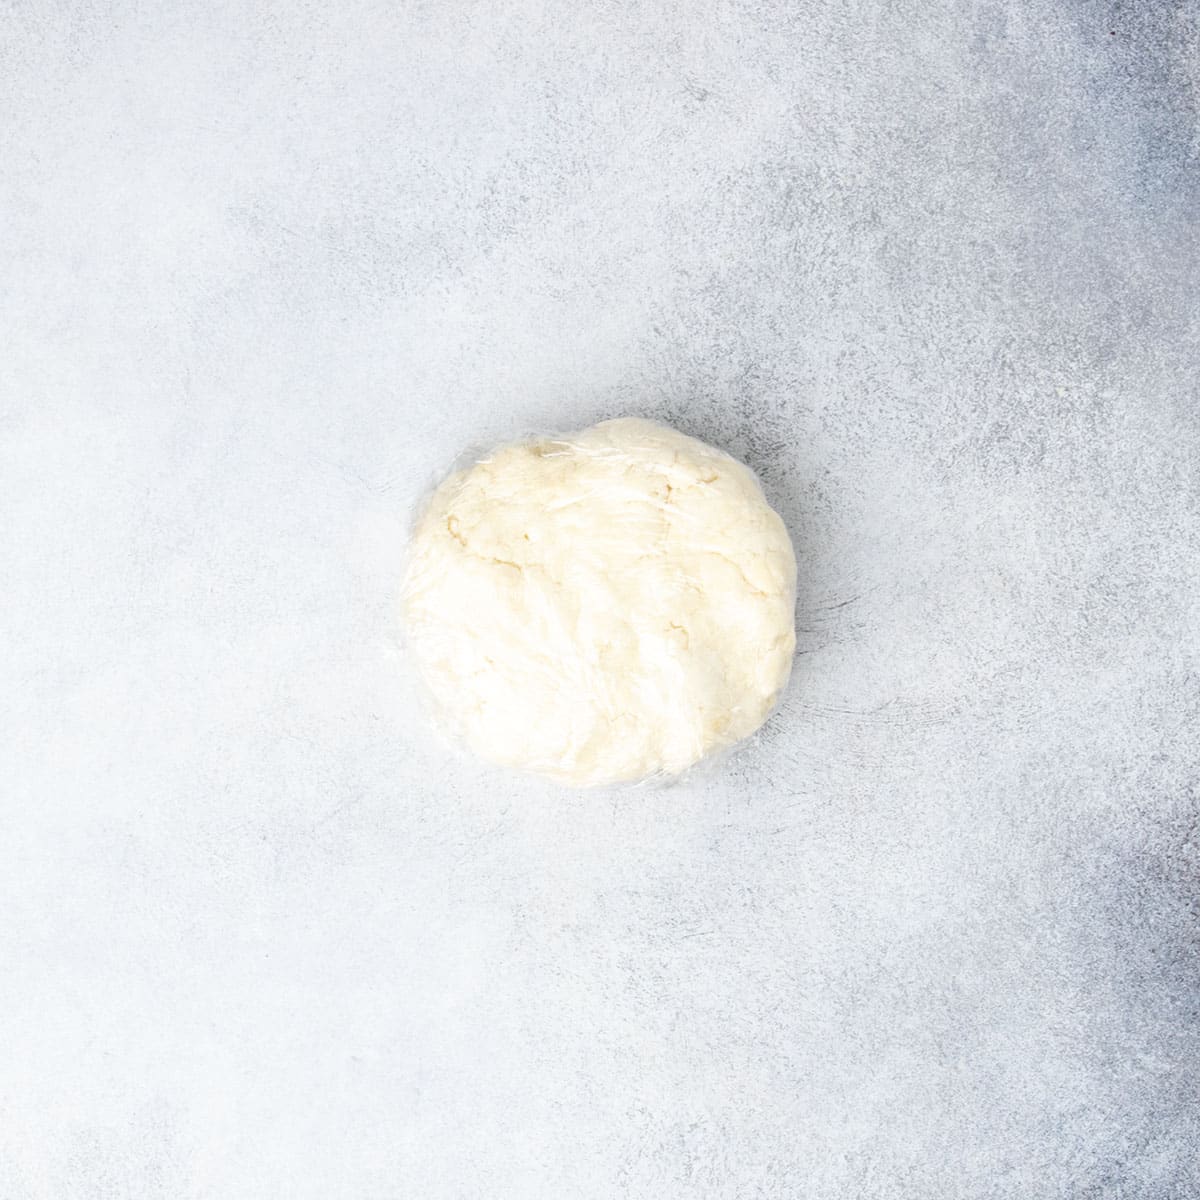
Chill the dough
Turn the dough out onto plastic wrap, press into a rough disk, and wrap tightly. Chill it, wrapped tightly so it doesn't dry out, for at least 30 minutes to ensure that the butter is firm enough to shape without melting at all.
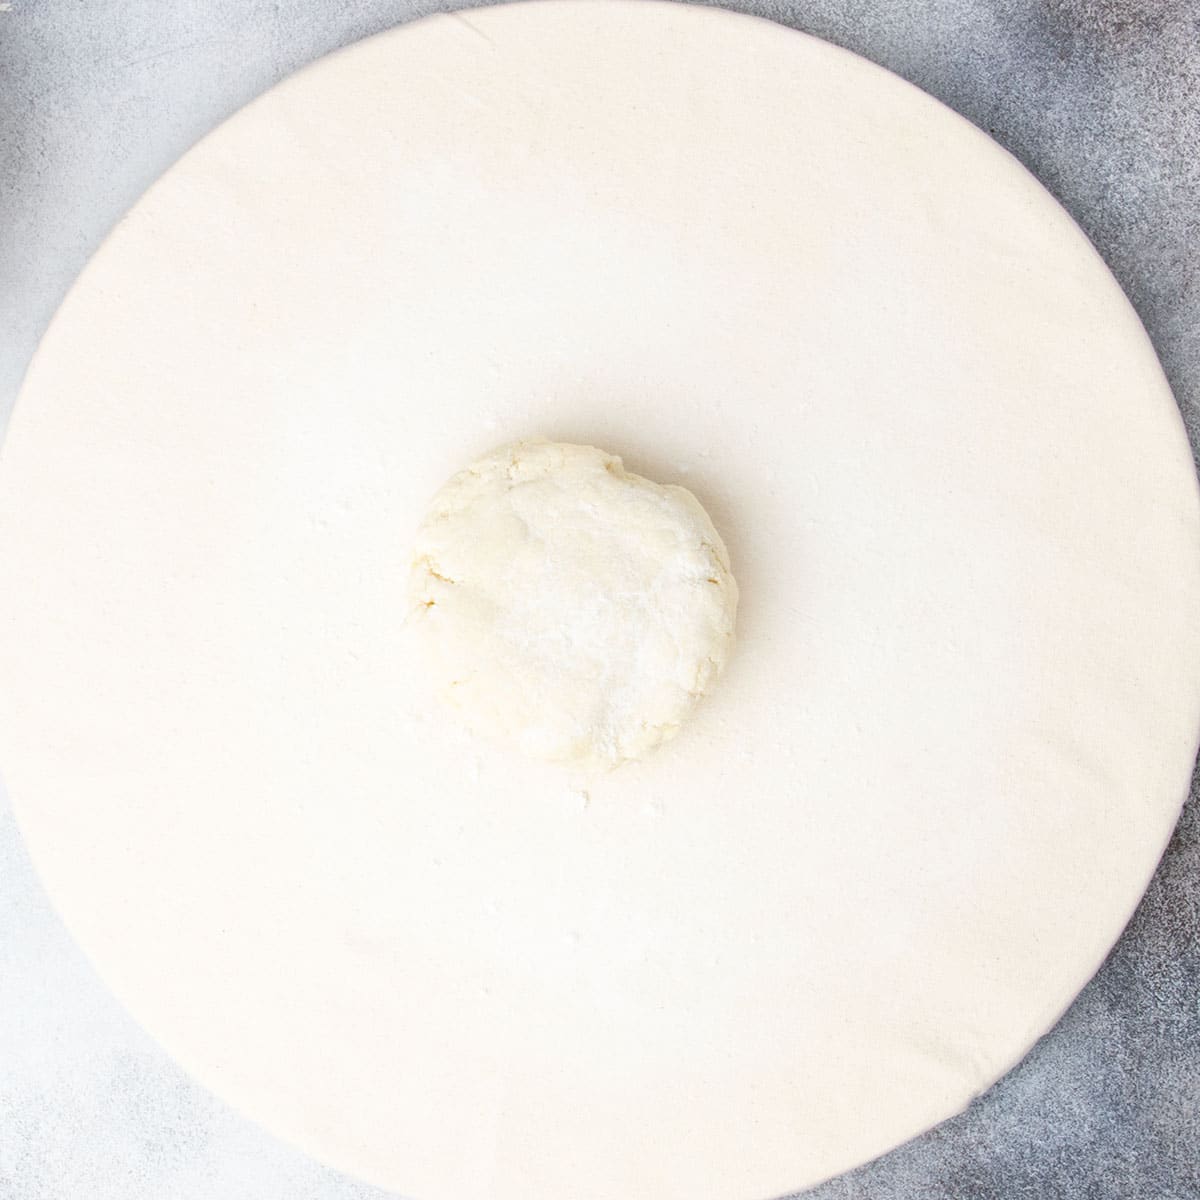
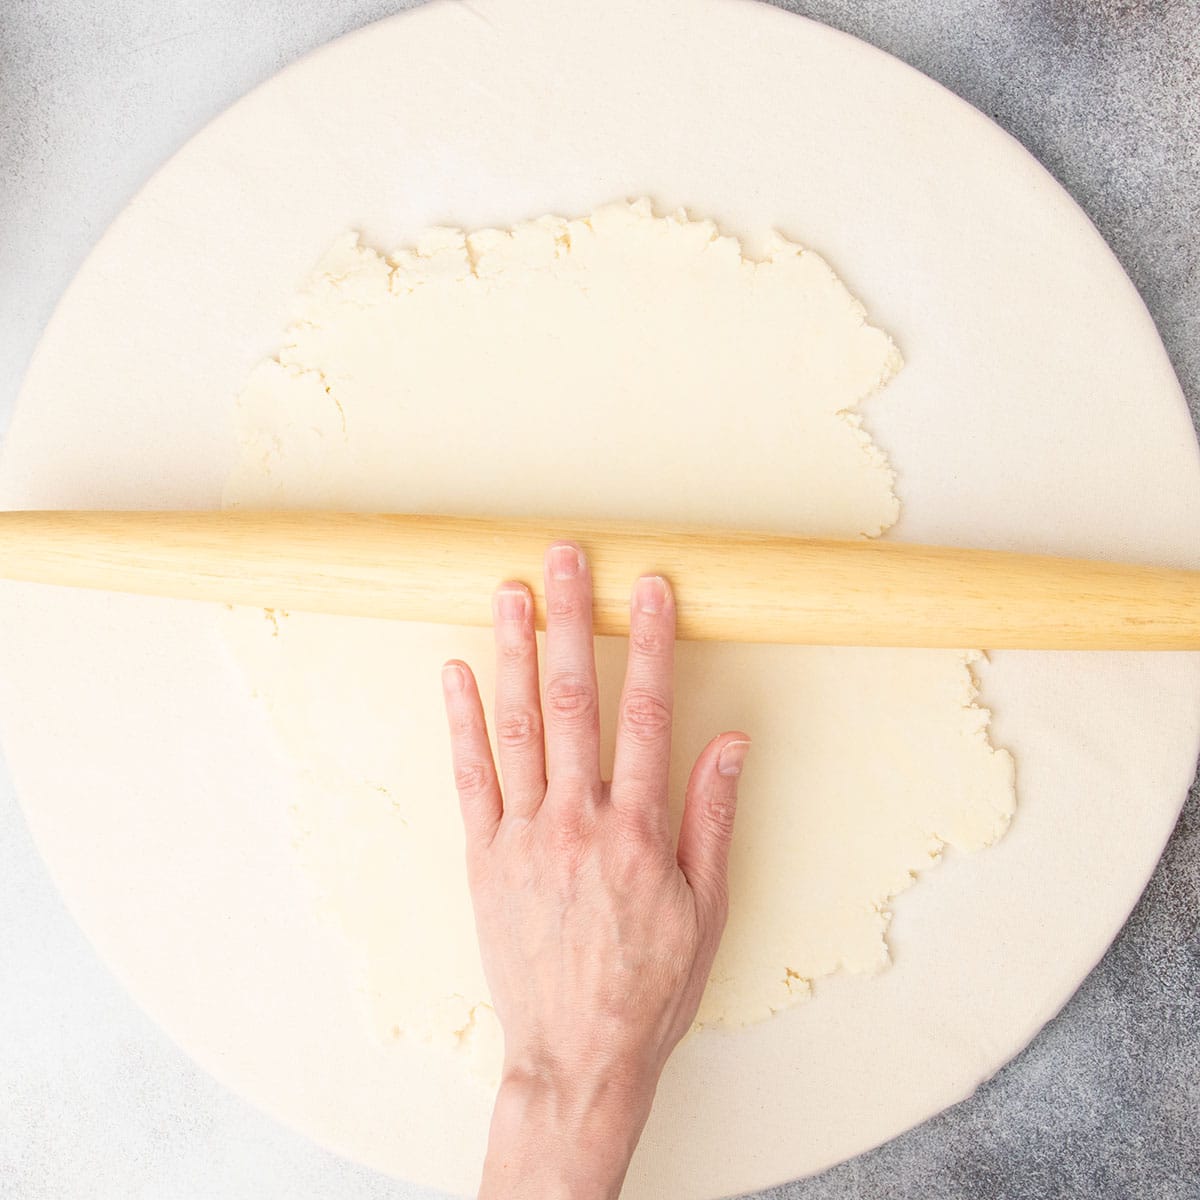
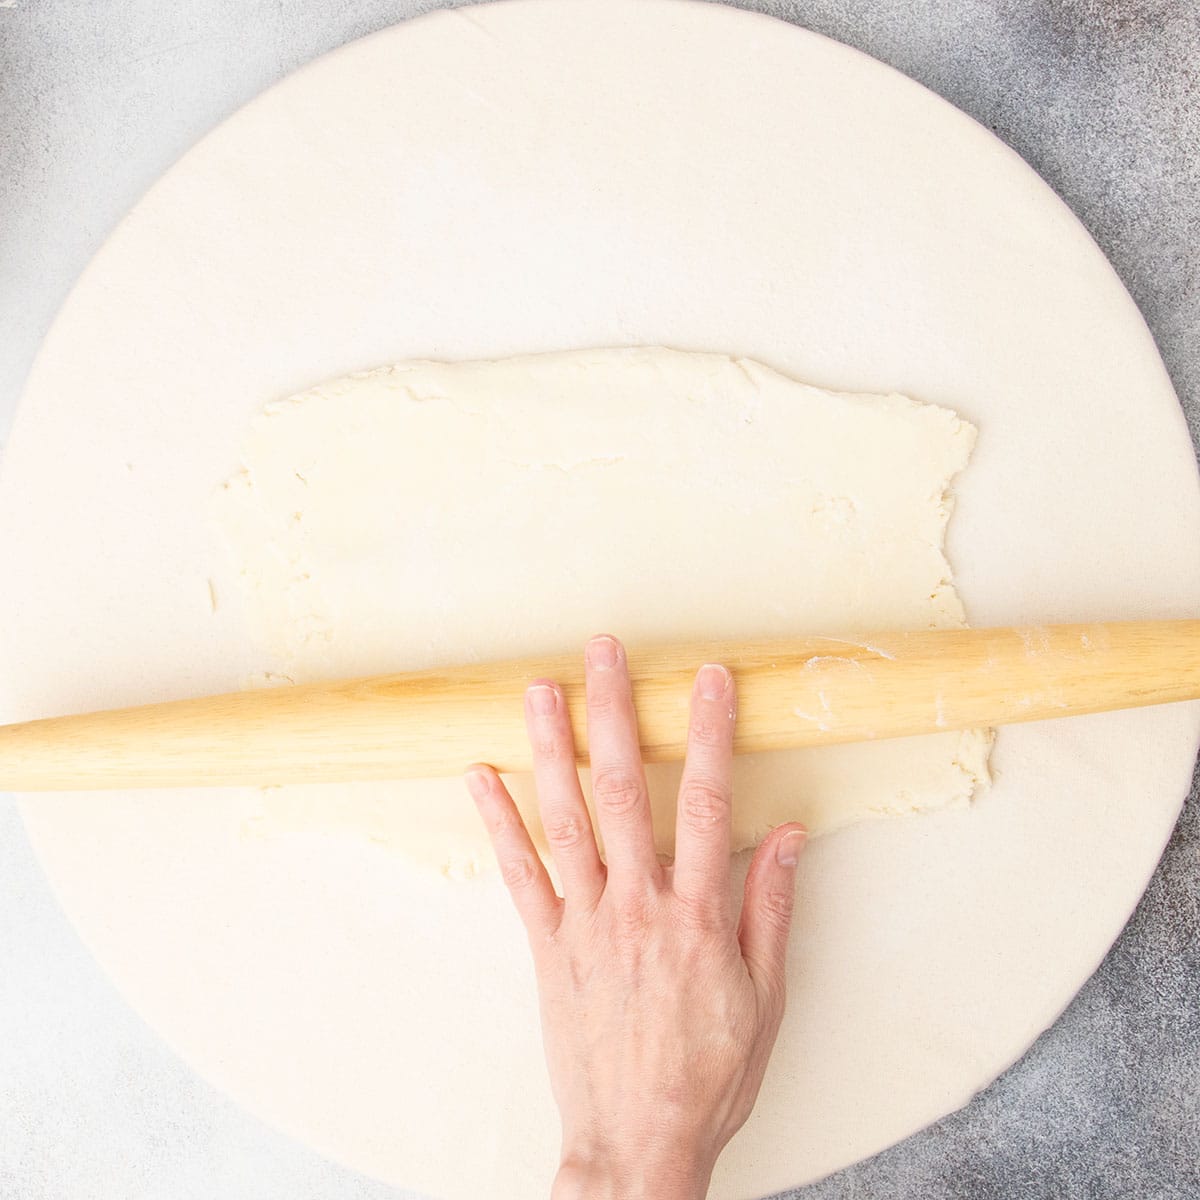
Roll out the cold dough
Place the cold disk of dough on a lightly floured surface, and dust it very lightly with just enough flour so it doesn't stick to the rolling pin. Use a clean rolling pin (or one lightly dusted with flour) to roll out the dough into a rough rectangle. If you've chilled the dough for too long, it may crack as you roll it out. You can let it warm up a bit before you continue.
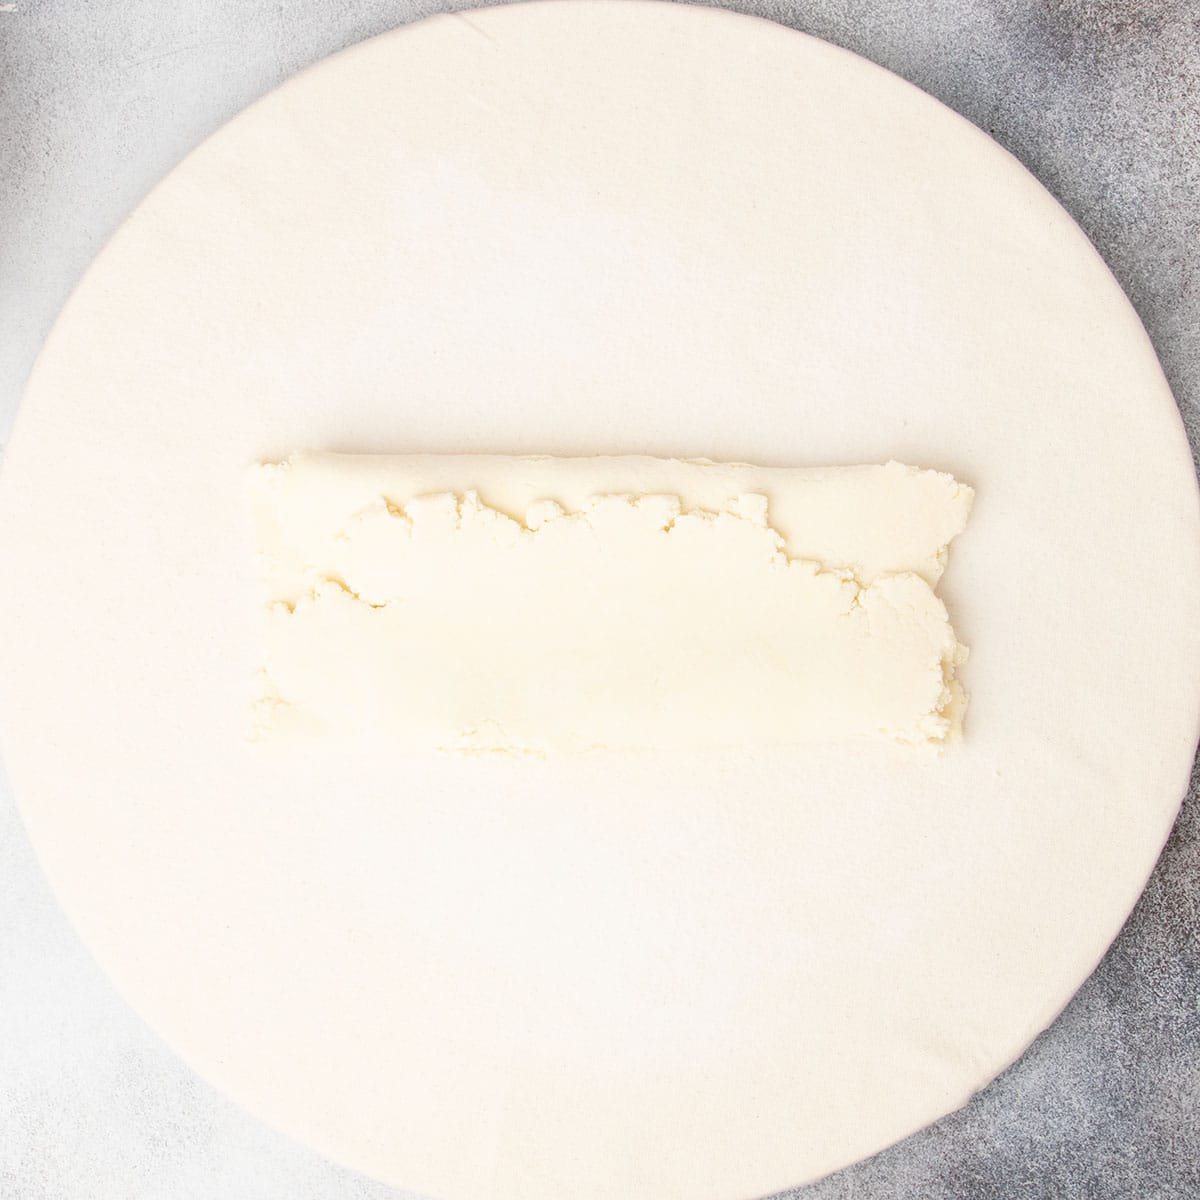
Laminate the dough with folds and rolling
Fold the rough rectangle of dough over on itself in thirds like you would a business letter. Roll it out the same way into a rectangle, then roll and fold once more. Repeat once more for a total of 3 folds.
This process is called lamination, and each process of rolling and folding (called a “turn”), multiplies the layers of butter encased in floury dough, similar to the process of making gluten free puff pastry.
Chill the crust as needed
If the butter starts to melt or the dough feels soft at any point, rewrap and chill again before continuing. Fold the laminated dough into a square, press to seal, and shape into a round disk. You can wrap store refrigerate or freeze the dough now to use another time.
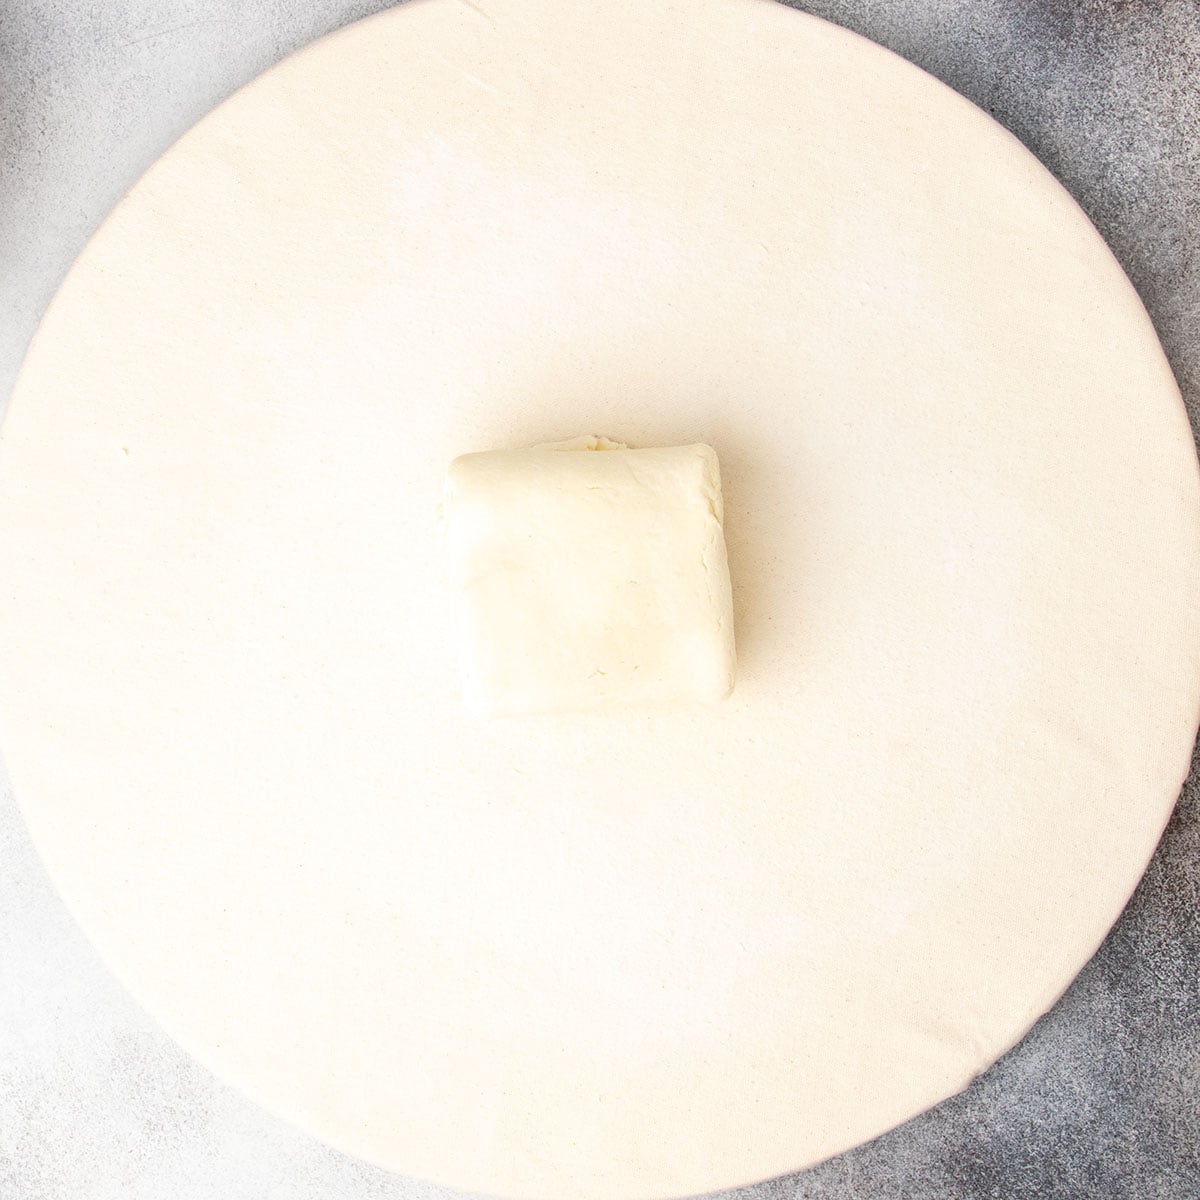
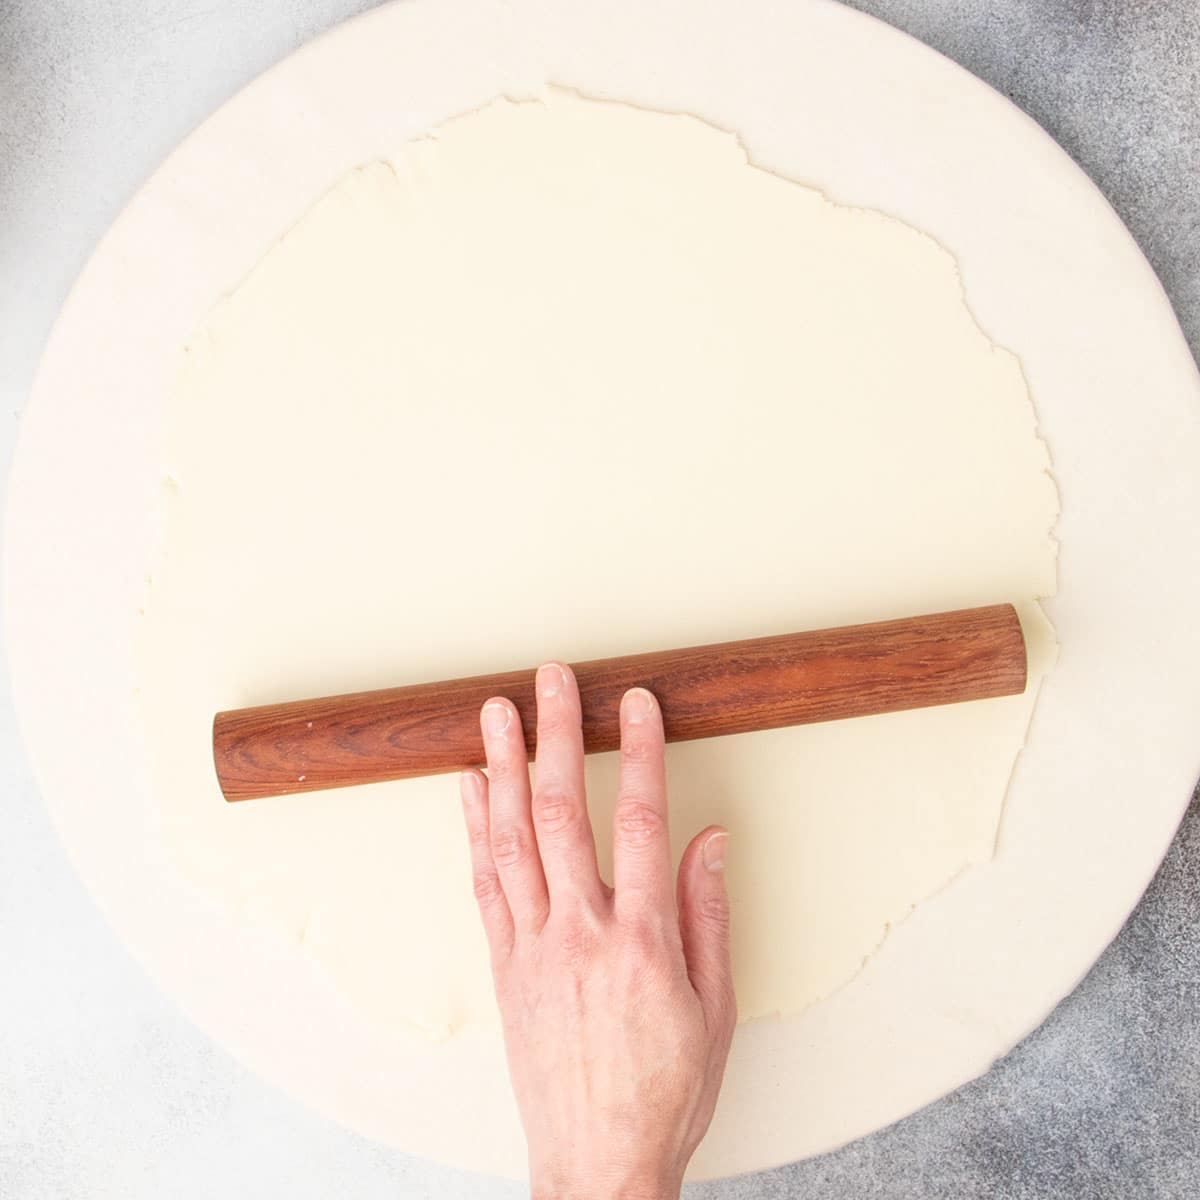
Create a round
If you're ready to use the crust, place the dough packet on a lightly floured surface and sprinkle it lightly with more flour to prevent sticking.
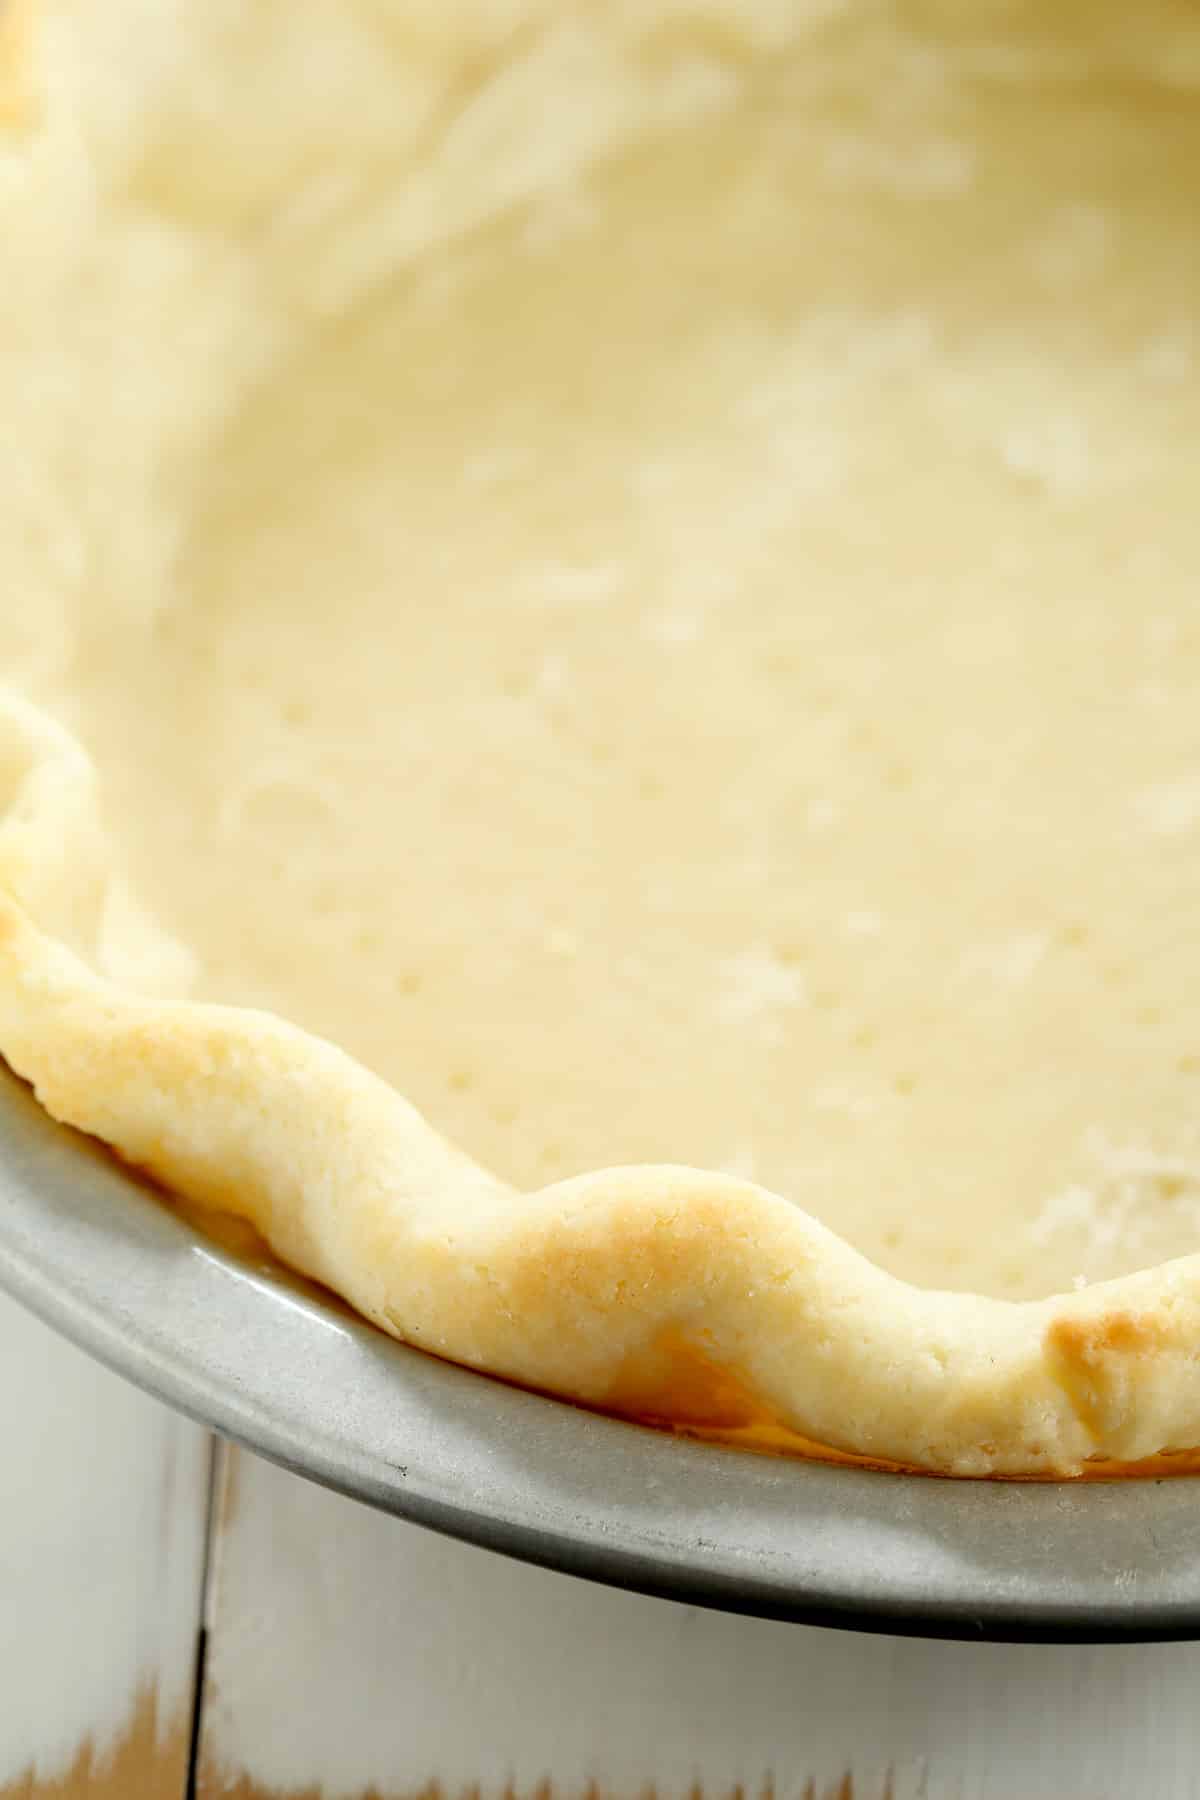
Use a rolling pin to roll the dough into a round about 2 inches larger than the dish you're baking it in. That will give you enough crust to press it into the bottom and sides of the dish without tearing it. It will be between 3/8-inch and 1/4-inch thick, depending on the size of the baking dish.
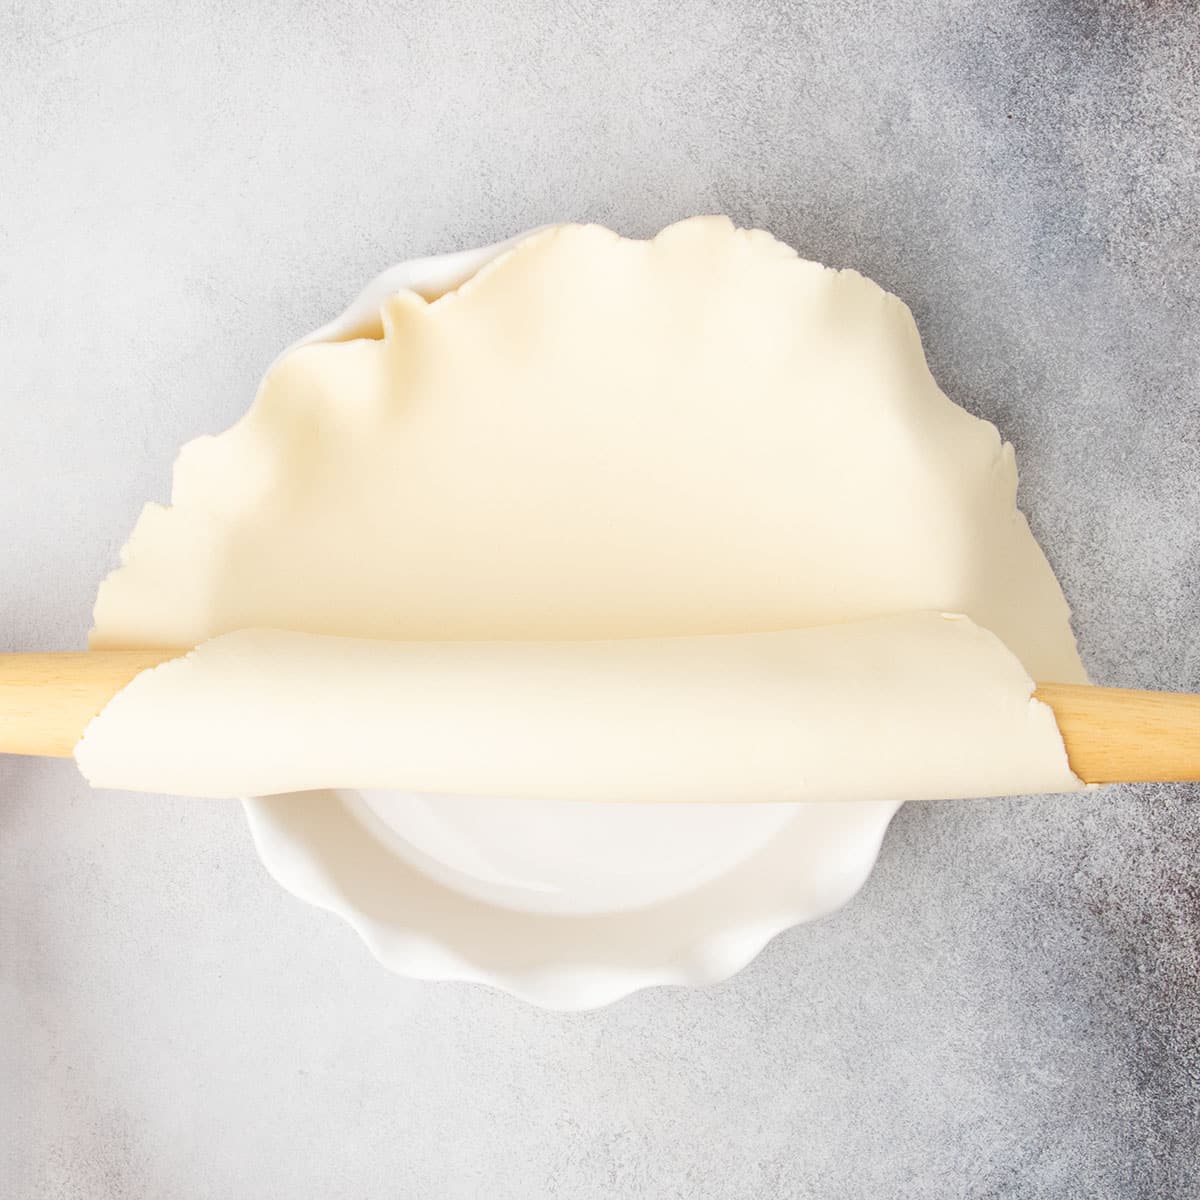
Transfer the crust
We roll the crust gently over the rolling pin to transfer it to the baking dish without stretching it. Flour the rolling pin lightly, hold it above one edge of the round pie crust, and roll the crust loosely onto it. Unroll the crust over a prepared pie plate, positioning the center of the crust over the center of the plate as best you can.
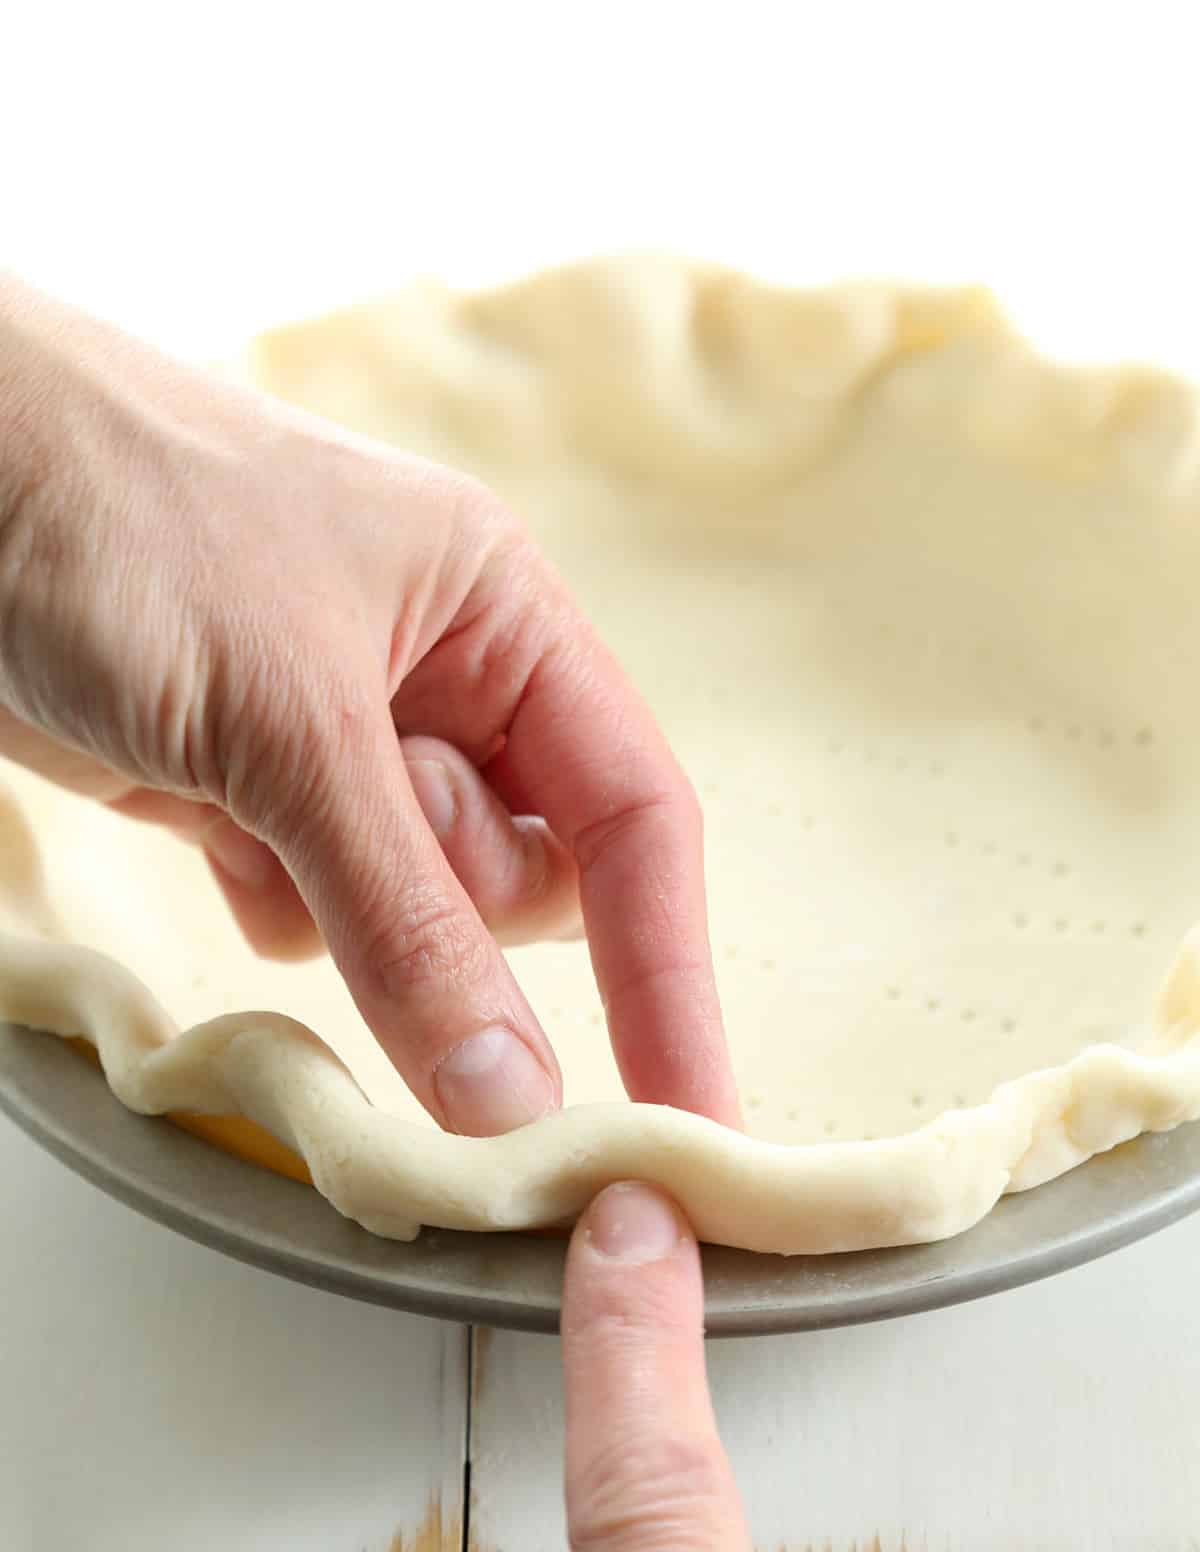
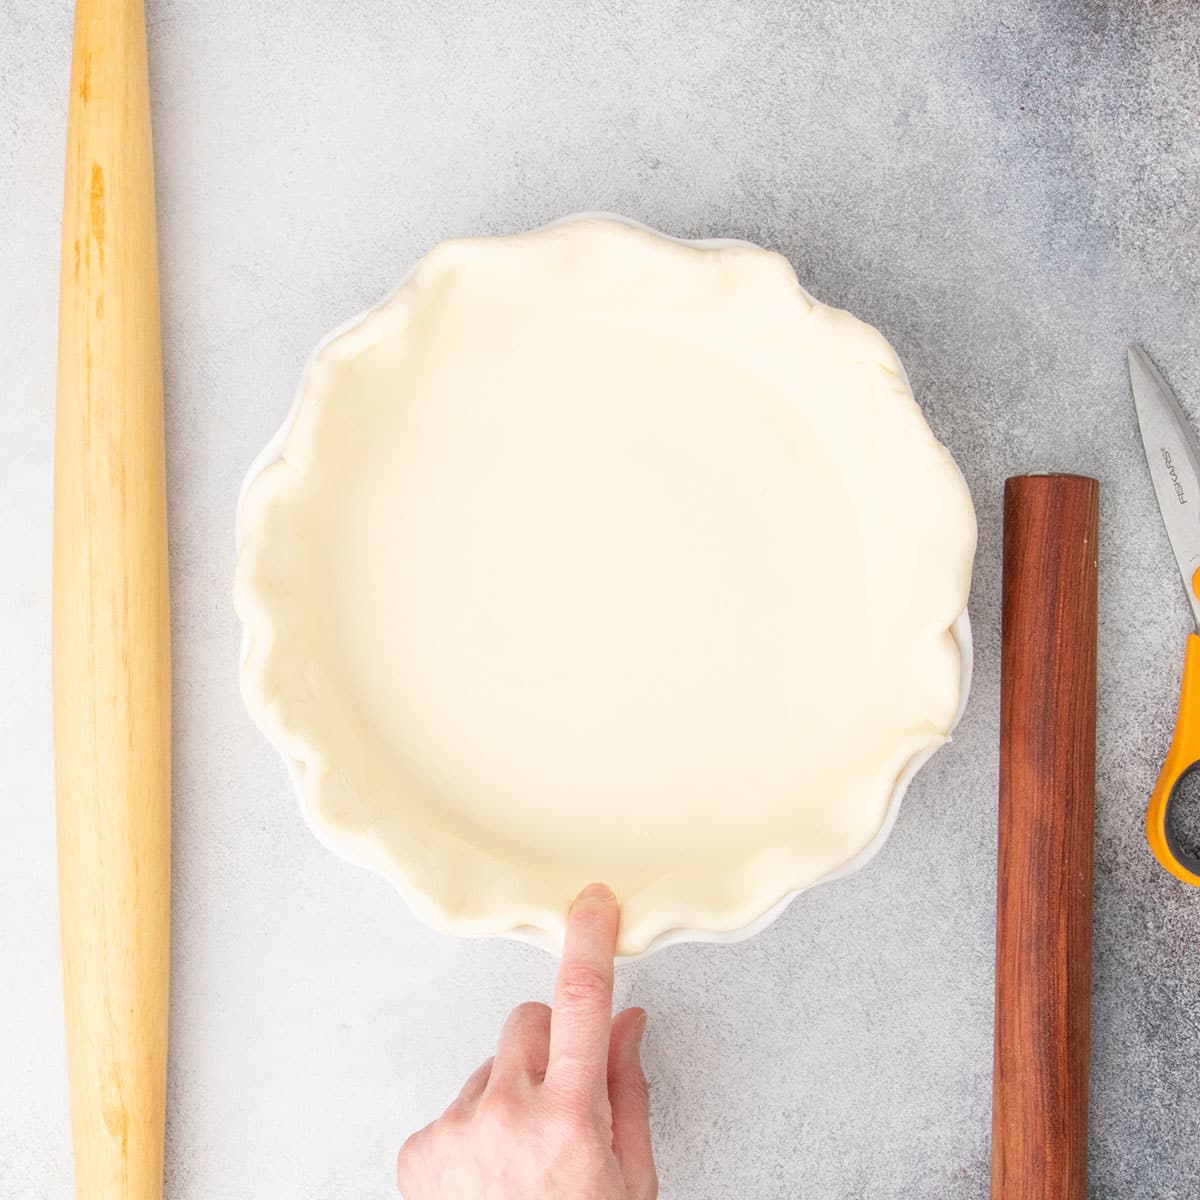
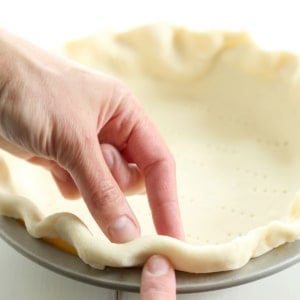
Shape the crust
Gently lift the edges to allow the dough to settle into the corners of the plate without pulling at all. Tuck the overhanging edge under itself and crimp as desired. Chill the shaped crust in the fridge, covered, for at least 30 minutes, and up to 3 days.
How to parbake the crust
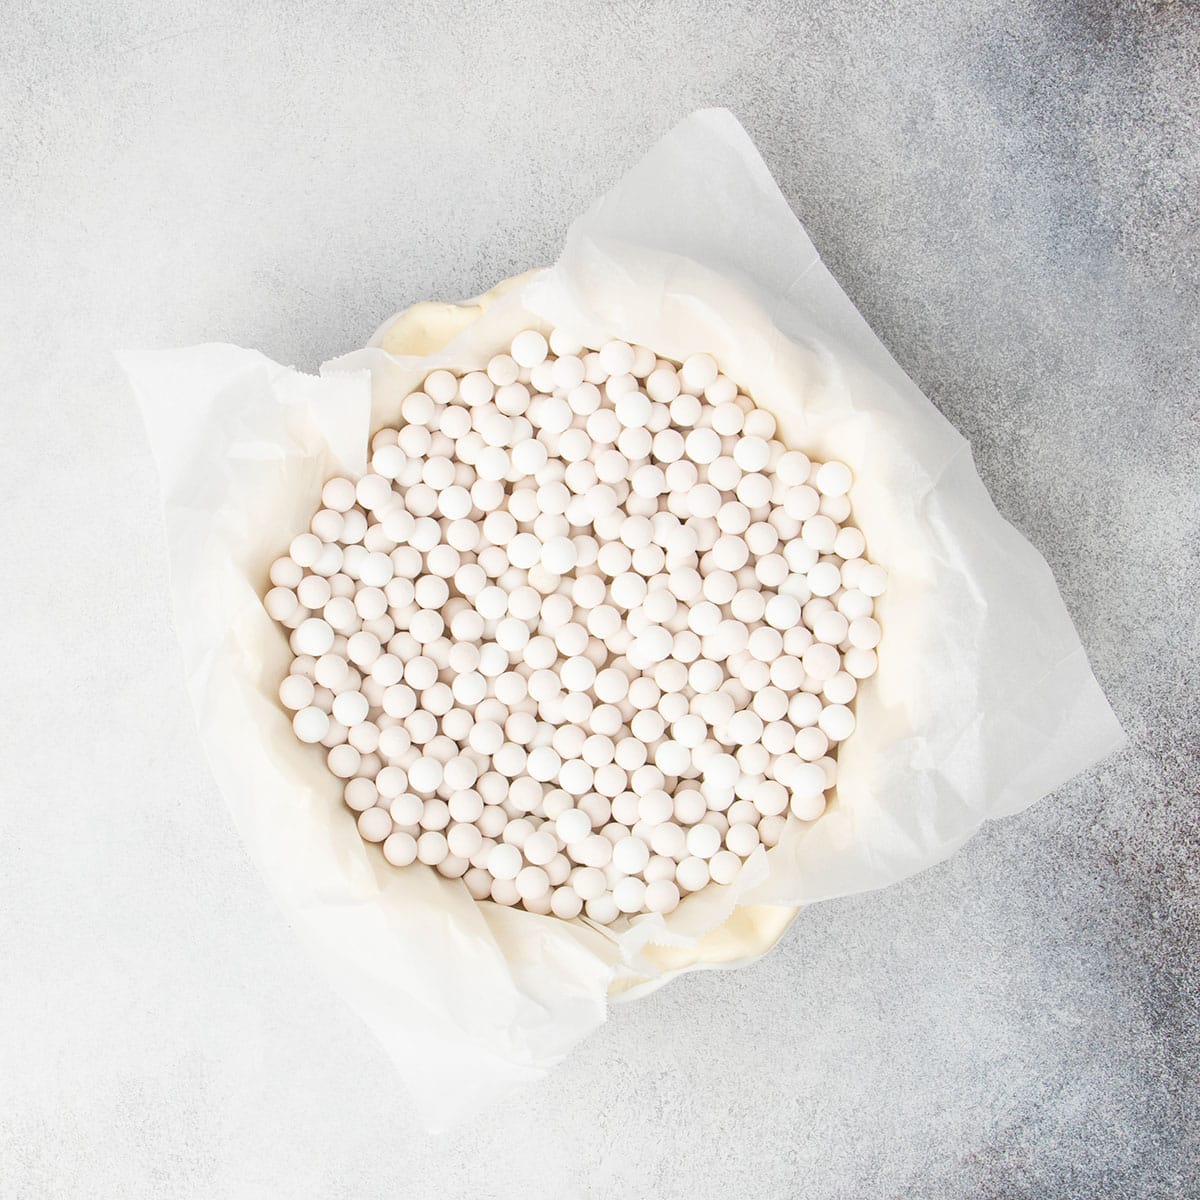
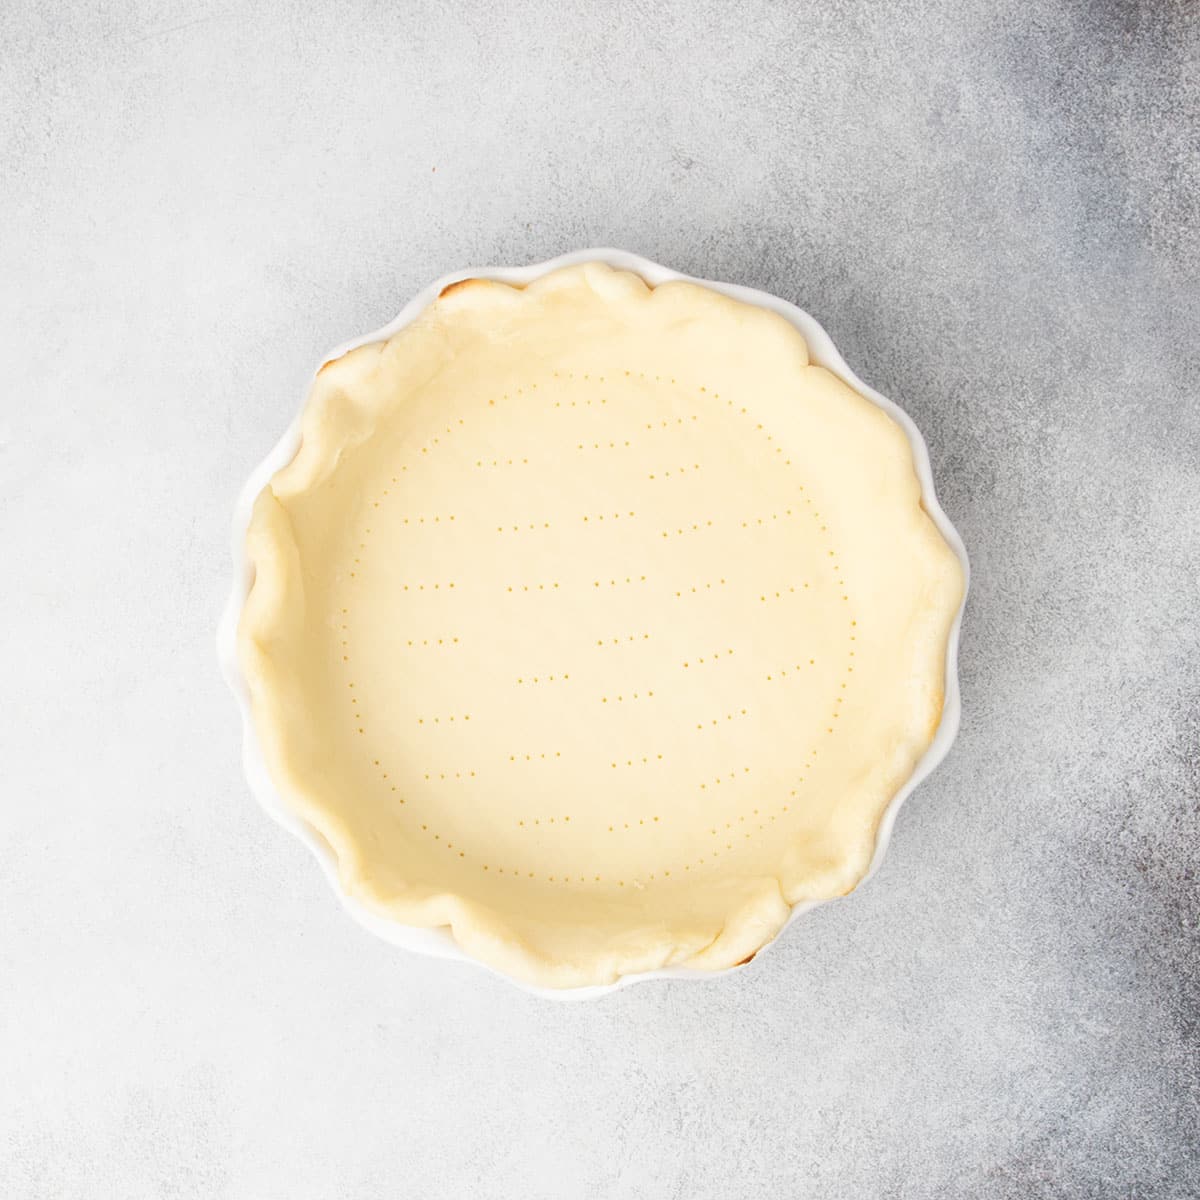
If the pie recipe you're using calls for parbaking, or partially baking the crust before filling it, here's how you do it. Pierce the bottom of the chilled crust in the pan all over with a fork to prevent it from puffing up in spots during baking.
Line the raw crust with parchment and fill it completely with pie weights or dried beans to keep it from shrinking down the sides or forming irregular air bubbles which will cause it to bake unevenly. Bake for 10 minutes at 375°F, then remove the weights and parchment. If the crust still looks shiny, brush the bottom with egg white and return to the oven for 2–4 more minutes.

Expert tips
Keep the butter big and flat
Many recipes recommend “cutting in” the butter into the flour until you have pea-sized pieces, but those pieces melt very easily when you handle the dough to shape it. For real flakiness, keep your butter in large, flat shards throughout the dough that won't melt completely and can be firmed back up by chilling the dough periodically. They’ll create light, layered pockets as they melt during baking, releasing the water in the butter as steam, separating the layers of dough from one another.
Mix by hand
Use a bowl and spoon to keep control over butter size. Food processors and mixers tend to overwork the dough and overheat the butter, making the crust dense.
Chill often
If your dough softens or the butter starts to melt while working, wrap and chill again before continuing.
Don't stretch the dough
When fitting the crust into the pie plate, gently lift and lower it into place. Never stretch—it will shrink back in the oven.
Follow your pie recipe
This recipe is only for the pie crust, not the pie. There are plenty of recipes for gluten free pies on this website such as my gluten free apple pie that will tell you whether or not you need to parbake the crust (or partially bake just the bottom crust), blind bake it (for no bake fillings, you'll bake another 10 to 12 minutes after parbaking), or bake it only once filled. If you're using someone else's recipe, follow their instructions for how, when and at what temperature to bake the crust.
Ingredient substitutions
This recipe is naturally egg-free, but if you also have to bake dairy-free, here are my suggestions for how to replace the dairy-containing ingredients in the recipe:
Butter
The best way to replace the flavor and moisture balance of butter is to use 3 tablespoons shortening and 3 tablespoons vegan block-style butter. I like Miyoko’s, Melt, or Trader Joe's brands. Do not use a tub-style vegan butter, which is mostly oil.
Sour cream
Substitute with nondairy sour cream or plain Greek-style nondairy yogurt. Or, make a water-only version. Skip the sour cream completely, increase the baking powder to ½ teaspoon, and start with 3/8 cup (3 fluid ounces) ice water. Add more ice water by the teaspoon as needed to just the dry patches.
Storage instructions
For the raw dough
No matter how long you store the dough, make sure none of it is exposed to the air or it will quickly become too dry to shape. For short term storage, wrap the dough tightly in plastic and refrigerate for up to 3 days.
For longer storage, wrap the dough in plastic and in a zip-top bag, and freeze for up to 2 months. Thaw overnight in the fridge, then let sit at room temperature for 10 minutes before rolling so it doesn't crack.
For a shaped crust
Roll out the crust and shape it in the pan that you'd like to bake it in. Wrap the pan tightly in plastic wrap and then in a zip-top bag, and freeze it for up to 2 months. You can bake it straight from frozen, but you'll need to add 25°F to the oven temp for the first 10 minutes, then reduce to 375°F.
For a parbaked crust
A partially baked crust is best used the same day. If needed, cool completely, wrap tightly, and use within 24 hours.
Gluten Free Pie Crust Recipe (Extra Flaky)
Equipment
- Rolling Pin
- Pie weights enough to fill your pie crust
Ingredients
- 1 ½ cups (210 g) all purpose gluten free flour blend, (See Recipe Notes) plus more for sprinkling
- ¾ teaspoon xanthan gum, omit if your blend already contains it (use a heaping 3/4 teaspoon)
- ¼ teaspoon baking powder
- ½ teaspoon kosher salt
- 6 tablespoons (84 g) unsalted butter, roughly chopped and chilled
- ½ cup (120 g) sour cream, full fat, preferably, chilled
- Ice water by the teaspoonful, as necessary
- Egg white, for brushing (optional)
Instructions
Make the pie crust dough
- In a large bowl, place the flour, xanthan gum, baking powder and salt, and whisk to combine well.
- Add the chopped and chilled butter, and use a spoon to toss to coat the flour in the dry ingredients.
- Press each chunk of floured butter between your thumb and forefinger to make flat shards of butter, coated fully in flour.
- Create a well in the center of the dry ingredients with the butter shards, add the sour cream, and mix to moisten the dry ingredients with the sour cream. The dough should be shaggy and still somewhat crumbly.
- If there are any portions of the dough that are especially dry, try to isolate them in the mixing bowl, drizzle ice water by the teaspoon on only those parts and then mix to moisten them.
- Drizzle in more ice water only as necessary to moisten lightly all of the dry ingredients. Knead the dough together with clean hands until it begins to come together.
- Turn the dough out onto a sheet of plastic wrap, and press into a disk as you close the plastic wrap around the dough. It will still seem rough.
- Place the dough in the refrigerator to chill for 30 minutes. You can wrap the dough now and store it in the refrigerator for up to 3 days, or shape and bake it next.
- Preheat your oven to 375°F. Grease a 9-inch to 10-inch pie plate generously and set aside.
Roll out the chilled dough
- Once the dough has chilled, turn it out onto a lightly floured surface, and sprinkle the top lightly with more flour.
- Roll the dough out into a rough rectangle that is about 1 inch thick, moving the dough frequently and sprinkling it lightly with flour if it begins to stick.
Laminate the dough
- Fold the dough over on itself in thirds like you would a business letter. This is called one "turn."
- Sprinkle the dough again lightly with flour, and roll out the dough once again into a rough rectangle about 1 inch thick. Fold again in thirds.
- Working quickly, sprinkle the dough lightly with flour, and roll out once more into a rough rectangle, for a total of 3 times.
- Fold the dough in thirds again, then fold in the sides to make a square packet of dough. Press the dough together, and try to round the sides into a disk.
- If the dough feels warm at all, or like the butter is melting, cover it with plastic wrap and chill it until the butter is firm again.
Shape the dough in the pie plate
- Roll the dough out into a round about 2 inches larger than the diameter of the baking dish you're using. It will be between 1/4-inch and 3/8-inch thick. Roll from the middle to the edges in every direction to help create a round. If the dough splits on the edges, pinch them together.
- Roll the pie crust loosely onto the rolling pin and then unroll it over a greased pie plate.
- Trim any especially rough edges of the crust with kitchen shears or a sharp knife. Lift up the edges of the pie crust gently to create slack in the crust, and place the crust neatly on the bottom and up the sides of the pie plate.
- Tuck the excess pie crust under itself along the perimeter of the crust, where it overhangs the pie plate. Crimp the edge gently all the way around the crust by pinching the dough at regular intervals with one hand, and creating a crimped impression with the forefinger of the other hand.
- Cover the pie crust with plastic wrap and place it in the refrigerator to chill until firm, at least 30 minutes (and up to 3 days).
Parbake the crust (See Recipe Notes)
- Remove the pie crust from the refrigerator, then remove the plastic. Pierce the bottom and halfway up the sides of the pie crust all over with the tines of a fork.
- Place a sheet of parchment paper on top of the raw crust and fill the crust with pie weights or dried beans. This will help keep the bottom from expanding and the edges from falling down into the pie dish.
- Place the plate in the center of the preheated oven and bake for about 10 minutes, or until the crust is just beginning to turn very lightly golden brown on some edges.
- Remove the pie weights and parchment. The bottom of the crust should be less shiny but not browned. If it's still shiny, brush the bottom of the crust with the optional egg white, and return the pie crust to the oven and bake for another 2 to 4 minutes.
- Allow the parbaked crust to cool before proceeding with your pie recipe.
Video
Notes
Nutrition
Nutrition information is automatically calculated, so should only be used as an approximation.
Frequently Asked Questions
Yes! Glass works well and helps you see when the bottom crust is browned. Just keep an eye on it, since glass warms slowly but retains heat very well and can cause over-baking if left too long.
You can, but it's not ideal. These tools can overmix and melt the butter. If you do use one, use large pieces of cold butter and pulse briefly to avoid losing flakiness.
Simply double the recipe or use the 2[X] option in the recipe card. Divide the dough into two disks, chill, and roll separately.


This crust is amazing! Thank you for sharing it. It turned out perfect on my first try. Thank you for giving this GF girl a pie crust that is as good as any pie crust I’ve ever had!
That’s so awesome to hear, Allie! I love the way you put that, and thank you for sharing your experience!
I was misdiagnosed with celiac and lived without gluten for a few years. After trying nearly 12 different recipes, this one is the best. Every recipe in this book is the best. I still use this recipe multiple times a year even now that I eat gluten again. It’s that incredible. Dare I say it’s my favorite galette crust recipe of all time? Yes, I will. For both savory and sweet! Yum.
Oh wow, Molli, that’s quite the endorsement! I’m so so glad you love this crust. Thank you for sharing that!
ccan you make this in a glass pie pan
Hi, JoAnne, yes, please see the text of the post in the FAQs under the question “Can I use a glass pie pan for this recipe?” I hope that’s helpful!
Hello Nicole! Thank you so much for your recipe! Looking forward to making it for Thanksgiving. Can I make it along with a pumpkin pie filling from a different recipe and bake it with the filling inside? Or should I cake the crust before I put the filling? Thank you!
Hi, Janelle, You’re very welcome! If you’re following someone else’s recipe for pumpkin pie, I would use their recipe for instructions on how to prepare the crust. If you’d like my advice on how to prepare the crust beyond the raw, shaped dough, I’d recommend following my recipe for gluten free pumpkin pie. I hope that helps!
Perfect thank you so much! Happy Thanksgiving to you and your family! God bless.
I have only glass pie plates. What can I expect how this will affect the results?
Hi, Laura, please see the text of the post in the FAQs under the question “Can I use a glass pie pan for this recipe?” I hope that’s helpful!
Should I parable the gf crust for a pecan pie?
If you’re not using my recipe for gluten free pecan pie, Lorene, please follow the recipe you are using. This recipe is just for the crust, and there’s no universal rule for when to parbake a crust. I hope that helps!
I’m an experienced baker & I understand GF baking is a learning curve but this pie crust was very difficult to work with. After rolling it out it looked fine but when I tried to pick it up it just crumbled. After trying twice I ended up pressing it into the pie plate.
I have found that in my regular pie crust recipe if I just substitute GF flour it works out better than the mess I had with your recipe.
What do you think I did wrong?
I understand how frustrating it can be when a recipe doesn’t turn out as expected. I’m sorry you’re having that experience. Even though we intend to faithfully follow a recipe carefully, we all have habits in the kitchen that we think don’t matter, but do end up affecting the end result.
Here are some of the ways that I’ve found over the years it’s common to run into trouble:
Did you make ingredient substitutions, particularly the gf flour blend? Unfortunately, they’re not all created equal, and some I actively recommend against. Sadly, some of the most readily available, most affordable blends like Bob’s Red Mill create poor or at best inconsistent results. Please see the AP GF flour blends page on the blog, which is linked in every recipe that calls for one for full info on what blends I recommend, which to avoid, and how to make your own “mock” version of my favorite blends if you can’t access the readymade ones.
With this recipe in particular, did you follow the instructions for keeping the butter cold and in larger pieces? If it melted, or you used a substitute that comes in a tub, the recipe won’t work as no pastry will work without cold, solid fat.
Did you measure by weight, not volume? I wish we could get accurate measurements by volume, but I’d get a different amount every time, even using the same measuring cups. It’s just not possible to avoid human error that way, and cup sizes are just not standardized in the U.S., at least.
Again, I really hope these troubleshooting tips are helpful, and that you’re able to use the recipe successfully. I know how much we all miss our old favorites, and I work really hard to try to help bring them all back.
Hi – I used King Arthur measure for measure flour, yes the butter was cold I cut in the butter to pea size lumps is that too small? And I used a cup measure not weight.
The best luck I’ve had so far with GF pie crust is just substituting KA measure for measure flour in Martha Stewart Pate Brise pie crust recipe.
I’ll keep experimenting. Thanks
I’m afraid I do recommend against that flour blend, Nickie. And measuring by volume will never provide accurate results, as it seems like you suspect. Please see the all purpose gluten free flour blends page for full information on my recommended blends and how to use them. My recipes are very specific and provide superior results, but also require a lot of precision. If that isn’t for you and you’re happy with that blend in another recipe, then I think that’s great and you should keep doing it!
May I use Nicole‘s best flour as is in this recipe or do I need to modify it by adding corn starch? Thanks!
Hi, Stacy, yes definitely, I love this pie crust with Nicole’s Best! The blend has cornstarch, but not an overabundance of it, so I would follow the recipe and add cornstarch as a separate ingredient. I’ve also made the recipe using Nicole’s Best and replaced the cornstarch with more Nicole’s Best, and I like it a tiny bit better with the added cornstarch. Just be sure to add heaping (overfull) 3/4 teaspoon xanthan gum to the flour blend for a single recipe.
Sorry to be so technical – if I use the better than cup for cup recipe/template, am I using Nicole’s best for 80% of my flour weight and cornstarch for 18%. ( assuming the 3/4 teaspoon xanthan gum is approximately 2% per the guideline?)
Thank you so much for all of your guidance during this busy time of year.!
Hi, Stacy, no problem I love technical. And I see now that my original response really wasn’t very clear, so I appreciate your following up and I’m sorry for that! To make things simple, I would just use Nicole’s Best for 100% of the flour blend called for in the recipe. If you’d like to lighten it a bit into a “gluten free pastry flour,” you can use 80% Nicole’s Best (here, 168 grams), 10% cornstarch (21 grams) and 10% milk powder (21 grams). Keep the amount of xanthan gum the same, not as a percentage. I hope that’s helpful, and you’re so welcome. Thank you for being kind in your questions. This time of year especially, people get stressed and don’t always remember to be kind. :)
Hey there! I noticed your comment on another recipe regarding a change to Cup 4 Cup’s formula. Wondering if you’ve used it to make this crust recipe since the change. I’m worried it might not turn out correctly. Thanks so much for your help!
I’m afraid I can’t stand behind the new formulation of Cup4Cup, Katie, but I haven’t tested it in every category of recipe. I would recommend using one of the other blends I recommend, or building your own “mock” blend to be sure. I’m afraid there’s nothing I can do about the reformulation, I wish I could!
Thank you for responding, Nicole. I’m sure you get so many questions during the holidays. I will play it safe and make my own blend.
Thank you so so much for your understanding, Katie. I do have to stay on my toes during the holidays and you are very kind to acknowledge that. I was so disappointed to hear that they changed Cup4Cup, and even though I sell my own blend, if I could convince them to change it back, I would!
I noticed that you didn’t include Mock Better Batter in your recommended flour blends to use. Is it fine for me to use it,or is it better to use the ones you recommended?
Hi, Samuel, you can always use mock Better Batter anywhere that you can use Better Batter. And you can always use Better Batter as an all purpose gluten free flour blend in any of my recipes that call for one (including this one). But this recipe, as pastry, is just even better with a gluten free pastry flour type blend. That’s all. :)