Extra Flaky Gluten Free Pie Crust Recipe
This gluten free pie crust holds together beautifully, tastes just like the real thing, and works for everything from fruit pies to pot pies and quiche.
Servings: 1 pie crust
Equipment
- Rolling Pin
- Pie weights enough to fill your pie crust
Ingredients
- 1 ½ cups (210 g) all purpose gluten free flour blend (See Recipe Notes) plus more for sprinkling
- ¾ teaspoon xanthan gum omit if your blend already contains it (use a heaping 3/4 teaspoon)
- ¼ teaspoon baking powder
- ½ teaspoon kosher salt
- 6 tablespoons (84 g) unsalted butter roughly chopped and chilled
- ½ cup (120 g) sour cream full fat, preferably, chilled
- Ice water by the teaspoonful as necessary
- Egg white for brushing (optional)
Instructions
Make the pie crust dough
- In a large bowl, place the flour, xanthan gum, baking powder and salt, and whisk to combine well.
- Add the chopped and chilled butter, and use a spoon to toss to coat the flour in the dry ingredients.
- Press each chunk of floured butter between your thumb and forefinger to make flat shards of butter, coated fully in flour.
- Create a well in the center of the dry ingredients with the butter shards, add the sour cream, and mix to moisten the dry ingredients with the sour cream. The dough should be shaggy and still somewhat crumbly.
- If there are any portions of the dough that are especially dry, try to isolate them in the mixing bowl, drizzle ice water by the teaspoon on only those parts and then mix to moisten them.
- Drizzle in more ice water only as necessary to moisten lightly all of the dry ingredients. Knead the dough together with clean hands until it begins to come together.
- Turn the dough out onto a sheet of plastic wrap, and press into a disk as you close the plastic wrap around the dough. It will still seem rough.
- Place the dough in the refrigerator to chill for 30 minutes. You can wrap the dough now and store it in the refrigerator for up to 3 days, or shape and bake it next.
- Preheat your oven to 375°F. Grease a 9-inch to 10-inch pie plate generously and set aside.
Roll out the chilled dough
- Once the dough has chilled, turn it out onto a lightly floured surface, and sprinkle the top lightly with more flour.
- Roll the dough out into a rough rectangle that is about 1 inch thick, moving the dough frequently and sprinkling it lightly with flour if it begins to stick.
Laminate the dough
- Fold the dough over on itself in thirds like you would a business letter. This is called one "turn."
- Sprinkle the dough again lightly with flour, and roll out the dough once again into a rough rectangle about 1 inch thick. Fold again in thirds.
- Working quickly, sprinkle the dough lightly with flour, and roll out once more into a rough rectangle, for a total of 3 times.
- Fold the dough in thirds again, then fold in the sides to make a square packet of dough. Press the dough together, and try to round the sides into a disk.
- If the dough feels warm at all, or like the butter is melting, cover it with plastic wrap and chill it until the butter is firm again.
Shape the dough in the pie plate
- Roll the dough out into a round about 2 inches larger than the diameter of the baking dish you're using. It will be between 1/4-inch and 3/8-inch thick. Roll from the middle to the edges in every direction to help create a round. If the dough splits on the edges, pinch them together.
- Roll the pie crust loosely onto the rolling pin and then unroll it over a greased pie plate.
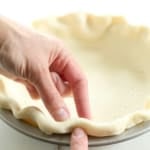
- Trim any especially rough edges of the crust with kitchen shears or a sharp knife. Lift up the edges of the pie crust gently to create slack in the crust, and place the crust neatly on the bottom and up the sides of the pie plate.
- Tuck the excess pie crust under itself along the perimeter of the crust, where it overhangs the pie plate. Crimp the edge gently all the way around the crust by pinching the dough at regular intervals with one hand, and creating a crimped impression with the forefinger of the other hand.
- Cover the pie crust with plastic wrap and place it in the refrigerator to chill until firm, at least 30 minutes (and up to 3 days).
Parbake the crust (See Recipe Notes)
- Remove the pie crust from the refrigerator, then remove the plastic. Pierce the bottom and halfway up the sides of the pie crust all over with the tines of a fork.
- Place a sheet of parchment paper on top of the raw crust and fill the crust with pie weights or dried beans. This will help keep the bottom from expanding and the edges from falling down into the pie dish.
- Place the plate in the center of the preheated oven and bake for about 10 minutes, or until the crust is just beginning to turn very lightly golden brown on some edges.
- Remove the pie weights and parchment. The bottom of the crust should be less shiny but not browned. If it's still shiny, brush the bottom of the crust with the optional egg white, and return the pie crust to the oven and bake for another 2 to 4 minutes.
- Allow the parbaked crust to cool before proceeding with your pie recipe.
Video
Notes
Flour blends
My favorite gluten free flour blends are Better Batter's original blend gluten free flour and Nicole's Best multipurpose blend. Bob's Red Mill 1-to-1 Gluten Free Baking Flour should also work, but you’ll need to add an extra ¾ teaspoon xanthan gum.
To make your own blend using one of my “mock” recipes, please see the all purpose gluten free flour blends page.
Parbaking and blind baking
This recipe is only for the pie crust, not for the pie or the pie filling. If your recipe calls for parbaking the bottom crust, follow the instructions above. If it calls for blind baking, remove the parchment paper and pie weights, and return your pie shell to the oven for another 10 to 12 minutes. If these instructions conflict with the pie recipe you're using, I would defer to that recipe.
Nutrition
Serving: 1pie crust | Calories: 1588kcal | Carbohydrates: 172g | Protein: 12g | Fat: 90g | Saturated Fat: 55g | Polyunsaturated Fat: 3g | Monounsaturated Fat: 23g | Trans Fat: 3g | Cholesterol: 248mg | Sodium: 1492mg | Potassium: 172mg | Fiber: 10g | Sugar: 4g | Vitamin A: 2816IU | Vitamin C: 1mg | Calcium: 196mg | Iron: 0.2mg
