This post may contain affiliate links. Please read our disclosure policy.

Table of Contents
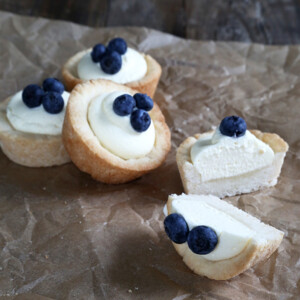
I'll admit it: I bought some sort of special pan for baking little angel food cake cups, like the kind you get in a clamshell container in the grocery store for filling with whipped cream and berries. It sits in a cabinet, unused. I knew I'd never tell you that you should buy one. You shouldn't.
And anyway I really thought I could make gluten free cookie cups using a variation on our gluten free drop sugar cookies recipe. After the wild success of that experiment, I went ahead and made the easiest no-bake cheesecake filling ever invented. No gelatin, no agar agar, nothing special—and it still sets up just right.

These cookie cups are light and not-too-sweet, and so the cheesecake filling is made to match. If you're looking for a sweeter filling, you can always add more confectioners' sugar to the filling to taste.

All you need to make the cookie cups, well other than some basic gluten free pantry ingredients, is a standard 12-cup muffin tin, and a juice glass to press the dough into the wells and up the sides. That's it.

Unlike some versions of these sort of cookie cups you might find around on the ‘net, these are not all dense and gooey at the bottom. And the filling sets up perfectly in the refrigerator, but you can serve the cups when the filling is at room temperature, too.
It doesn't need to be sliced like a regular no-bake cheesecake, so setting up is optional. It's kind of a come-as-you-are filling. Oh, and they store really well in the refrigerator for at least a few days and even travel well.
Gluten Free Cookie Cups | No-Bake Cheesecake Filling
Equipment
- Stand mixer with paddle and whisk attachments or handheld mixer
Ingredients
For the Cookie Cups
- 1 ¾ cups (245 g) all purpose gluten free flour blend, (I used Better Batter; please click thru for full info on appropriate blends)
- ¾ teaspoon xanthan gum, (omit if your blend already contains it)
- ½ teaspoon baking powder
- ½ teaspoon kosher salt
- ½ cup (58 g) confectioners’ sugar
- ½ cup (100 g) granulated sugar
- 5 tablespoons (70 g) unsalted butter, at room temperature
- 5 tablespoons (60 g) vegetable shortening, melted and cooled
- 1 (50 g (weighed out of shell)) egg, at room temperature, beaten
- 2 teaspoons pure vanilla extract
For the No-Bake Cheesecake Filling
- 2 cups (16 fluid ounces) heavy whipping cream, chilled (plus more by the teaspoon, if necessary)
- ¾ cup (86 g) confectioners’ sugar
- 1 package (8 ounces) cream cheese (in the bar form), at room temperature
- 1 teaspoon pure vanilla extract
- ⅛ teaspoon kosher salt
Instructions
Make the cookie cups.
- Preheat your oven to 350°F. Grease well a standard 12-cup muffin tin and set it aside.
- In a large bowl, place the flour blend, xanthan gum, baking powder, salt, confectioners’ sugar and granulated sugar, and whisk to combine well.
- Create a well in the center of the dry ingredients and add the butter, shortening, egg and vanilla, mixing well to combine after each addition. The dough should come together and will be soft.
- Roll the dough into balls about 1 1/4-inches in diameter, and press into disks about 1/4 inch thick. Place one disk into each of the prepared wells of the muffin tin, and press the bottom of a juice glass right into the center of the dough, forcing the dough evenly up the sides of each well.
- Remove the glass. If any of the cookie has reached above the lip of each well, press it down to avoid its burning in the oven. Using a toothpick, poke 3 evenly spaced holes in the bottom of the dough in each well.
- Place in the center of the preheated oven and bake for 12 minutes, or until the edges are very lightly golden brown and the center of each cup springs back when pressed gently.
- Remove from the oven and allow to cool for 5 minutes before carefully transferring the cups to a wire rack to cool completely. Repeat with the remaining few pieces of cookie dough.
Make the filling.
- Transfer 2 tablespoons of the cream to a small bowl and set it aside.
- In the bowl of a stand mixer fitted with the whisk attachment or a large bowl with a handheld mixer, place the remaining cream and beat on medium-high speed until soft peaks form.
- Add the confectioners’ sugar, and continue to beat until stiff, glossy peaks form.
- Transfer the whipped cream to a separate, large bowl and place in the refrigerator to chill. In the same bowl, place the cream cheese, vanilla, salt and reserved 2 tablespoons cream.
- If using a stand mixer, switch to the paddle attachment (if using a handheld mixer, the beaters will be fine) and beat on medium-high speed until the cream cheese is light and fluffy.
- Remove the whipped cream from the refrigerator and add the beaten cream cheese mixture.
- Using a separate, handheld whisk, whisk the mixture together until light and fluffy, adding more cream by the teaspoonful as necessary to create a smooth mixture.
Fill the cookie cups.
- Transfer the filling to a piping bag fitted with a large open tip and pipe the filling into the wells of the prepared cookie cups. Decorate with berries or sprinkles, if desired.
- Place the filled cups in the refrigerator to chill until set (about 2 hours) or serve as is.
Nutrition information is automatically calculated, so should only be used as an approximation.



Is this a new recipe? I have 3 of your books but don’t see this exact one. Can’t wait to try this! I think it would be perfect for a wedding that is very casual, finger foods and desserts only. Better print it just in case! :) Thank you for all you do!
can it be done with regular AP flour?
The filling looks yummy. What about a chocolate version?
Ooooh! Wouldn’t it be lovely with lemon added to the filling?
Oh, my! Have to make this one.
I was wondering if you could use muffin liners to make it a little easier to remove the cookie crusts from the tin. I especially like parchment liners.
With the vegetable shortening can you use just vegetable oil in a bottle
These give me inspiration! I will be utilizing this method to make a GF Almond Joy cookie cup for Thanksgiving.
These look incredible! Going to attempt to make these for my book club meeting in a couple weeks!
They sound perfect for that, Elizabeth! They really do travel very well.
Seriously girl – these are so awesome. I see these as fabulous potluck items or something to take to the office for a treat. Wonderful! :)
What lucky coworkers, Jennifer! I have to imagine they eat quite well with you around. :)