
This post may contain affiliate links. Please read our disclosure policy.
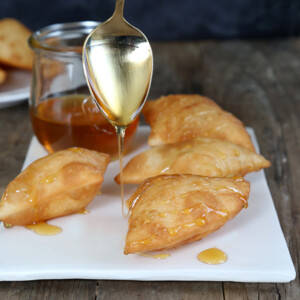
Authentic-tasting gluten free sopapillas, the New Mexican or South American fried dough, are fried to perfection and drizzled with honey.

Table of Contents
There are so many ways to enjoy these gluten free sopapillas, but my favorite is with a light drizzle of honey. In fact, I actually prefer to bite off a corner, and drizzle some extra honey right inside.
I spoke to someone recently who said that she likes to eat sopapillas stuffed with meat and cheese. Just split one open, and pile in the fixings. What a treat!

It's truly amazing how the dough puffs up into these little hollow pillows so quickly during frying. To achieve a uniform “puff” of your sopapillas, just be sure to roll the dough into a single, even layer.
Then, cut the edges sharply, leaving very clean edges. You can use a sharp knife, but a pastry or pizza wheel is easiest.

I am bound and determined to give you back allllll the foods you thought you'd never have again now that you're gluten free. Or your son is gluten free, like mine. Or your partner. Or your best friend. Or your mom. You get the idea.

If you follow these recipe instructions, and use these ingredients, you can have it all back. If you can't use all of the ingredients, I hope you'll find success using as many as you can.

Oh, and fear not deep frying! For plenty of frying tips, see the directions in this post. When you see those triangles of dough “pop” in the first few seconds of frying, you won't regret it one bit. So exciting!
Anyway, thank you. Thank you for reading. Thank you baking with these different, foreign-sounding ingredients. Thank you for trusting me enough to take a chance. I promise the rewards are great. And we've only just begun!
Gluten Free Sopapillas
Equipment
- Candy/deep fry thermometer
- Pizza wheel/pastry wheel
Ingredients
- 1 ¾ cups (245 g) all purpose gluten free flour blend, (I used Better Batter; please click thru for full info on appropriate blends)
- ¾ teaspoon xanthan gum, (omit if your blend already contains it)
- ¼ cup (36 g) Expandex modified tapioca starch, (See Recipe Notes)
- 1 teaspoon kosher salt
- 2 teaspoons baking powder
- 2 teaspoons (8 g) granulated sugar
- 2 tablespoons (28 g) vegetable shortening, melted or neutral oil (like canola or vegetable oil)
- ¼ cup (2 fluid ounces) milk, at room temperature
- ½ cup (4 fluid ounces) lukewarm water, plus more by the teaspoon as necessary
- Oil, for frying
- Honey, for serving
Instructions
- In a large bowl, place the flour blend, xanthan gum, Expandex, salt, baking powder and sugar, and whisk to combine well.
- Create a well in the center of the dry ingredients and add the melted shortening or oil, milk and water and mix to combine until the dough comes together.
- With clean hands, squeeze the dough together into a ball. It should hold together well, and not be so stiff that it is hard to knead.
- If it is hard to knead, add more water by the teaspoonful, kneading it in after each addition, until the dough is pliable but still holds together very well.
- Transfer the dough to a large piece of plastic wrap, and wrap tightly. Allow to rest at room temperature for 15 minutes.
- Unwrap the dough and divide it into 7 equal portions.
- On a large, flat surface, roll each piece of dough into a ball and, with a rolling pin, roll into a round about 6 inches in diameter and about 1/4-inch thick, and cut off the rough edges with a 6-inch cake cutter. The lid of a pot in the proper size should work, too. It is important to roll the dough out very evenly, and for each round to have very clean, well-defined edges. This helps the sopapillas to puff up during frying.
- Using a pizza or pastry wheel, or a very sharp knife, slice each round carefully into 4 quarters.
- While the dough is rising, place 2 inches of oil in a heavy-bottom saucepan or deep fryer.
- Clip a candy/deep fry thermometer to the side of the saucepan, and bring the oil to 375°F. Place the quarters of dough in the hot oil, taking care not to crowd them at all.
- Within the first few seconds, the should float to the top and expand as they fill with air.
- As soon as they “pop,” turn the over using tongs or chopsticks, and fry until lightly golden brown on both sides (30 to 45 seconds per side).
- Remove the dough from the oil, and place on paper towel-lined plates to drain.
Notes
Nutrition information is automatically calculated, so should only be used as an approximation.


I own all three cookbooks and I love them dearly, but Bakes Bread is the only one I’ve not baked from. This isn’t because I don’t like the recipe… but because I’m afraid. I know that’s silly, but I’ve had so many recipes fail and have spent so much money on flours that I just can’t build up the courage to spend more money on things I’ve not used before. I’ll get there, I know I will, and I want to thank you for doing everything first. You’re brave and I hope I can be brave too.
I understand, kizzl. I really do! Yeast bread-baking is intimidating to many. You’ll get there, and when you do, I’ll be here for you. We all will!
I felt the same way truly. Watch the videos online and just give it a go. You have to just jump right in and go for it. I did and I’m so glad I did!
Kizzi, Go for it! I was petrified because I never made bread – never mind GF bread. I finally gave in and did it and have not regretted it at all! Start with the English Muffin bread. I have to say, even my “failures” (didn’t rise) tasted better than what is in the supermarkets. I have not given up! I figured out the rise issue thanks to to someone who posts here (was it Donia?–CRS moment). I am scared of the “No Rye Rye” starter. I need to bite that bullet next because I want a Reuben and pastrami on rye!
I started with pancakes and now that I have mastered them, I’m empowered to move to other more complicated stuff. As Nicole says, it just takes a bit of practice with the weighing and measuring. I really do think having my tub of supplies has made it a lot less intimidating. So far, my “failure” on the lean white bread was the same as Mare’s – very tasty, but just didn’t rise.
If you are already using Better Batter, it’s easy to make the bread flour with it. Just use the BB as the base flour and all you have to add are the Expandex and the whey protein isolate. I make big batches and keep it in a glass jar. The ricotta and oatmeal breads are probably my favorites for basic toast, but I made the olive bread and love it with a salad. I was out of kalamatas, so used regular black olives and some jalapeno- stuffed green olives. It was amazing! I also make the pizza crust and the yeast- raised waffles all of the time.
My dear Nicole, I address you as a friend because I have been following you for so long. I too, have all of your books EXCEPT the last bread book. I cannot in good conscience use the additives you mention above. I promote cooking and baking from scratch, to avoid such things. That said, I use your other books and look forward to your posts that don’t include these ingredients. I think what you do is stellar and you make me laugh. My job is pretty humorless so I look forward to your daily posts. Too bad you are in Westchester. If you were a “little bit” further north, I could/would write a Chef Spotlight for the newspaper I work for.
PS can’t wait to make the sopapillas!
While it would be lovely to use only four ingredients to bake bread like you can with wheat, you just can’t do that GF. I think the negativity you have been receiving is reflective not of the value of your book, but of people’s frustration with this fact. You can’t change the facts, though, and I am thankful for you whenever I cook. Sure, it is daunting to have an entire plastic bin of weird-sounding flours, gums, starches, etc., but now I haul out my bin and mix up my GF flour (with scale) and make my recipes with no problem. You are a gift to anyone who cooks GF. Thank you.
I think you’re right, Stephanie. In that regard, I guess I’m the bearer of bad tidings! But I strive to make things as normal as possible, including the method of making gluten free yeast bread. I feel that if it is as “familiar” as possible, people will feel more confident. But gluten is at the very heart of conventional yeast bread baking. To think that we could just take it out and carry on as “usual” without replacing it with other ingredients is just never going to happen, as you say!
I’m one who doesn’t love the bread book but with suitable modifications and a few caveats how found it very helpful and exciting. We are dairy free. finding a suitable relplacement for whole milk yogurt was an adventure. Using almond flour by weight instead of skim milk powder and I live in a very dry part of texas, invariably I have to add more moisture. usually just a tablespoon of two but in july of august i may need as much as a1/4 cup or more! I don’t have anything with an airtght seal, that isn’t already storing flour, for the long refrigerator rises. So i just rise the breads on the counter until double then refrigerate for 15 min or so until easier to handle. For any recipe baked for 30 min or longer i just use whey isolate as I can get that pretty cheap locally anything less that 30 min i use the dairy free substitutions and handle the dough wearing vinyl gloves from the dollar store sprayed with cooking oil…… hasn’t failed me yet and the hawaiin rolls come out delicious. So I bought the book and the ingredients and made it work for us.
I’m proud of you too and I tell everyone that asks me to buy your books and get to your blog immediately. I somewhat of a cookbook hoarder and your GF books are the ones that I go to the most, are dog eared, and smeared with all sorts of crap because all the others are just weird. I still read through them but hardly use them much. Your recipes are honestly anyone should ever need when going gluten free plus more!!!
I especially love the bread as I sit here and eat my yummy ricotta bread (no cinnamon for me) with fried egg whites and cheese for breakfast. I have it EVERY.DAY. and I love it to pieces!!! Thank you for all you do and for making our lives normal.
Thank you, Jennifer! I get that there’s a hurdle to leap over. But you and I both know that it’s a one-time hurdle, and it’s well worth the leap!
Nicole, as the saying goes “you can’t please everyone all the time”. Just know that, for ME, YOU are my go to blog/person when I need inspiration for anything GF, if I have a need for another way to prepare a meal, or even just a chuckle
That means so much to me, Elizabeth! You definitely can’t please everyone. I gave up on that long ago (in my 20’s, I think!) and I’m definitely the better for it. I do wish that people could express themselves with more tact, but it appears that’s not going to happen either! I’m not gonna stop, though. I’ll just have to steel myself for the inevitable!
Nicole, I have been baking gluten free for ten years. I’ve bought the three books of yours and they are absolutely great! I love your blog and the recipes are the top of gluten free baking. And they simply work, what it cannot be said about quite many of those others made by the “no gums no thickeners” prophets. Don’let yourself be discouraged an PLEASE bake bake bake!
Oh, I hear you loud and clear, Alexandra. Every word! I’m pickin’ up what you’re puttin’ down, without any more spoken. :)
I do feel a little left behind by the revolution since the dairy-free version doesn’t produce the same results, but I am *SO* happy for everyone who can use the whey version and am *VERY* proud of you! I love the book 1 and book 2 recipes, and don’t mind gloppy batter. ;)
Thank you, Donia! No why did that choke me up a little bit?!
I’ve just ordered the book in the UK and didn’t think to read the amazon usa reviews! Oh well! Both myself and my husband have coeliacs disease diagnosed in the last 12 months and are awaiting biopsy results on our eldest child, we desperately need to find baked goods that work for us so I can’t wait to get reading and baking.
In the UK, Mary, you’ll need to use Ultratex 3 in place of Expandex. Just click on the resources page for information on how to use it!