
This post may contain affiliate links. Please read our disclosure policy.
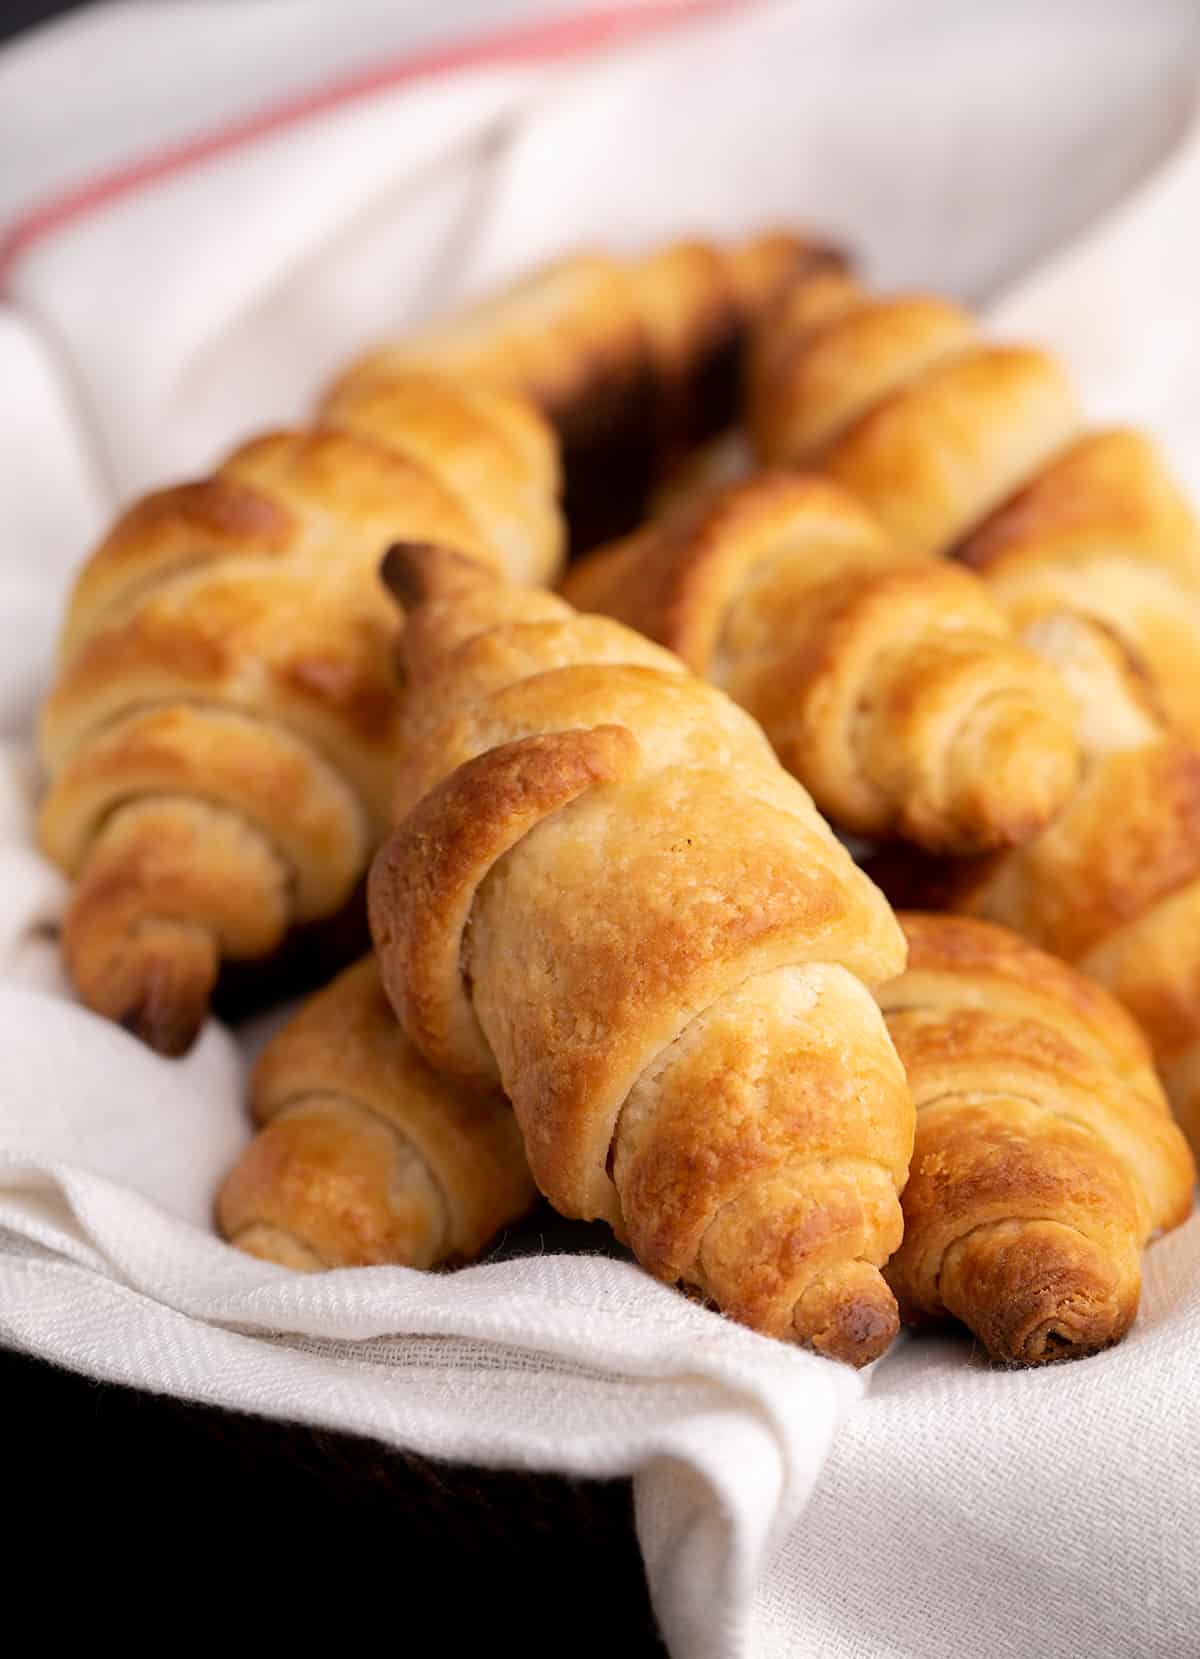
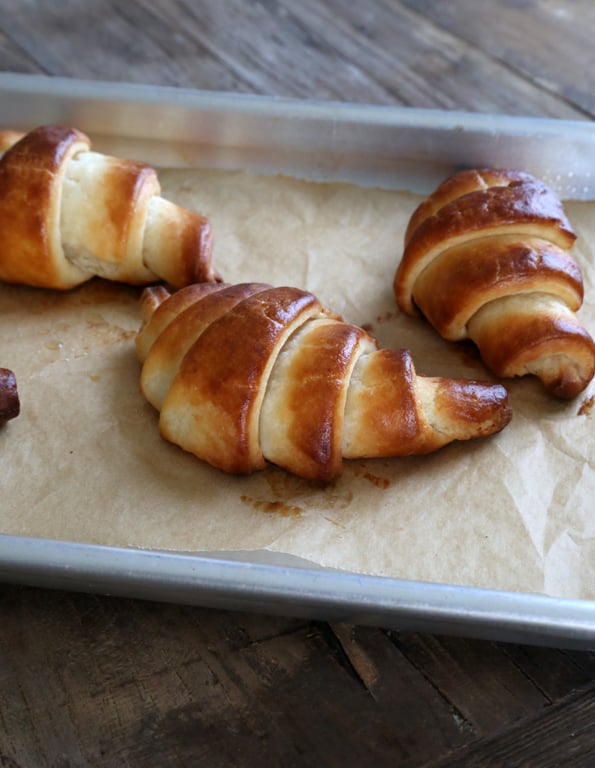
If you have ever wondered if you could make a gluten free croissant at home—whether you could really do it—this recipe is the proof that you can do it. You should do it. Here's how, step by step.
Why this recipe works
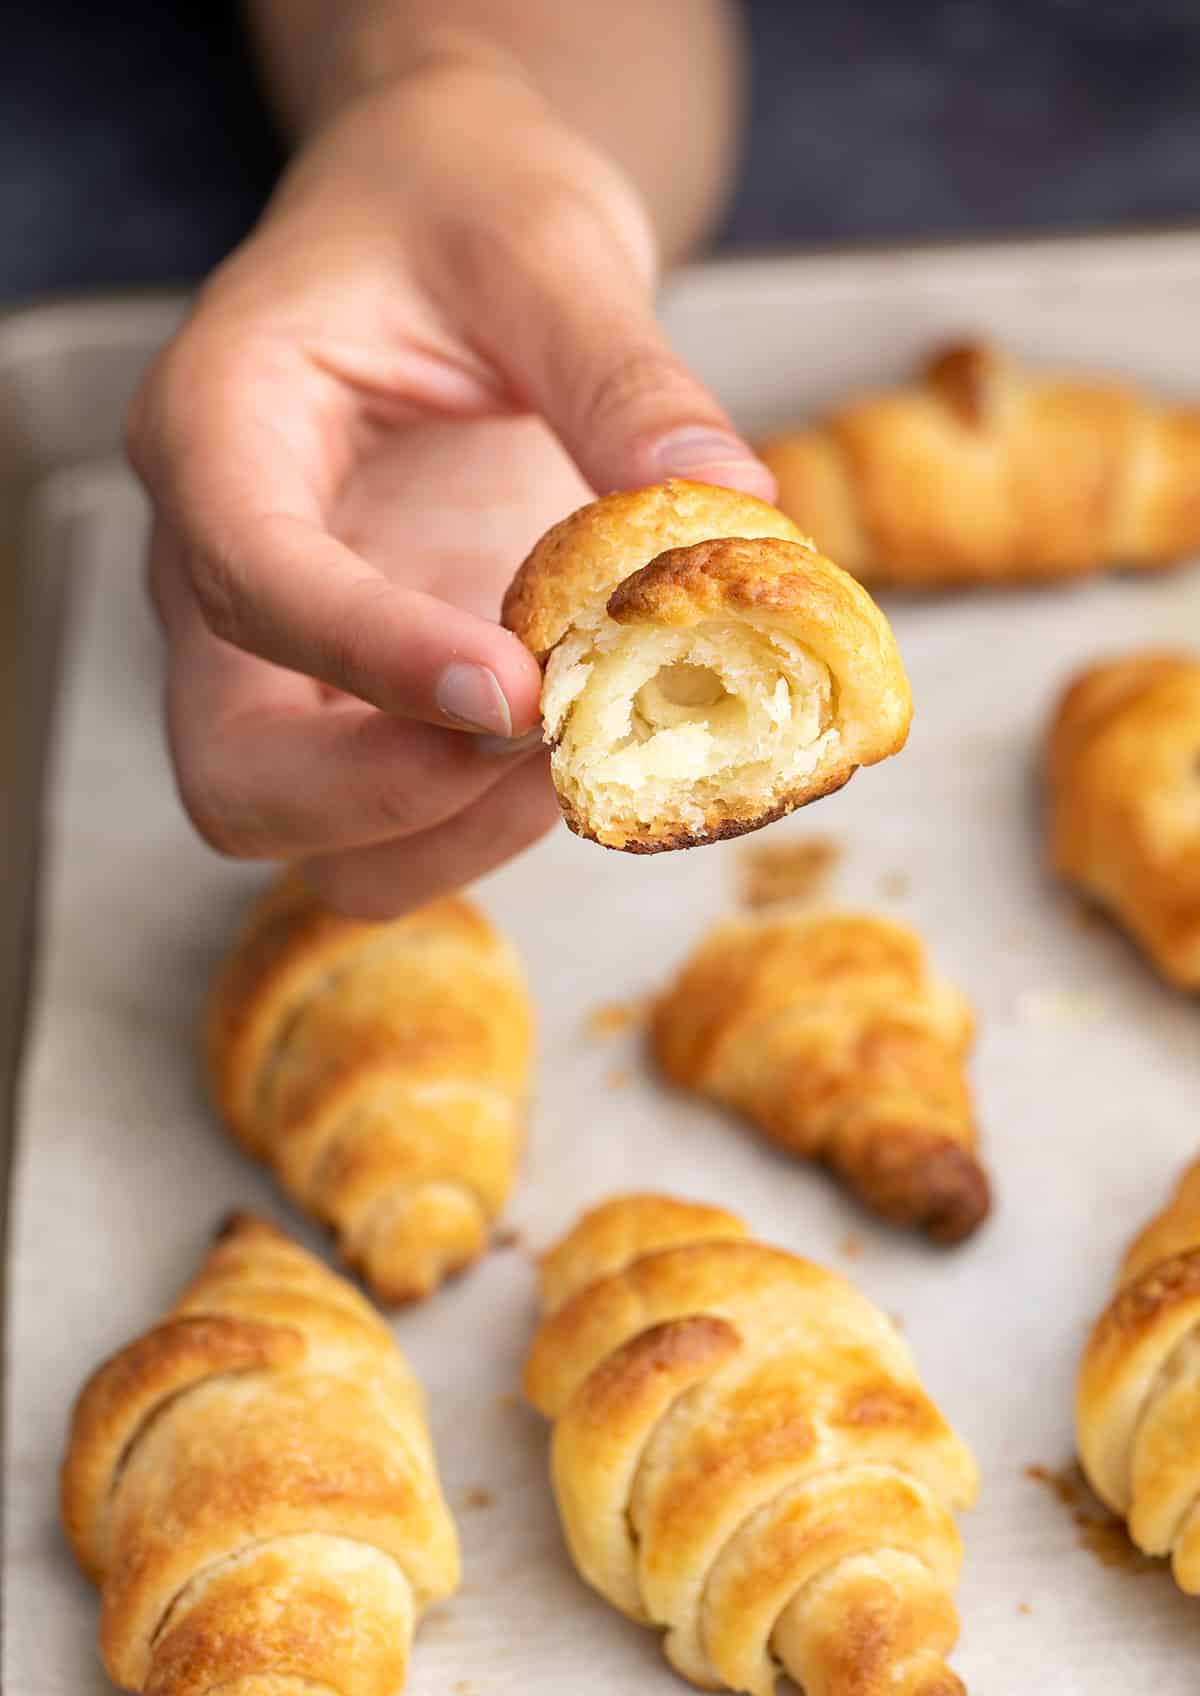
These croissants have that melt-in-your-mouth flakiness that seems intimidating, but they’re actually quite simple to make. The amount of information in the recipe card and the step-by-step photos here is not because it’s hard to make these beautiful pastries happen. It’s because it can be hard to imagine what it's like to make them, but once you see it done and the concept clicks, they're really simple to make (although they do take some time).
Believe it or not, traditional gluten free croissants are one of the most common recipes requests I have received over all the years of writing this blog. It’s not like it’s every day that I’m positively buried with requests from readers simply dying to make their own croissants, though.
It’s more like a steady drip-drip-drip of requests over the years. Over time I’ve mostly pointed readers in the direction of an old custard-filled danish recipe from years ago, since danishes are made from yeasted puff pastry, which is really what croissant dough is.
I’ve also suggested to readers that they just use my recipe for gluten free puff pastry (no yeast involved), and call it a day. After all, that's a delicious recipe that makes really flaky gf pastries.
The secret to making a perfect gluten free croissant
Traditional croissants are, indeed, made with what is essentially a yeasted puff pastry dough, making these the most delicate and flaky of pastries as they get lift both from yeast and from “laminated” dough (lamination is simply the process by which you encase layer after layer of cold butter in layer after layer of pastry dough). That’s the only time you’ll hear any “fancy” terms, though, in this whole business. Period full stop.
Read through the instructions below, stare at the step-by-step photos, and watch the video. Follow the temperature instructions to the letter (sometimes ingredients and doughs are room temperature, sometimes (usually) they’re cold), and remember that pastry dough is much less a matter of chemistry than it is a matter of architecture.
Layers and layers of butter surrounded by layers and layers of gluten free flour. The yeast gives these an extra lift over puff pastry, but really the general puff pastry architecture is what does the heavy-lifting of creating the flakiness we crave.
Think of it like this: unlike flour, butter expands as it warms. When the butter layers (created in the “turns” described below) are properly chilled, they hit the heat of the oven and puff up, forcing the flour layers up and out.
Recipe ingredients
- Gluten free pastry flour – For this easy gluten free croissant recipe, you need a pastry flour, which you can easily make yourself by combining Better Batter all purpose flour, cornstarch, and dry milk.
- Instant yeast – Yeast is what distinguishes gluten free croissant dough from pastry dough. During a proofing period, it causes your croissants to puff up, revealing all those amazing layers. Here, we use instant yeast, since it doesn't have to be hydrated in liquid first, but can be whisked right into the dry ingredients. If you only have active dry yeast, you'll need 25% more of it, by weight, and to let it proof first in some of the milk.
- Sugar – There's only a little sugar in this gluten free croissant recipe to “feed” the yeast.
- Salt – Salt is a must to complement the intense buttery flavor, and to control the yeast.
- Butter – This is the star of the show. It's what gives you that incredible flavor and mouthfeel, but as the gf croissants bakes, it's also what releases steam for maximum flakiness.
- Milk – This is the liquid that brings the gluten free croissant dough together.
- Eggs – We only need one egg for this gf croissant recipe, to brush on before baking, so you can achieve a rich, golden brown crust.
Equipment needed
- Large mixing bowl
- Rolling pin
- Parchment paper
- Plastic wrap
- Pastry cutter or pizza cutter
- Baking sheets
- Basting brush
Expert tips
Don't rush the process
It's takes time to make croissants, and if you try to rush the process by skipping the several refrigeration steps or reducing the number of turns, they won't turn out.
The first time you decide to make gluten free croissant rolls, set aside a weekend. Give yourself plenty of time to get familiar with the preparation steps and practice, practice, practice. It's the only way you'll build the confidence and skill to do these right.
Splurge on the butter packet
I would argue that the butter packet is the star of this show, so I highly suggest trying a European-style butter which is made with more fat, so it's so incredibly rich and flavorful.
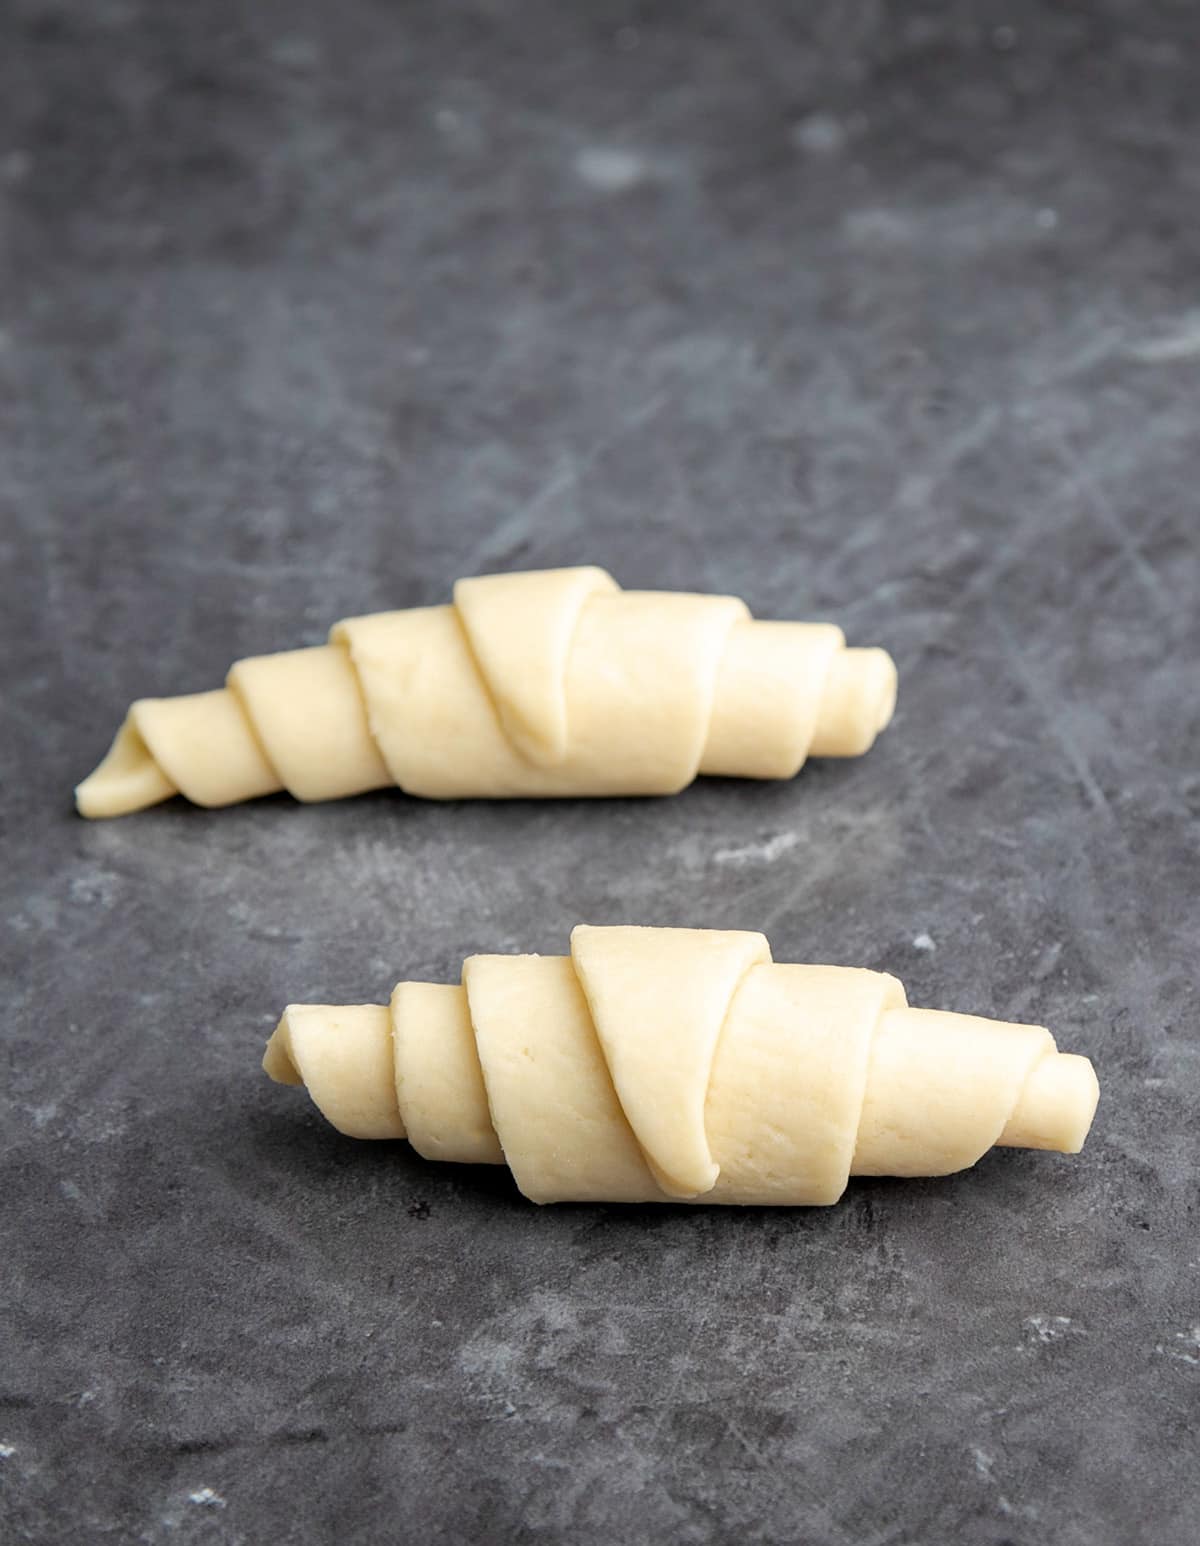
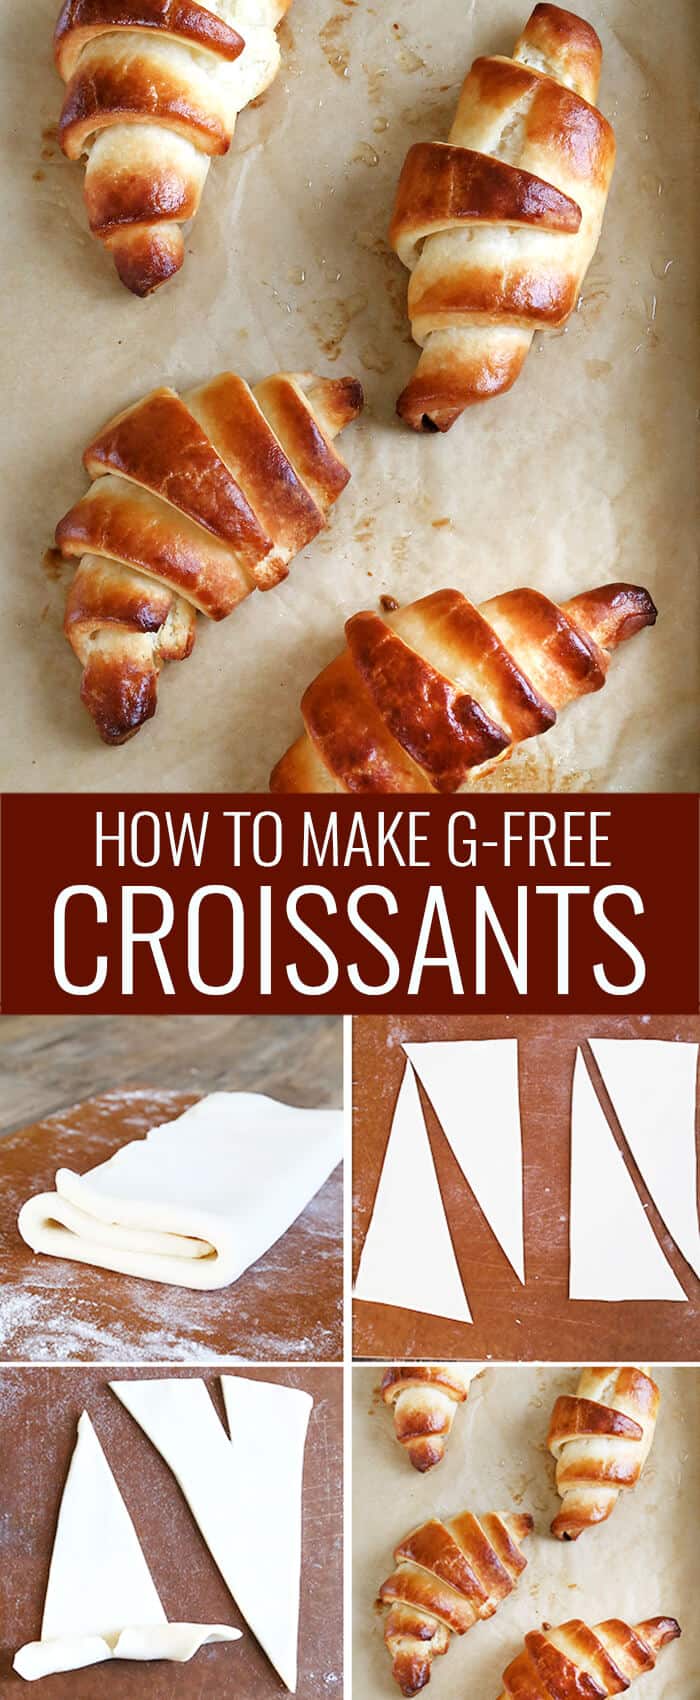
Envision shaping the croissants
Once you've rolled out your dough a final time, cut out equally sized rectangles. Then, slice the rectangles diagonally to create long triangles using a pastry wheel, pizza cutter or very sharp knife. You need a sharp tool as crisp lines help maintain definition.
Then, put a small slit at the widest part of the triangle, and then roll the croissants up from the base, just slightly turning the edges away from each other as you go.
Chill the dough whenever necessary
Butter is the star of the show, and although we begin working with it while it's cold, we have to work with solid at room temperature, using our hands. The heat from the room and the heat of our hands does tend to warm the butter and cause it to begin to melt. That's why the process calls for handling the butter and the dough, and then refrigerating it until it's solid again before proceeding.
There may be times when you notice signs that the butter is melting, but the recipe doesn't yet call for refrigeration. The dough may become sticky or difficult to handle. Whenever this happens, refrigerate the dough, then pick up where you left off afterward.
Storage suggestions
Baked gluten free croissants can sit at room temperature in an airtight container, and they'll stay fresh for two to three days.
Note that the longer they sit, the more they'll harden and go stale. If you get to that point, you can quickly refresh a gluten free croissant to restore softness by popping it into the microwave for 10 to 15 seconds.
Freeze for longer storage
For longer storage, make sure the baked pastries are completely cool. Place them on a baking sheet, and pop the whole thing into the freezer. When the croissants are mostly frozen, you can transfer them to a freezer safe, ziptop bag. They'll stay good for a couple of months.
To defrost, you can leave the croissants on the counter or in the fridge, and then bake them for a few minutes at 350°F until they're heated through.
Ingredient substitutions
Dairy free
There's quite a bit of dairy in this gluten free croissants recipe. There's the dry milk in the gluten free pastry flour blend, the liquid milk for combining the dough, and of course, the butter.
In place of dry milk, you can try using a substitute like coconut milk powder or soy milk powder. Soy milk tends to toughen baked goods, though, so I'd be more inclined to try the coconut milk powder.
You can use a dairy free milk of your choice in place of the liquid milk. Almond milk or coconut milk will probably work fine.
For the butter, you can likely substitute your favorite vegan butter. My favorite brand is Melt, and when I can't find that, I go with Earth Balance.
Egg free
We only use egg as a wash prior to baking these gluten free croissants. It helps create a gorgeous golden-brown crust, but if you can't have eggs, you can easily use melted butter or melted vegan butter in its place.
Vegan
For gluten free, vegan croissants, you'll want to follow all of my suggestions above for replacing the dairy and eggs.
Recipe variations
There aren't a lot of variation options when it comes to traditional gluten free croissants, but there is one you'll likely be interested to know about.
And that would be gluten free pain au chocolat — gluten free chocolate croissants. A gluten free chocolate croissant recipe is exactly the same as the traditional croissants recipe, except before you roll your triangles, you drop a few small pieces of chocolate onto the dough.
Bake as instructed, and you'll enjoy crispy, flaky croissants with a center of rich, melted chocolate.
FAQs
The biggest difference between gluten free croissant dough and gluten free puff pastry is that the first uses yeast and the second doesn't.
Preparation of the two is very similar with the butter packets and the laminating, but adding yeast gives croissants a puffier, flaky consistency.
No, croissants are the not same as crescent rolls. Although a croissant and a crescent roll may look similar and both contain yeast, croissants require a lamination process that creates alternating layers of flour and cold butter that create flaky pastry layers during baking. Crescent rolls are shaped enriched yeast bread, made with warm ingredients. Try our recipe for gluten free crescent rolls to taste the difference.
Laminating may sound technical, but it just describes the process of folding a butter packet into dough. It's not a hard process at all, but the method is specific and essential if you want all the flaky layers for which croissants are known.
Yes, you can double this gf croissant recipe, but I don't recommend it if you're making them for the first time. There's a bit of an art of making the best gluten free croissants, and it's much easier if you aren't working with double the amount of dough. Begin by reading the recipe all the way through to the end, gathering your ingredients, and following the recipe exactly as written.
Gluten Free Croissant Recipe | Buttery, Flaky, and Simple!

Equipment
- Rolling Pin
- Pizza wheel or pastry wheel, for slicing/shaping
Ingredients
For the dough
- 2 ¼ cups (315 g) gluten free pastry flour, (See Recipe Notes)
- 2 teaspoons (6 g) instant yeast
- 2 tablespoons (24 g) granulated sugar
- 1 teaspoon (6 g) kosher salt
- 3 tablespoons (42 g) unsalted butter, melted and cooled
- ¾ cup (6 fluid ounces) whole milk, at room temperature
For the butter packet
- 16 tablespoons (224 g) unsalted butter, chilled
- ¼ cup (36 g) gluten free pastry flour, (See Recipe Notes)
- Egg wash, (1 egg + 1 tablespoon water, beaten well), for brushing
Instructions
Make the dough
- In a large bowl, place the flour, yeast and sugar, and whisk to combine well. Add the salt, and whisk again to combine.
- Create a well in the center of the dry ingredients, add the butter and milk, and mix until the dough comes together.
- Add more flour by the half-teaspoonful if necessary to bring the dough together.
- Turn out the dough onto a lightly floured surface, sprinkle the top very lightly with more flour, and roll into a 9-inch round.
- Wrap tightly in plastic wrap and place in the refrigerator to chill while you prepare the butter packet.
Prepare the butter packet
- Sprinkle a piece of unbleached parchment paper with 1/8 cup (2 tablespoons) of the flour, and place all 16 tablespoons (preferably in 2 whole sticks) of butter on top and press together.
- Sprinkle with the remaining 2 tablespoons of flour, and cover with another piece of unbleached parchment paper.
- Pound the butter with a rolling pin until it flattens and melds together.
- Uncover and fold the flattened butter in half, cover again with the parchment and pound again until you have a 5-inch square butter packet.
- Cover the butter packet completely with parchment, and place in the refrigerator to chill for 5 minutes or until firm.
Wrap the dough around the butter packet
- Remove the 9-inch round dough from the refrigerator, unwrap it, and place it on a lightly floured surface.
- Place the chilled butter packet directly in the center of the dough and score the sides of the dough lightly to represent the exact size of the butter. Remove the butter and set it aside.
- Using a rolling pin and sprinkling the dough lightly with flour as necessary to prevent it from sticking, begin at the site of each of the four scorings and roll the edges of the dough away from the center to create 4 flaps, leaving the center of the dough intact.
- Return the butter packet to the intact center of the dough, and wrap the flaps of the dough around the butter packet like you would a present.
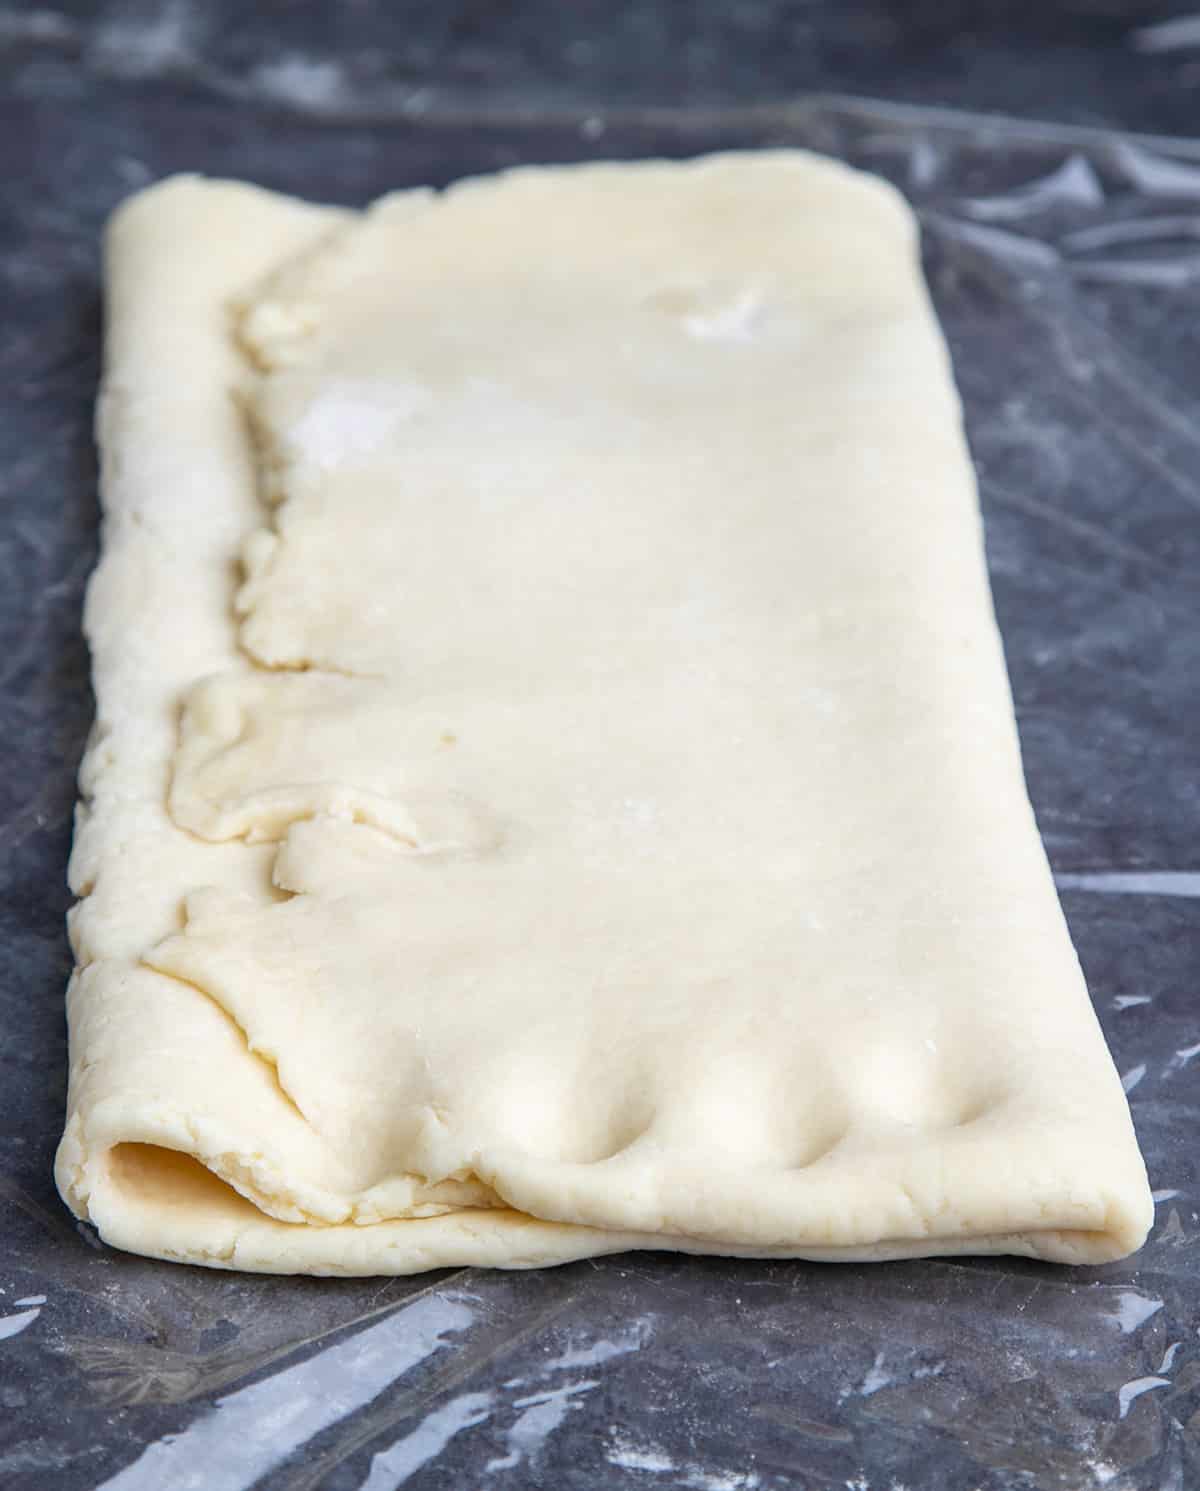
Roll out the dough with the butter and complete the first “turn”
- Sprinkle the dough-and-butter-packet lightly with more flour, and roll out into a 1/2-inch thick rectangle.
- Fold the rectangle over on itself in thirds, as you would a business letter. Sprinkle the dough again lightly with flour.
- With the length of the 3-layer rectangle of dough running parallel to your body, roll the dough away from you into a rectangle that is again about 1/2-inch thick.
- Turn the left and right sides of the 1/2-inch thick rectangle over on themselves again, as you would a business letter.
- You have just completed the first “turn.” Wrap the folded dough tightly in plastic wrap and place in the refrigerator to chill for at least 4 hours or up to overnight.
Complete the remaining 4 to 5 “turns”
- Once the dough has finished chilling after its first turn, repeat the process of rolling the 3-layer dough out into a 1/2-inch thick rectangle, then refolding the dough like a business letter, at least 4 more times, (for good measure, 5 more times). After each turn, keep track by pressing a notch in the dough with one knuckle to represent the number turn you're on (e.g., after 4 turns, make 4 notches).
- Be sure to wrap and chill the 3-layer rectangle of dough in the refrigerator for at least 30 minutes (or the freezer for 10 minutes) in between turns. If you let the dough chill for too long, it may become difficult to roll out smoothly. Just let it sit at room temperature for a few minutes before rolling it back out.
Shape the croissants
- Line rimmed baking sheets with unbleached parchment paper and set them aside.
- Roll out the prepared 3-layer croissant dough into a 1/4-inch thick rectangle.
- Using a pastry wheel or pizza wheel (or very sharp knife—well-defined edges are essential here), square the edges, then cut out as many 4-inch x 6-inch rectangles as you can.
- Slice each rectangle diagonally into two triangles and separate the shapes from one another.
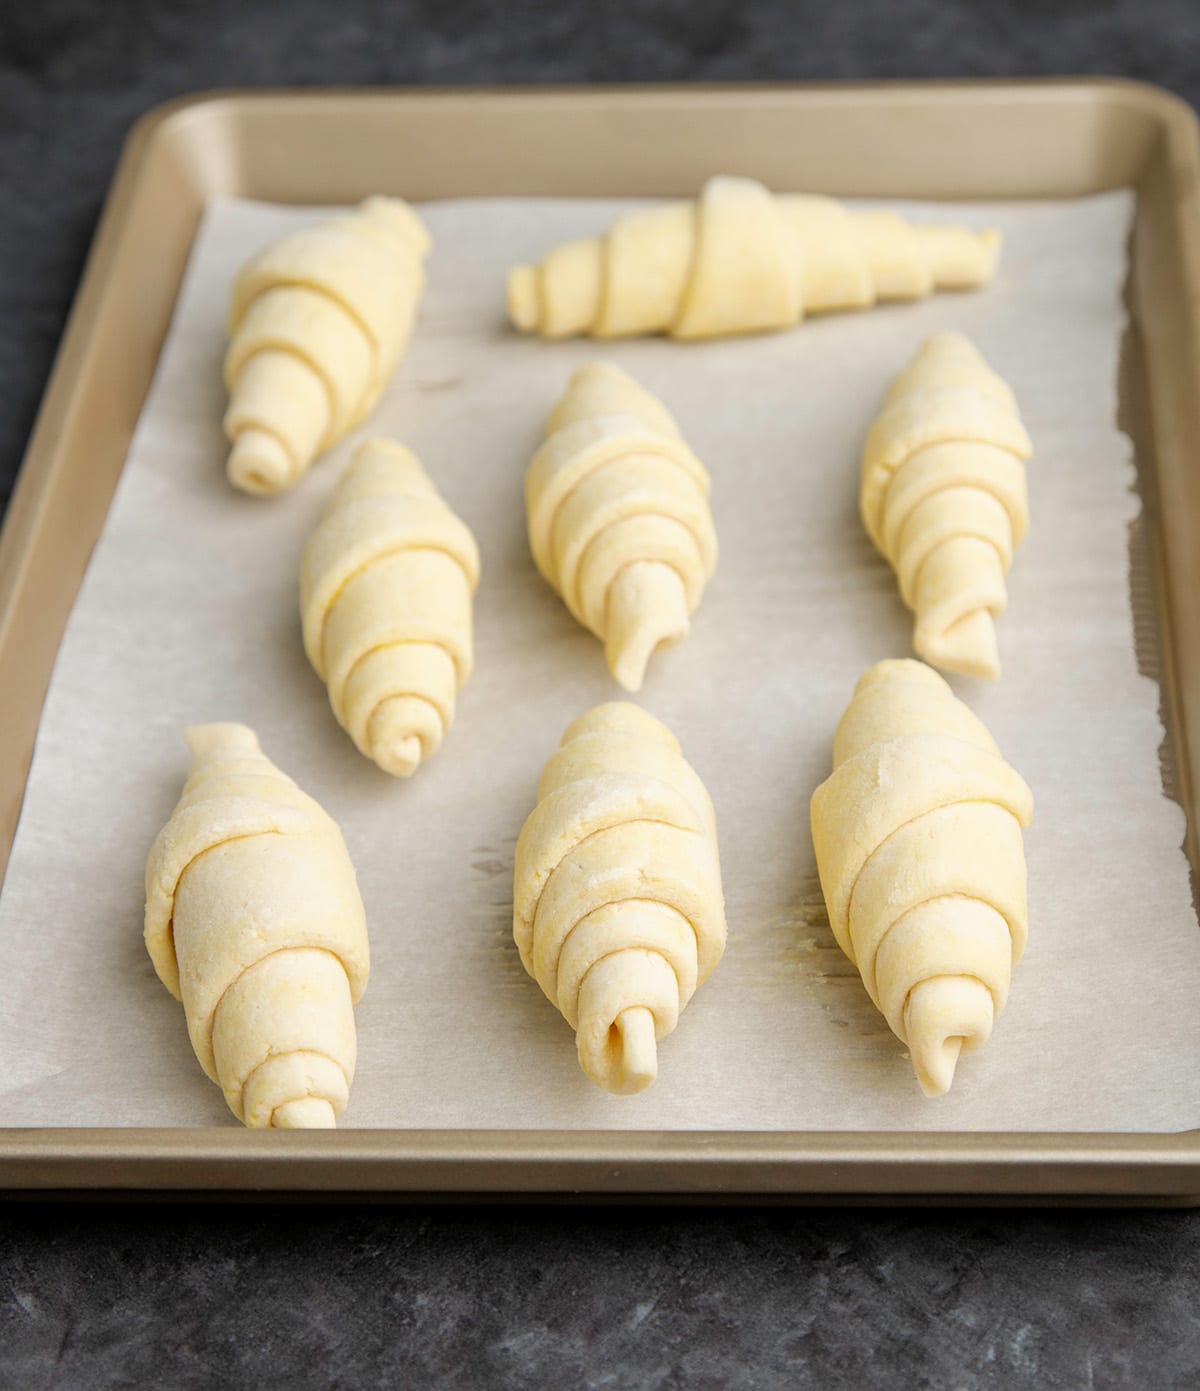
- Sprinkling lightly with flour as necessary to prevent sticking, roll each triangle out to elongate it to about 8-inches from base to tip.
- Slice a notch into the base of each triangle about 1/2-inch deep, and roll each triangle into a coil from base to tip, turning the edges slightly away from each other as you roll.
- Place on the prepared baking sheets, seam side down, about 2-inches apart from one another.
Proof the croissants
- Cover lightly with oiled plastic wrap and place in a warm, draft-free location until nearly doubled in size. You will see the individual layers in each fold begin to separate slightly from one another once the croissants are fully proofed.
- Uncover the baking sheets and brush the tops and sides of the croissants with the egg wash.
- To avoid gluing the coiled layers of each croissant together, brush with the egg wash by beginning in the center of each pastry and brushing out to the sides in one motion on each side, with the “grain” of each coil, not against.
Chill the proofed croissants
- Place the shaped and proofed croissants in the refrigerator to chill for at least 10 minutes or until mostly firm.
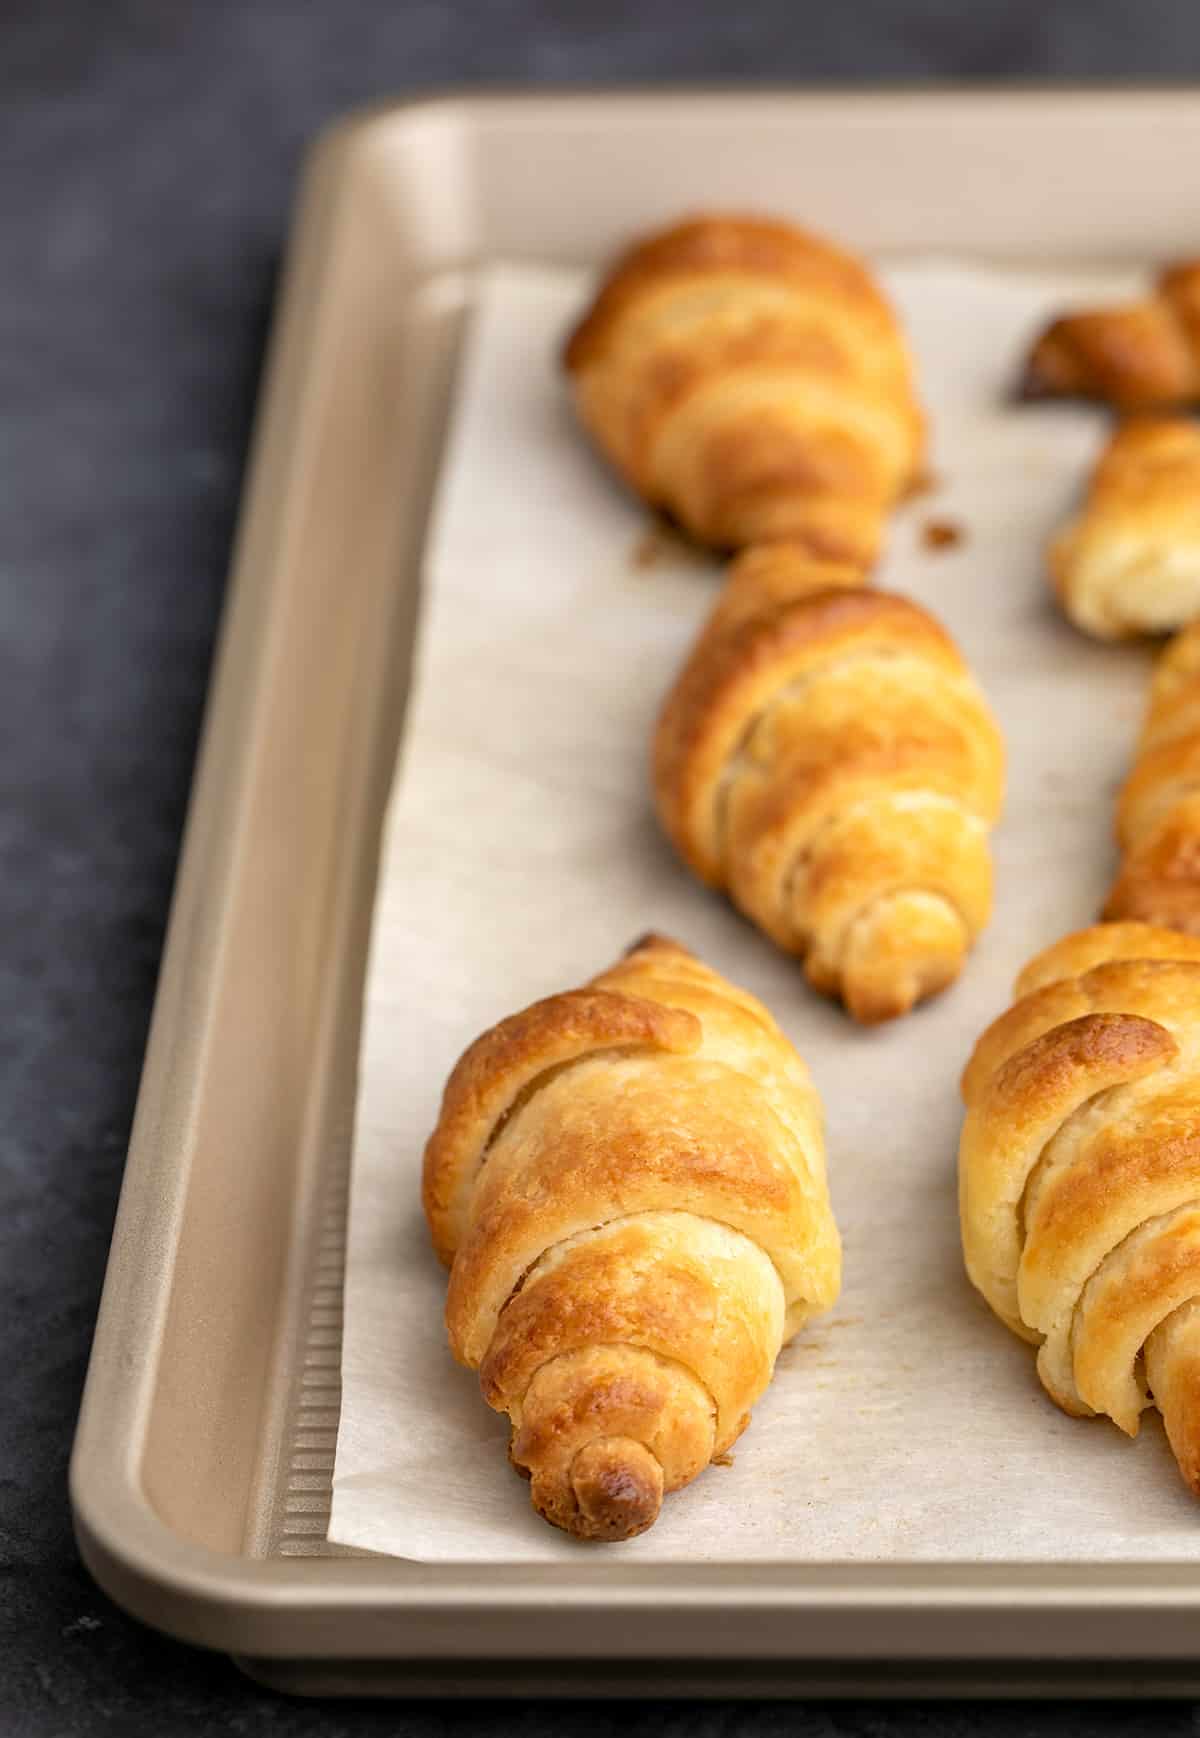
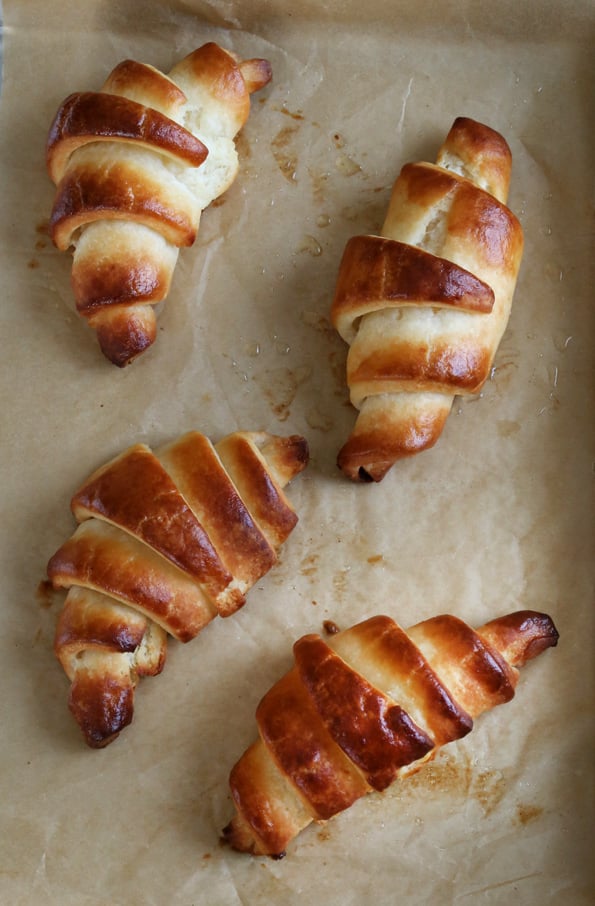
Bake
- While the shaped croissants are chilling, preheat your oven to 400°F.
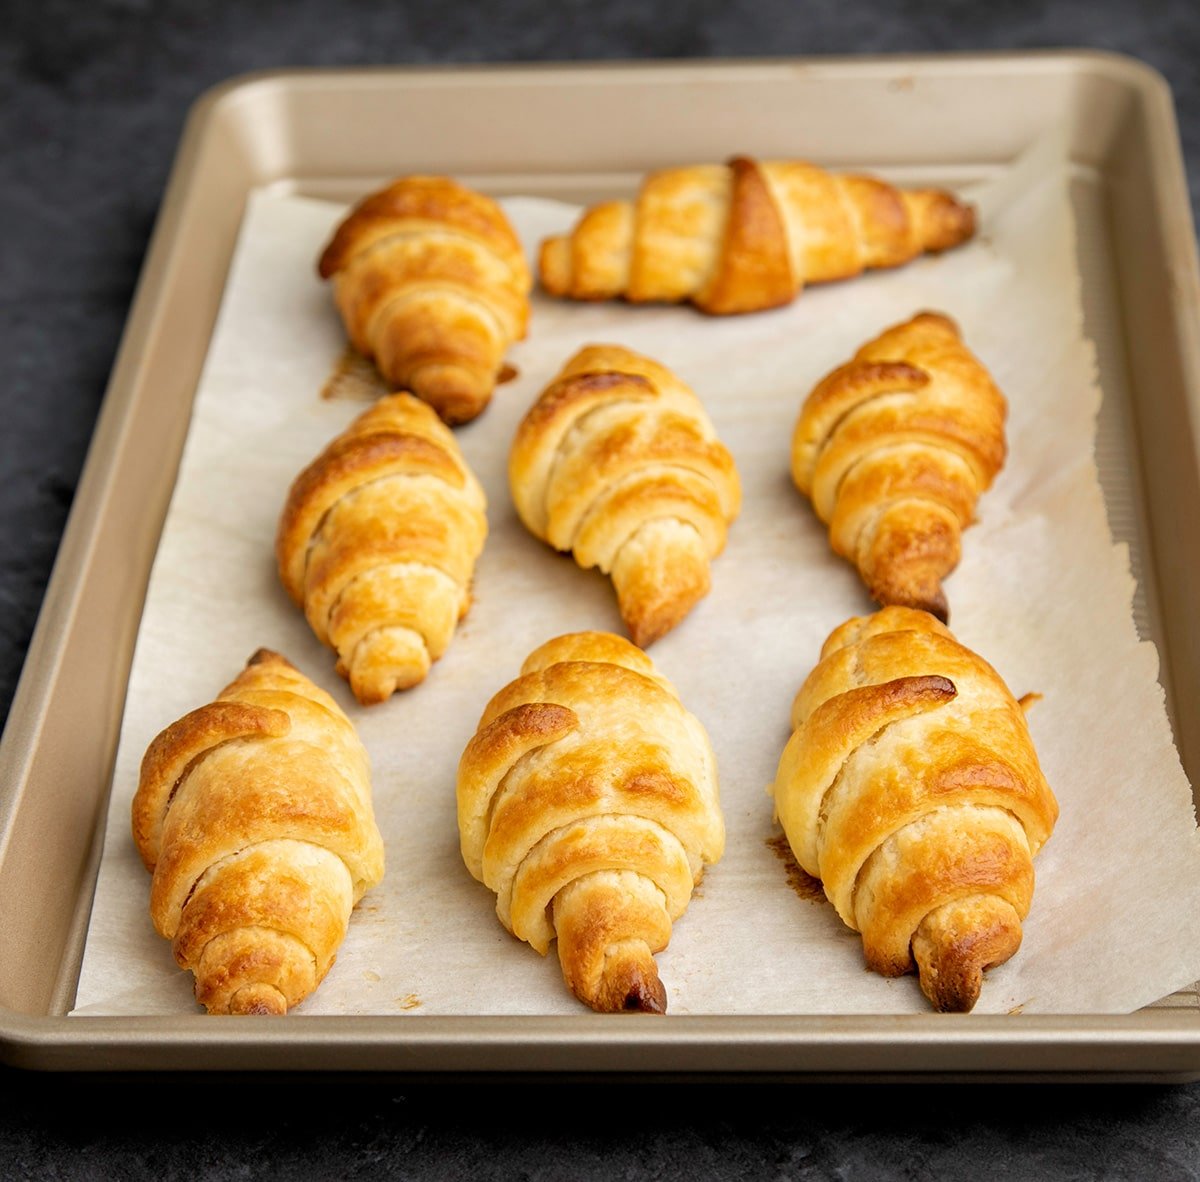
- Place the chilled and proofed croissants in the center of the preheated oven, one baking sheet at a time, and bake for about 20 minutes, or until deep golden brown all over and firm to the touch.
- Allow to cool briefly before serving.
Video
Notes
- 80% all purpose gluten free flour blend (with xanthan gum), by weight (in one cup or 140 grams, 80% is 112 grams)
- 10% cornstarch, by weight (in cup or 140 grams, 10% is 14 grams)
- 10% milk powder, by weight (in cup or 140 grams, 10% is 14 grams)
- 280 grams all purpose gluten free flour blend (with xanthan gum*)
- 35 grams cornstarch
- 35 grams milk powder
I no longer recommend Cup4Cup gluten free flour because they changed their formula. It functioned on its own like a pastry flour. If you'd like make your own version of the previous formula, please follow my recipe for mock Cup4Cup.
Nutrition
Nutrition information is automatically calculated, so should only be used as an approximation.


Hi Nicole,
Do you have a suggestion for what I could brush on the croissants in lieu of egg? Eggs are a no no in our house. Thanks
Hi, Karen, please see the substitutions section for suggestions.
Is one able to make this dairy free as well?
Please see the substitutions section, Clio, for that information.
Nicole, I just read through your page on where you buy your ingredients and kept thinking, come to Amish country (Indiana to Pennsylvania) where their stores have great ingredients in bulk very cheap. I buy nearly black cocoa powder for $4/lb and lots of GF flours and xanthan gum for way less than the name brands. But I did find Walmart brand almond flour for $2/2# a few months ago and stocked up. Also Costco carries 5# bags of Namaste GF flour for $9, while the same brand and size on Amazon is $25.
Can I use Better Batter Artisan Flour for the pastry flour? I am allergic to rice so I can’t use any flour with rice.
I’m afraid not, Sharon. I don’t care for that blend and it doesn’t work in my recipes.
Would love to try these but we do not have a pastry GF Flour here in Australia what can you suggest?
Please click the link to the pastry flour blend, Marlene. I discuss everything about it there. It’s not a purchased blend.
Hi Nicole, I made these over the weekend and I had some issues with them so I wanted to get some feedback from you. I have made regular Croissants before so I am familiar with the process. I used your recipe for Cup 4 Cup flour and used Bob’s Red Mill White Rice and Brown Rice Flours. The croissants ended up very sandy/crumbly rather than flaky. I used instant yeast and they did not rise at all, so I didn’t get any of the flaky layers. I’d say they ended up more biscuit like in texture. I’m not sure what went wrong and I’d like to give them another shot because yours turned out gorgeous.. Any tips and or feedback would be most appreciated, I love your blog! Thanks so much!
Hi, Carrie,
The grittiness is from your flours. As I describe on the Gluten Free Flours page, you must use superfine white and brown rice flours. Bob’s Red Mill rice flours are some of the grittiest rice flours you can buy, and are of inconsistent quality, at best. Authentic Foods is the only company that makes superfine rice flours, and I discuss where I talk about what’s in my pantry, here. I’m afraid you simply can’t make a proper gluten free flour blend using Bob’s rice flours.
Aha! When I searched online for Superfine Bob’s came up ;). That is good to know!! Do you think this also affected their ability to rise? Thanks so much for the help!
What would be the best way to cut the dough to make pain au chocolat?
Do these slice well to make sandwiches from the baked croissants?
I’m confused about the scoring and rolling away from the center.
Just take a look at the second-to-last photo in the step by step photo collage, Cindy. That should illustrate it for you!
Is the flour list on first line of recipe. Is that 3 choices to use or use all?