

This post may contain affiliate links. Please read our disclosure policy.
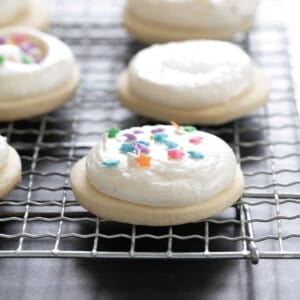
These tender, lightly sweet gluten free sugar cookies are soft but not fragile, so they’ll hold any shape you can imagine, all without chilling the dough so they’re done in 30 minutes start to finish!
With just the right balance of ingredients, there’s no need to wait to roll out the dough and get these perfect cut-out cookies in the oven. Plus, the texture and flavor is perfect for eating alone, and plain enough to top with buttercream or icing without making them too sweet!

“This was the first GF sugar cookie recipe I’ve tried and I can assure you that my search is off! This will be my new go to!”
“Brought the cookies with decorating supplies to family Christmas and they were a hit! Everyone was surprised that they are gluten free!”
Why this recipe works
Unlike other similar recipes you’ll find, the dough for these gluten-free sugar cookies is made in one bowl in minutes, with no chilling needed (or even recommended).
You’ll still get tender cookies that are soft in the center, lightly sweet and perfectly soft, with of vanilla flavor. lightly sweet with lots of vanilla flavor. And they’ll hold any shape, from rounds and basic Christmas stars to Valentine Hearts, spring flowers and Easter bunnies, all without making the dough in advance.
These cookies melt-in-your-mouth, but they’re thick enough that they won’t break when you stack or transport them. Every time you see the Lofthouse cookies in the clamshell box at the grocery store that you can’t have any more, remember these perfect, no-planning-ahead cookies and roll on by!
Recipe ingredients
Here’s what you need to make these perfect cookies, plus the role each plays in recipe success. For detailed ingredient measurements, please see the recipe card.

- Gluten-free flour: Provides the structure for a cookie that holds its shape and isn’t fragile, with a smooth rice flour to avoid any grit. I recommend Better Batter’s original gluten free flour blend or Nicole’s Best multipurpose blend (with added xanthan gum). Bob’s Red Mill 1-to-1 Gluten Free Baking Flour in the blue bag also works, but add an extra 1/4 teaspoon xanthan gum to the dry ingredients to avoid crumbly cookies.
- Baking powder: Helps the cookies puff out and spread a bit so they’re not dense or hard.
- Sugars: Granulated sugar sweetens and tenderizes the cookies by locking in moisture, and a touch of powdered or confectioners’ sugar helps make this a no-spread dough.
- Butter: Adds tenderness, buttery flavor, and moisture to bring the dough together. Make sure yours is at room temperature, but not too warm or the cookie dough will be greasy and can be difficult to roll out smooth, without cracks.
- Egg: Binds the cookie dough together; the white adds structure to hold the rise after the cookies cool, and the yolk adds richness.
- Vanilla extract: Adds depth of flavor.
- Salt: Enhances other flavors, and helps balance the sweetness.

How to make these sugar cookies (with photos)
Here’s an overview of how to make these simple cookies in your own kitchen, with an explanation of why each step is necessary:
1. Combine dry ingredients
Whisk together the gluten-free flour blend with xanthan gum, baking powder, salt, granulated sugar, and confectioners’ sugar to ensure an even distribution of all dry ingredients, avoiding pockets of baking powder.
2. Add the butter
We use the reverse cream method to avoid incorporating any extra air into the cookie dough, so the cookies bake flat but still very tender. Do this by pressing the softened butter into the dry ingredients with the back of a spoon until it looks like coarse sand.
3. Add egg and vanilla
Add a beaten egg and vanilla extract to moisten all of the dry ingredients. Keep working until everything looks uniform, then knead together with clean, dry hands just until smooth without overworking the dough, which could result in tougher cookies by drying it out.


4. Roll out the dough
Sprinkle the cookie dough with a light dusting of gluten-free flour to keep it from sticking as you roll it out about 1/3-inch thick without drying it out.
5. Cut out shapes
Use cookie cutters to cut out shapes by pressing straight down. Make sure the cookie cutter doesn’t have any cookie dough on the edge each time so you get clean edges for cookies that hold a well-defined shaped edge and rise up, not out.
6. Transfer the shapes and reroll
Pull away the rest of the dough to expose the shapes rather than pulling out the shapes, which might stretch them out of shape. Pick up the shapes and place them on a lined baking sheet. Gather the dough gently into another disk, reroll and cut out more shapes.


7. Bake the cookies
Bake at 350°F for less than 10 minutes, just until set, with little to no browning to ensure that the cookies stay very tender, without crisping.
8. Cool until stable, then transfer
Let them cool on the baking sheet for a few minutes until stable enough to move to a wire rack to cool completely.


9. Decorate (or don’t!)
Top with the meringue buttercream or royal icing, or leave plain. Store in a sealed glass container at room temperature, and they will keep their texture for about 1 week since glass doesn’t retain any moisture.

Expert Tips
Measure your ingredients by weight
You’ll find that the dough resembles moist crumbs and clumps, and you might be tempted to add more moisture. Make sure you’re measuring your ingredients (especially the gluten-free flour) by weight, not volume, for precise results. If you add too much moisture, your cookies will spread out, instead of just up, creating distorted shapes.
Use cool room temperature butter
The term “room temperature” for dairy, eggs, and other baking ingredients usually means about 68°F. Here, if it’s below about 70°F, it may be difficult to work into the dry ingredients evenly.
To soften it, chop it into small pieces and let it sit on the counter for about 20 minutes. Be sure your eggs are at room temperature (float them in very warm water for about 15 minutes, if not), or they’ll harden the fat and make it clump, creating an uneven cookie dough that is hard in some places, greasy in others.
Knead the dough until smooth
Once you reach a uniform mixture that resembles moist crumbs and clusters, knead the dough with clean hands just enough to bring it together before rolling it out. You can also use a stand mixer with a paddle attachment to make smooth dough easily, but avoid a handheld mixer with beater attachments or your cookies will have too much air, making them rise too much, and not smoothly to a flat top.
Store in glass containers
To maintain the texture of the cooled cookies, iced or plain, store them in a glass container with a tight-fitting lid. They won’t absorb moisture or odors from the environment.
One-bowl cookie dough
The whole cookie dough comes together in one bowl with a spoon, so there’s no mixer to clean until you make the buttercream.

Ingredient substitutions
Dairy free
I’ve used block-style non-dairy stick butter like Melt or Miyoko’s brand in the cookie dough before with success. The edges of the gf sugar cookies aren’t quite as clean as the original, but the recipe tastes and looks great overall.
For the buttercream, try Spectrum brand butter-flavored nonhydrogenated vegetable shortening, and any unsweetened, unflavored nondairy milk (I like coconut in the carton, or soy).
Egg free
You should be able to swap in a “chia egg,” Bob’s Red Mill replacer, or “Just Egg” liquid refrigerated plant-based alternative.
Meringue powder
Meringue powder is made of egg white powder, sugar, a starch, and some stabilizers. If you can’t have eggs, I’d just eliminate meringue powder as an ingredient altogether. The buttercream will just be a bit softer.
Almond variation: For a bakery-style flavor, swap ¼ teaspoon of the vanilla extract for almond extract.
Storage instructions
Short term
You can store plain baked unfrosted cookies in a sealed glass container at room temperature for at least 1 week. If you’ve used royal icing and allowed it to set fully, they’ll last up to two weeks.
With the meringue buttercream, once it’s set, you can stack them and store them in a sealed glass container for up to two days.
Longer storage
Freeze decorated cookies in a single layer on a rimmed baking sheet for two hours, then pile them into a freezer-safe zip top bag for up to three months. Defrost at room temperature. Don’t heat decorated cookies or the topping will melt. To freeze the raw cookie dough, roll it out, cut shapes, then wrap them tightly for the freezer. Let defrost before baking.
Gluten Free Sugar Cookies Recipe
Tell Google you trust GFOAS!
Equipment
- Stand mixer or handheld mixer
Ingredients
For the cookies
- 2 cups (280 g) all purpose gluten free flour blend, (See Recipe Notes), plus more for sprinkling
- ¾ teaspoon xanthan gum, omit if your blend already contains it
- ¾ teaspoon baking powder
- ¼ teaspoon kosher salt
- ½ cup (100 g) granulated sugar
- 3 tablespoons (22 g) confectioners’ sugar, or powdered sugar
- 8 tablespoons (112 g) unsalted butter, at soft room temperature (about 70°F)
- 1 (50 g (weighed out of shell)) egg, at room temperature, beaten
- 1 teaspoon pure vanilla extract
For the buttercream icing
- 10 tablespoons (140 g) unsalted butter, at room temperature
- ¼ cup (2 fluid ounces) milk, at room temperature
- 1 tablespoon pure vanilla extract
- ⅛ teaspoon kosher salt
- 2 teaspoons meringue powder, LorAnn and AmeriColor brands are gluten free
- 4 cups (460 g) confectioners’ sugar
- Seeds from one vanilla bean, optional
- Sprinkles, optional
Instructions
Make the cookies
- Preheat your oven to 350°F. Line rimmed baking sheets with unbleached parchment paper and set them aside.
- In a large bowl, place the flour, xanthan gum, baking powder, salt, granulated sugar and confectioners’ sugar and whisk to combine well.
- Add the butter, and mix to moisten the dry ingredients, until the mixture looks sandy, pressing down on it with the back of the mixing spoon.
- Add the egg and vanilla, and mix to combine, until the dry ingredients are all moistened with the wet.
- With clean, dry hands, knead the mixture together to form a cohesive dough. It will be thick and relatively stiff, but not dry.
- Place the dough on a clean, flat surface, and roll it into a round a bit less than 1/3-inch thick, sprinkling very lightly with flour to prevent the rolling pin from sticking.
- Using a 2 1/2-inch round cookie cutter (or whatever shape you like), cut out shapes from the dough and place them about 1-inch apart on the prepared baking sheets.
- It can be helpful to remove the surrounding dough from the cutouts, and then peel the shapes off. Gather and reroll the scraps and repeat the process until you’ve used all the dough.
- Place the baking sheet in the center of the preheated oven and bake until the cookies are just set on top, about 8 minutes, depending upon size and shape. The edges of some cookies may brown slightly.
- Remove them from the oven before there is any significant browning, and allow them to cool on the baking sheet until set before transferring them to a wire rack to cool completely.
Make the buttercream icing
- In the bowl of your stand mixer fitted with the paddle attachment or a large bowl with a handheld mixer, place the butter, milk and vanilla, and mix on medium speed until combined. Increase the mixer speed to high and mix until creamy (about 5 minutes).
- Add the salt, meringue powder and about 3 1/2 cups of confectioners’ sugar. Mix slowly until the sugar is incorporated. Turn the mixer up to high and beat until it becomes uniformly thick.
- Add the optional vanilla seeds and as much of the rest of the confectioners’ sugar as necessary to thicken it, and beat to combine well.
Ice the cookies
- Once the cookies are completely cool, pipe or spoon a generous amount of frosting onto the top of each, and spread into an even layer with a wide knife or offset spatula. Scatter sprinkles, if desired.
- Allow the cookies to set at room temperature until the topping hardens a bit before stacking them. Store any leftovers in an airtight glass container at room temperature. Freeze any plain cookies for longer storage.
Video
Notes
Nutrition
Nutrition information is automatically calculated, so should only be used as an approximation.
FAQs
Your dough may resemble moist crumbs and clumps when mixed with a spoon, but that doesn’t mean it’s too dry. Try pressing it into a disk. If it doesn’t hold together well, you can try adding water by the drop and kneading it in to the dough until you reach the right consistency. Go slowly, though, since you don’t want a drop more water than absolutely essential, or your cookies won’t keep their shape in the oven.
You may have rolled out your sugar cookie dough a bit unevenly. That means some cookies came out thinner, baking faster and turning crisp, while others stayed soft.
For best results, try my gluten free drop sugar cookies recipe instead. But if you change your mind mid-recipe, you can use this recipe. Just portion the cookie dough into equal-sized pieces, roll each in your palms into a ball, place it on the baking sheet, and flatten it using the palm of your hand. Bake at 350°F until the cookies appear set all the way through. Depending on how thick your cookies are, you may have to increase the baking time.
No, there’s no need to chill this cookie dough for it to hold its shape when made as written. This recipe is balanced just right to avoid needing time to chill the dough or let the flour absorb moisture for the cookies to hold their shape in the oven.
If your butter was too soft and the cookie dough feels greasy, wrap it tightly in plastic wrap and chill the dough just until it doesn’t feel greasy any more, then proceed with the recipe as written.
You can use 2 1/2 tablespoons of powdered sugar, which doesn’t contain added starch and 1/2 tablespoon (1 1/2 teaspoons) cornstarch instead. Or try 1 1/2 tablespoons more granulated sugar and 1 tablespoon cornstarch.
If your gluten-free flour blend already contains xanthan gum, leave out the ¾ teaspoon in the recipe.











I would like to make ahead and chill a few days before cookie decorating day. Any tips for bringing to room temp before rolling out?
The refrigerator tends to be drying on raw dough, which makes rolling out very difficult, Amy. I really think you’re better off making the cookies ahead of time and storing them as baked. Please see the storage instructions in the text of the post for guidance.
Would king Arthur’s gluten free flour work? And would any extra xanthem gum need to be added?
I’m afraid I recommend against KAF’s Measure for Measure flour, Alexandria. It’s gritty and poorly balanced. Please see the all purpose gluten free flour blends page, along with the relevant text of this post, for my full recommendations.
Thank you for the quick response! I went ahead and ordered the Better batter GF flour!
Great as always! Awesome for cookie cutters and handles be dyed lol.
I don’t think a single recipe I have tried for this site wasn’t awesome!
So glad you enjoyed the cookies, Mae. Thank you for sharing your experience and for the trust you place in me!
Hi! My reading comprehension might be lacking, but when you say to use an EXTRA 1/4 tsp. xantham gum if using Bob’s Red Mill GF Flour, do you mean to use only 1/4 tsp. or the 3/4 tsp. written in the ingredients section PLUS the extra 1/4 tsp. that you mentioned, for a total of 1 tsp. xantham gum? Thanks so much! Can’t wait to make them!
The instructions say to leave out the xanthan gum if your blend already contains it, which Bob’s Red Mill 1-to-1 does. But you need an extra 1/4 teaspoon here because Bob’s doesn’t contain enough gum.