This post may contain affiliate links. Please read our disclosure policy.

Table of Contents
It's here it's here it's here! Today is the official publication date of Gluten Free Classic Snacks!! That means that it's for sale everywhere books are sold, including the ebook version (if you pre-ordered the ebook version, it should automatically download for you today). The “Look Inside” feature is finally live on the ebook version of the book on amazon.com. The copies have been shipped from the publisher's warehouse to retailers all over the United States (and Canada!), and all that's missing is … YOU! Buy it, download it, ask your local library to buy a copy or two, buy one for a friend, surprise your partner on her birthday—and then tell everyone exactly what we can do. P.S. We can do everything!
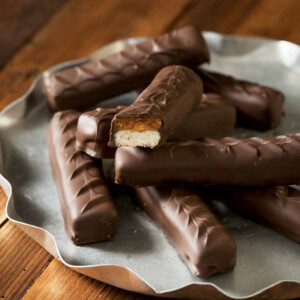
Today, we celebrate Gluten Free Classic Snacks with a free recipe straight from the book. The people have spoken, and out of 9 possible free recipes, a whopping 25% of you chose (you guessed it) this straight-up perfect copycat recipe for Gluten Free Twix (close behind with 18% of the vote was the Whoppers recipe from Classic Snacks). Mars may not make Twix gluten free, but we sure do! Here's how it's done:
A Personal Note
If you are really looking to go all out and temper chocolate the traditional way, with a candy thermometer and everything, I discuss that in the book, too. Which brings me to a very important point about this recipe, and all the others in the book (and really about every recipe I publish on this blog, in one of my cookbooks or anywhere else for that matter): it doesn't have to be perfect. It certainly doesn't have to look perfect. I developed every recipe in this book, and did all of the prep work for the photo shoot for every recipe you see in this book. But a well-trained professional food stylist “styled” the recipes, and they were shot by a well-trained professional photographer. And even the recipes that I style and shoot on my own for this blog? I may not be a classically trained professional, but I do this all day every day, 7 days a week. They have to look almost-perfect, but only because we eat with our eyes first. And I want you to see what's possible. Especially for this book—I want to trigger your memories of all the packaged snacks, crackers, breakfast treats, cookies and candies that are off-limits when you're gluten free. I want to remind you of what you're missing, and then give it back. So I need proof. If it doesn't look like Twix bars, then you won't believe that my version of gluten free Twix bars are the real deal. But when you make it yourself, all that falls away. You've already seen the proof. Now you really just need the texture and the taste. So be kind to yourself. This is supposed to be fun!
When I started this food blog in 2009 (6 years ago, almost to the day), I had just been laid off from my well-paying job as a lawyer in a large New York City law firm. I felt awful about myself. I had three young kids at home and they needed (deserved!) a mother who didn't feel like a total failure. I had been cooking and baking gluten free with a measure of success (after tons of early failure) for years already, so nothing felt more natural than sharing that with you. So the very last thing I would ever want to do is to make you feel badly about yourself. We all have enough of that in our lives, don't you think? I want to show you what's possible, and to inspire you to get into the kitchen and bake some love. Since when does love have to look perfect?
Gluten Free Twix Recipe
Equipment
- Candy thermometer
Ingredients
For the Shortbread Cookie
- 1 ½ cups (210 g) all purpose gluten free flour blend, (I used Better Batter; please click thru for full info on appropriate blends)
- 1 teaspoon xanthan gum, (omit if your blend already contains it)
- ¼ cup (36 g) cornstarch, (replace with more Cup4Cup if that is your all purpose gluten free flour blend)
- ⅛ teaspoon kosher salt
- ½ cup (100 g) granulated sugar
- 8 tablespoons (112 g) unsalted butter, at room temperature
- 1 to 2 tablespoons lukewarm water
For the Soft Caramel
- 2 cups (400 g) granulated sugar
- ½ cup (4 fluid ounces) water
- ¼ teaspoon cream of tartar
- ¾ cup (6 fluid ounces) heavy whipping cream
- 5 tablespoons (70 g) unsalted butter, chopped
- 1 teaspoon pure vanilla extract
For the Chocolate Topping
- 18 ounces milk chocolate, chopped
- 4 tablespoons (56 g) virgin coconut oil
Instructions
Prepare the cookies.
- Preheat your oven to 325°F. Line rimmed baking sheets with unbleached parchment paper and set them aside.
- In a large bowl, place the cake flour, salt and sugar, and whisk to combine well.
- Create a well in the center of the dry ingredients, add the butter and 1 tablespoon of the water, and knead until the dough comes together, using more water by the teaspoon if necessary.
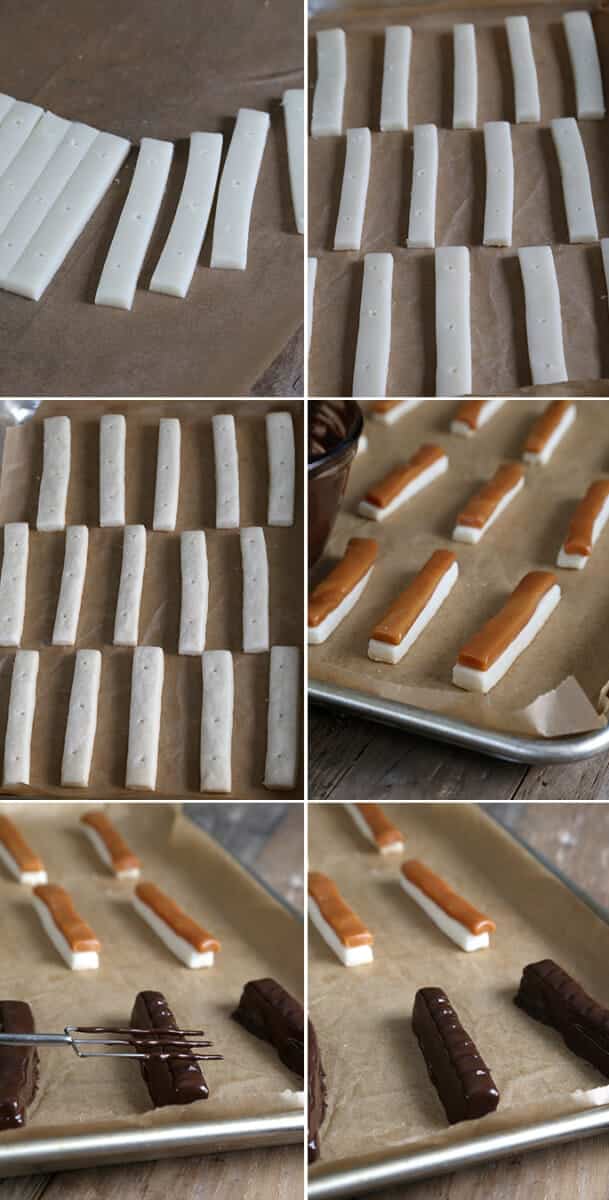
- Place the dough between two sheets of unbleached parchment paper and roll into a rectangle about 1/2 inch thick.
- With a sharp knife or pizza or pastry wheel, slice into rectangles 3 1/2 inches long and 1/2 inch wide.
- Place the rectangles 1 inch apart from one another on the prepared baking sheets. Using a toothpick or wooden skewer, press three holes, evenly spaces apart and each about 1/8 inch deep, into the top of each dough rectangle.
- Place the baking sheets in the center of the preheated oven and bake for about 10 minutes, or until just beginning to brown on the edges. Remove from the oven and allow to cool completely on the baking sheets.
Prepare the caramel.
- Line a quarter sheet (13 x 9 x 1-inch) pan with unbleached parchment paper and set it aside. In a medium-size, heavy-bottomed saucepan, place the sugar, water and cream of tartar and whisk to combine.
- Clip a candy thermometer to the side of the saucepan and cook, undisturbed, over medium-high heat until the sugar begins to turn amber-colored around the edges and reaches 300°F.
- Remove the saucepan from the heat, stir to prevent the sugar from burning, and add the cream. The mixture will bubble up quite a lot. Stir until the bubbling subsides. The sugar may seize up, but it will melt again.
- Add the butter and stir to combine. Return the saucepan to the heat and cook, undisturbed, over medium-high heat until the mixture reaches 245°F. Remove from the heat and whisk in the vanilla.
- Pour the hot caramel into the prepared pan and shake it back and forth and side to side into an even layer.
- Allow to sit at room temperature until set, at least 2 hours.
- Once cool, the caramel can be covered in plastic and stored in a cool, dry place for up to a month.
Shape the caramel and assemble.
- Roll out the cooled caramel between two sheets of unbleached parchment paper into a rectangle about 1/2 inch thick.
- With a sharp knife or pizza or pastry wheel, cut the caramel into 3 1/2 x 1/2-inch rectangles (the same size as the shortbread cookies).
- Place one caramel rectangle on top of each cooled shortbread cookie, and press gently to adhere.
Prepare the topping and finish the candies.
- Place the chocolate and coconut oil in a large, microwave-safe bowl and melt in 45 second bursts at 60% power, stirring in between, until melted and smooth.
- Allow the chocolate to sit at room temperature until it begins to thicken a bit. Immerse the caramel-topped shortbread, one at a time, in the chocolate.
- Pull the bar out of the chocolate by slipping the fork under it and bobbing it on the surface of the chocolate a few times before pulling it along the edge of the bowl and carefully placing it on a clean sheet of waxed or parchment paper.
- Allow the chocolate glaze to set at room temperature.
Notes
Nutrition information is automatically calculated, so should only be used as an approximation.



Love all your books-I am sure I’ll add the new one to my collection in the near future! I’d love to try the twix bars, but when I click on the “print” button above, what comes up is not exactly the recipe, but more of an add with your personal note on the bottom. I’ve never had trouble printing your other recipes so I’m not sure what’s up with this one. I so enjoy your blog and appreciate all your hard work that goes into creating these wonderful recipes. I have your cookbooks, but I think I enjoy the recipes on your blog more because it feels like YOU are in there too!
Hi, Faith, this recipe is available on the blog only as pages from the new book as it just has too many parts for me to type the whole thing into the “recipe” field on the back end, which is what enables the clean print function you’re used to. I’m afraid you’ll just have to keep the blog page open while you make the recipe. Alternatively, you could drag the images from the book onto your desktop and print from there!
Thanks for the kind words about the blog. It’s always such a balance in books to insert my own commentary so you feel like you have a friend baking alongside you, which I wish I could do personally (!) but without making the book too long!
Dragging images didn’t work-but snip-tool did the job. Ha! It’s rather awkward to drag the desktop to the kitchen and I’ve tried making recipes with the ipad in front of me but my husband hates the sticky finger prints and flour dust all over the screen-go figure! LOL! It’s better to keep the peace and just print a paper version or use the cookbook. Thanks again.