
This post may contain affiliate links. Please read our disclosure policy.
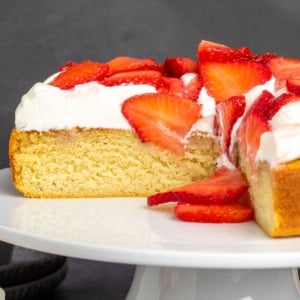
This gluten free strawberry shortcake cake is a fun take on the classic strawberry shortcake dessert, with an impossibly tender vanilla cake, a thick layer of fresh whipped cream, and plenty of fresh strawberries.
This true layered vanilla cake made with butter and a touch of oil is sturdy enough to hold all those strawberries, their juice, and fluffy whipped cream.

“I made this for Easter Sunday … and it was perfection. Honestly there was kind of a stunned silence when everyone started eating it, and nobody touched the gluteny desserts. Thank you, Nicole!”
My take
Gluten free strawberry shortcakes vs. layered cake
Traditional gluten free strawberry shortcake is a sweet biscuit-style dessert split in half and served with berries and cream. If you're looking for the classic gluten free strawberry shortcake recipe , click over there.
But if you want to be able to serve the love the berries and cream flavors as a proper layered cake, keep reading here…
The cake is even more tender than a classic vanilla cake, with a slightly more dense, velvet smooth crumb. And it's stable enough to hold layers of strawberry juice, whipped cream, and berries.
We start by mixing fresh sliced strawberries with sugar and a bit of vinegar. Then pour the released juices on top of the yellow cake and layer the berries themselves with fresh whipped cream for a showstopper dessert they'll ask for by name!

substitutions
Recipe ingredients
For the full ingredient list for this layered cake, strawberries and whipped cream, please see the recipe card. Here are some notes on the ingredients we use to make it all:
- Whole milk & butter: Both add richness, tenderness and flavor.
- Eggs: One whole egg and 1 egg white add structure, moisture and bind the cake together.
- Gluten free flour: Any high quality all purpose gluten free flour blend that's well balanced and has a finely ground rice flour should work here.
- Oil: Adding some neutral oil like canola, vegetable, peanut, avocado, or grapeseed adds lots of moisture without making the cake taste or smell oily like an all-oil cake can.
- Sugar: Adds tenderness and sweetness, and helps to macerate the strawberries and enhance their flavor.
- Vinegar: A bit of white balsamic or white wine vinegar to the strawberries helps draw out their moisture and enhance the flavor.

How to make gluten free strawberry shortcake cake
To make this layer cake, place the sliced strawberries, some granulated sugar and vinegar in a bowl. Let them sit to macerate.

To make the cake batter, in a large measuring cup, whisk together an egg, egg white, some milk and vanilla.
Sift your gluten free flour blend into the bowl of a stand mixer, then whisk in the xanthan gum if adding, baking soda, baking powder, salt and sugar. Add melted butter and oil to the dry ingredients, and mix until the mixture looks sandy.


With the mixer on low speed, beat in the milk and egg mixture until smooth. Don't overmix the batter in this gluten free cake.
Transfer the smooth vanilla cake batter to a greased round cake pan, and smooth into an even layer.
Bake at 350°F for 20 minutes, rotate the pan, and finish baking at 325°F. Let the cake cool while you prepare the other layers.


Whip the heavy whipping cream with powdered sugar until stiff peaks form. By now, the macerating strawberries should be really fragrant and should have created a nice thick, syrupy liquid.


Turn the cooled cake out onto a serving platter. Drain the liquid from the bowl of strawberries, and pour it over the cake slowly, letting the cake absorb the liquid.
Spread the whipped cream on the cake, then layer the macerated strawberries on top. Slice the cake with a sharp knife, and serve.


My Pro Tip
Expert tips
Sift the flour
Like with our gluten free angel food cake, sift your the flour blend to make sure the rise is even and the cake is lighter. Since it's the first ingredient in the cake, you can just sift it right into the mixing bowl.
Use softer butter
We're using the “reverse cream method” to make this cake, which just means that we whisk together the dry ingredients (including sugar), and then beat softened butter (and oil) in to create a velvety cake that has a somewhat denser crumb.
To make sure that the butter mixes easily into the flour, make sure yours is a little softer than the non-greasy butter we usually need if we're beating it first with sugar. If you want to be really precise, a temperature of about 75°F on an instant read thermometer is just perfect.

substitutions
Ingredient substitutions
Dairy free
To make this cake dairy-free, try vegan butter (Miyoko's Kitchen & Melt brands work best) and unsweetened unflavored nondairy milk like almond milk or Ripple unsweetened milk. Coconut milk in the carton (not the can) should work well, too). For the whipped cream, you can try using chilled coconut cream or one of the new dairy free whipping creams.
Egg free
To make the cake egg-free, for the whole egg, you can try a “flax” or “chia” egg, or Bob's Red Mill egg replacer. For the egg white, try unsalted aquafaba, or the brine from a can of chickpeas. You can also try 1 1/2 of your favorite egg replacer, too.
Vinegar
Instead of vinegar, you can add a dash of salt to the strawberries with the sugar to help draw out their juices. Don't add too much or they will taste salty.
Sugar free
You can try replacing the sugars with a granulated sugar and powdered sugar alternative like Lankato monkfruit sweetener where appropriate. You can also try reducing the sugar in the cake by about 25 grams and it should still work. I don't recommend swapping in a liquid sweetener here.
Gluten Free Strawberry Shortcake Cake Recipe
Equipment
- Stand mixer or handheld mixer
- Metal sieve or strainer for sifting the flour
Ingredients
For the strawberries
- 12 ounces strawberries, hulled and sliced
- ¼ cup (50 g) granulated sugar
- ¾ teaspoon white wine vinegar, or white balsamic vinegar (optional)
For the cake
- 1 (50 g (weighed out of shell)) egg, at room temperature
- 1 (25 g) egg white, at room temperature
- ⅔ cup (5 ⅓ fluid ounces) whole milk, at room temperature
- 1 teaspoon pure vanilla extract
- 1 ¼ cups (175 g) all purpose gluten free flour blend, (See Recipe Notes) (click thru for complete info)
- ¼ teaspoon xanthan gum, omit if your blend already contains it
- ½ teaspoon baking soda
- 1 teaspoon baking powder
- ¼ teaspoon kosher salt
- ¾ cup (150 g) granulated sugar
- 4 tablespoons (56 g) unsalted butter, at room temperature
- 2 tablespoons (28 g) canola or vegetable oil
For the whipped cream
- 1 ½ cups (12 fluid ounces) heavy whipping cream, kept very cold
- ¼ cup (30 g) confectioners’ sugar
Instructions
Prepare the strawberries
- In a medium-size bowl, place the sliced strawberries and sprinkle the granulated sugar and (optional) vinegar on top. Toss gently to combine without crushing any strawberries.
- Allow the mixture to sit while you make the cake so the strawberries release their juices.
Prepare the cake
- Preheat your oven to 350°F. Grease an 8-inch or 9-inch round cake pan and line the bottom with a round of parchment paper (trace the perimeter of the pan on the parchment, then cut out the circle). Set the pan aside.
- In a large measuring cup or medium-size bowl, place the egg, egg white, milk, and vanilla. Whisk to combine very well, and set aside.
- Into the bowl of your stand mixer fitted with the paddle attachment (or a large mixing bowl with a handheld mixer), sift (yes, you have to sift!) the gluten free flour blend.
- To the mixing bowl, add the xanthan gum (if needed), baking soda, baking powder, salt, and sugar, and whisk to combine well.
- Add the butter and oil to the large mixing bowl, and mix on medium speed until the mixture appears uniformly sandy (about 2 minutes). Stop the mixer a few times to scrape down the sides to make sure all of the flour gets moistened by the butter and oil.
- With the mixer on low speed, add the whisked wet ingredients.
- Once the wet ingredients have been added, increase the mixer speed to medium and beat until the mixture seems mostly uniform (about 2 minutes). Using a silicone spatula, turn over the batter a few times by hand.
- The batter should be fluffy and relatively smooth, although a few lumps are fine. Do not overmix the batter in an attempt to make it perfectly smooth. It will be thickly pourable.
- Transfer the batter to the prepared pan, and smooth into an even layer with an offset spatula. Bang the bottom of the pan flat on the counter a few times to break any large air bubbles.
- Place the baking pan in the center of the preheated oven and bake for 20 minutes. Rotate the pan in the oven 180°, and reduce the oven temperature to 325°F.
- Continue to bake at 325°F until the cake is lightly golden brown all over, has begun to pull away from the sides of the pan and a toothpick inserted in the center comes out with no more than a few moist crumbs attached (at least another 15 minutes for an 8-inch cake, less for a 9-inch cake).
- Remove the cake from the oven and place the pan on a wire rack. Allow the cake to cool in the pan for 15 minutes on the rack before turning it over onto the rack (and removing the parchment paper liner) and letting it cool completely.
Prepare the whipped cream
- Place the heavy whipping cream and confectioners’ sugar in a large mixing bowl or the clean bowl of a stand mixer fitted with the whisk attachment.
- Whip on medium-low speed in the stand mixer or using a handheld mixer until the cream just begins to thicken. Increase the mixer speed to medium or medium-high and continue to whip until the mixture holds a stiff (but not dry) peak.
- Place the whipped cream in the refrigerator to chill while you finish the cake.
Assemble the cake
- Once the cake has cooled completely, place it (bottom side up) on a cake plate or other serving plate.
- Drain as much of the juice that the strawberries have released into a jar or small container.
- Pour evenly over the top of the cooled cake. Pour the juice slowly so the cake has a chance to absorb the moisture. You can also use a spatula to help move the juice around and help the cake absorb it.
- Remove the whipped cream from the refrigerator and spread it into in a single swoopy layer on top of the cake.
- Top with the sliced strawberries and remaining juice. Serve immediately.
Notes
Nutrition
Nutrition information is automatically calculated, so should only be used as an approximation.

make ahead/leftovers
Storage instructions
Once you've assembled the cake by adding the strawberry juice, plus the whipped cream and strawberries, the cake is best served the same day. You can refrigerate the cake, as assembled, to keep the whipped cream from melting. Just let it come back to room temperature before serving.
The plain vanilla cake can be made, cooled and wrapped tightly, then stored for up to 1 day on the counter, 3 days in the refrigerator, or up to 2 months in the freezer. If frozen, defrost at room temperature before finishing the cake.
Recipe variations
Since this recipe has 3 distinct parts, you can play around with flavors and textures pretty easily. Here are some ideas to get you started:
Frosting ideas
There are about as many recipes for gluten free frosting as there are flavors you can imagine. Try using a classic vanilla buttercream recipe and adding a layer of chopped strawberries on top. Or add some strawberry jelly to the buttercream (use jam if you prefer some strawberry pieces).
You can also use a stabilized whipped cream instead of regular whipped cream so you can keep the cake out at room temperature for longer.
Different fruits
In place of strawberries, you can use a different fruit. Raspberries would be the easiest swap, since they'll release juice as they sit with the sugar and vinegar. You can also try blueberries, but I would brush the top of the cake with blueberry or even apple jelly rather than soaking the berries first. Passion fruit or kiwi would probably also work, or a combination of different fruits.
Make a layer cake
You can also double the yield of the recipe (to 16 slices) and divide the cake batter equally into 2 separate 8-inch or 9-inch cake pans. Then, follow the directions as written, except use fewer strawberries in the center. Then, layer the second cake on top of the some of the strawberries, and top with whipped cream and more strawberries.
FAQs
I wouldn't recommend making this cake in a loaf pan. If you'd like a vanilla cake that's in a loaf shape, try this gluten free pound cake recipe.
You should be able to make this recipe into 12 cupcakes, pour strawberry juice on top after they've cooled, then top with whipped cream and berries. I think they should take about 22 minutes to bake at 350°F, but I can't be sure. I would chop the strawberries rather than slicing them, though, to fit more on each cupcake. Or you could use our gluten free cupcakes recipe instead and use the same toppings.


This gluten free strawberry shortcake cake is a delightful twist on the classic strawberry shortcake dessert. Featuring an incredibly tender vanilla cake layered with fluffy fresh whipped cream and juicy strawberries, it offers the perfect balance of sweetness and freshness in every bite. The combination of butter and a touch of oil creates a moist yet sturdy cake that can easily support generous layers of whipped cream, fresh berries, and their natural juices. Whether you’re celebrating a special occasion or simply craving a light and fruity dessert, this cake is sure to impress with its beautiful presentation and irresistible flavor.
I made your strawberry shortcake for Easter, Nicole and it was so delicious! Not a slice left over! Thank you!
That’s so great to hear, Annette! Thank you so much for sharing your experience, and I’m so glad you love this cake as much as we do!
Our family loved this cake. I made it with King Arthur, gluten-free flour (which does contain xanthan gum) and added 1/8 of a teaspoon of additional xanthan gum because I wasn’t sure if I needed to add extra, but it was a good choice and the cake turned out perfectly with this addition. I used a 9 inch cake pan, baked at 350 for the allotted amount of time, and then turned the oven down to 325 and left it for an additional six minutes. The cake was baked beautifully with no crumbs on the toothpick tester. I’m glad I didn’t leave it in there for a minute longer! for the whipped topping, I used two cans of coconut cream with the additional liquid poured off. I only added about 2 teaspoons of powdered sugar, +1 teaspoon of vanilla paste, and it was perfectly sweet. I probably could have gotten away with just one can of coconut cream because this made a large amount of topping.I did add white balsamic vinegar to the strawberries, and that was a good choice. You could not taste the vinegar and the strawberries were lovely. I’ve been baking gluten-free for sometime, and I have to say this is one of my favorite cakes that I have ever made! This recipe will be going into my regular rotation of cakes I can depend on.
Made this for my granddaughter’s First Communion lunch. It was light, moist and absolutely the best strawberry shortcake I have ever had (including both gluten and gluten free) I used your Better Than Cup 4 Cup flour blend. It was a hit with everyone at the party.
Thank you so much for sharing that you made this cake so successfully for such a special occasion, Lisa. So glad you love the cake!
I made this for Easter Sunday (after our kids aged out of the traditional bunny cake) and it was perfection. Honestly there was kind of a stunned silence when everyone started eating it, and nobody touched the gluteny desserts. I used King Arthur Measure for Measure flour. Thank you, Nicole!
Thank you so much for sharing that, Christine! Stunned silence earns this comment a place at the top of the blog post!
Wow! This recipe is fantastic!! It is so delicate in flavor and really lets the whipped cream and strawberries be the stars of the show. My granddaughter is now requesting this for her birthday cake in a few weeks.
That’s so great to hear, Laney! I love your description of this cake, and happy birthday to one lucky granddaughter!
Hi Nicole
I made this cake using your cup4cup mix, and it was good. However, it was a little dark in color, and I noticed some brown spots in the middle. What could be causing this?
It sounds like most likely your oven runs hot, Aya, as most do. I recommend using an inexpensive standalone oven thermometer and replacing it often for this reason (that’s what I do). In addition, here are questions to ask yourself that could have led to dark spots: Were any of your ingredients cold, which could keep sugar crystals from melting properly in the oven? Did you sift the flour (especially since my mock Cup4Cup contains milk powder)?
No, none of the ingredients were cold, and yes, I sifted the flour. I used an oven at 155 degrees because it is really high, as you mentioned, and this temperature is usually suitable for cakes, but some types of cakes have the same problem, and in some of them, I find some dough on the toothpick.
I’m going to try this GF Strawberry short cake.Yum. Thankyou for such good instructions. They are excellent.
Easy recipes and delicious
Thank you so much, Julie!!