
This post may contain affiliate links. Please read our disclosure policy.
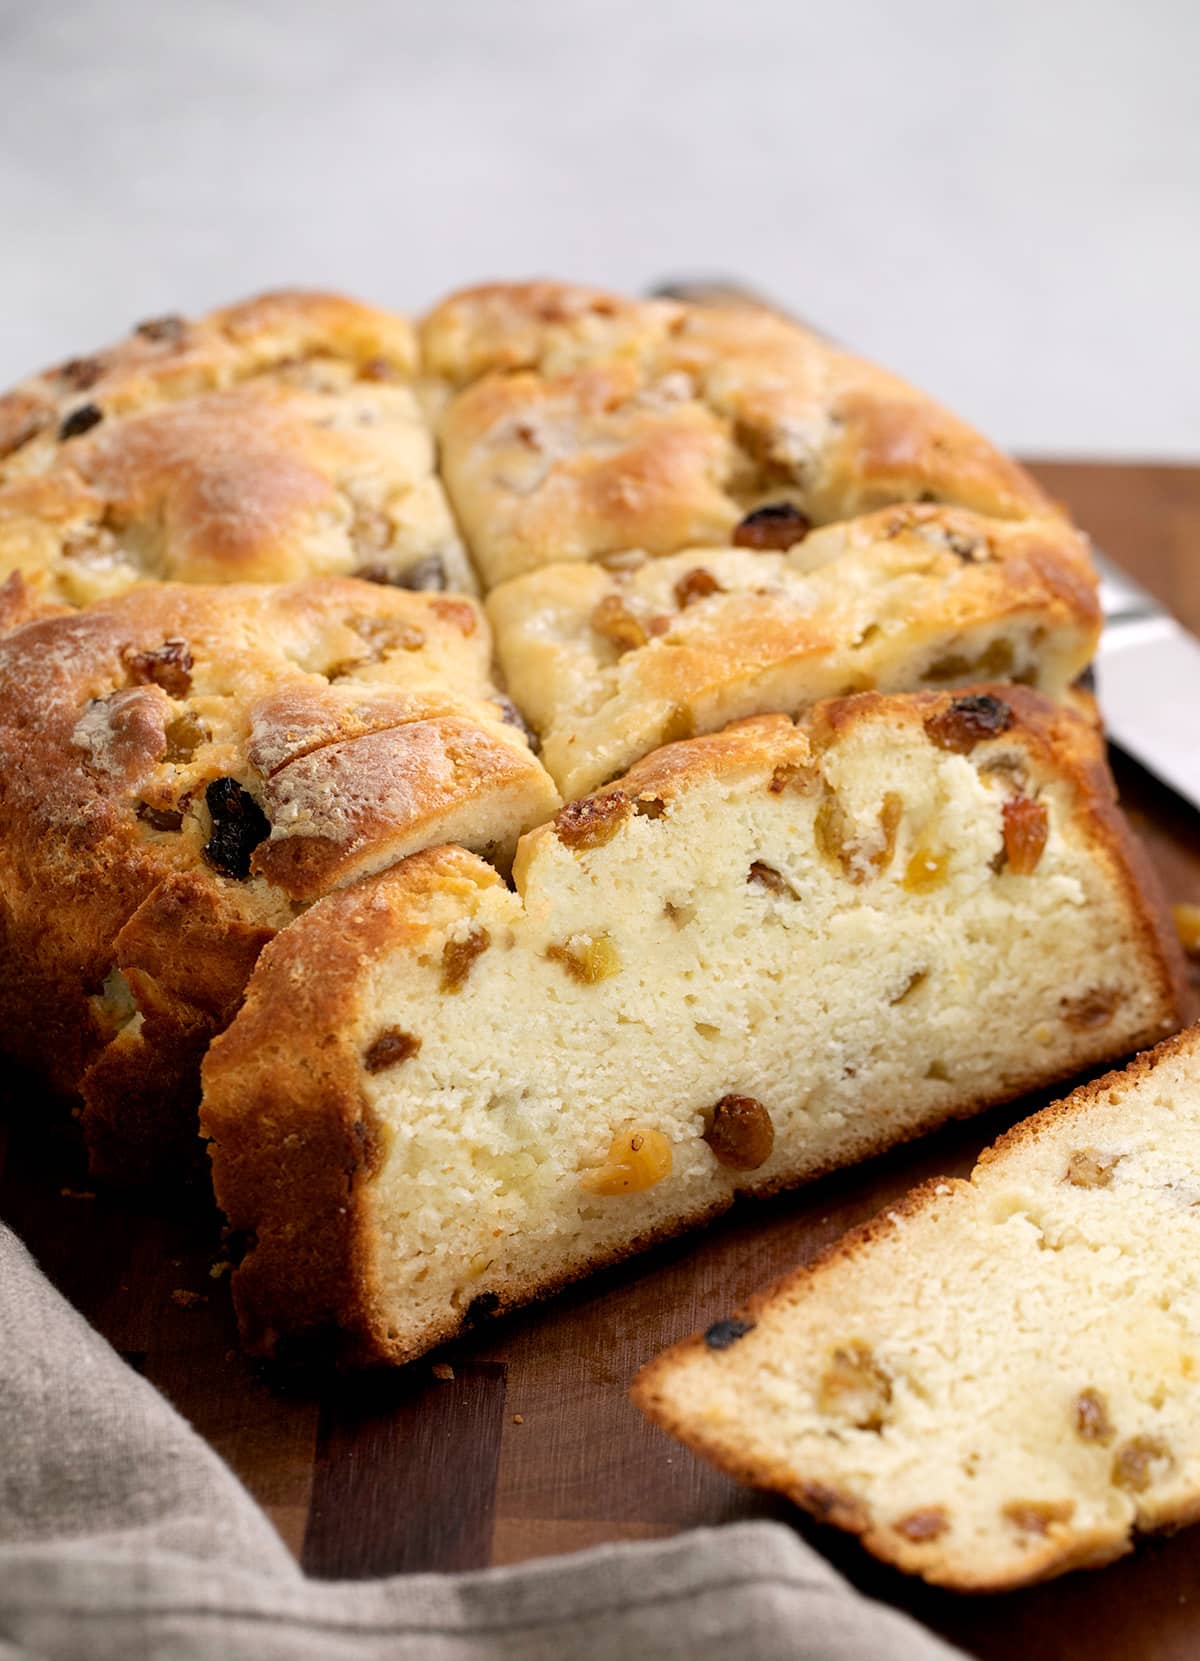
This gluten free Irish soda bread is a lightly sweet quick bread that tastes best slathered with some extra Irish butter. Celebrate St. Patrick's Day, or any day, the way you remember with this classic, golden brown soda bread!
Why this recipe works
Irish Soda Bread is a quick bread, not a yeast bread, but it's not your typical quick bread. You don't bake it in a loaf pan, to start. Plus, I make it more like a pastry, with clumps of cold butter, chilled buttermilk, and a light touch when handling.
Made this way, the bread is light, tender and buttery. But you can slice it perfectly, either in wedges or more traditional slices.
I first developed this recipe 2015 when my gluten free son's grammar school class was celebrating St. Patrick's Day by sharing Irish soda bread. He still remembers today how I made sure that he could have what everyone else did when he was small. Let's bring it all back, for ourselves and our gluten free loved ones!
Recipe ingredients
Here's what you'll need to make this recipe, including the role each ingredient plays in a successful soda bread:
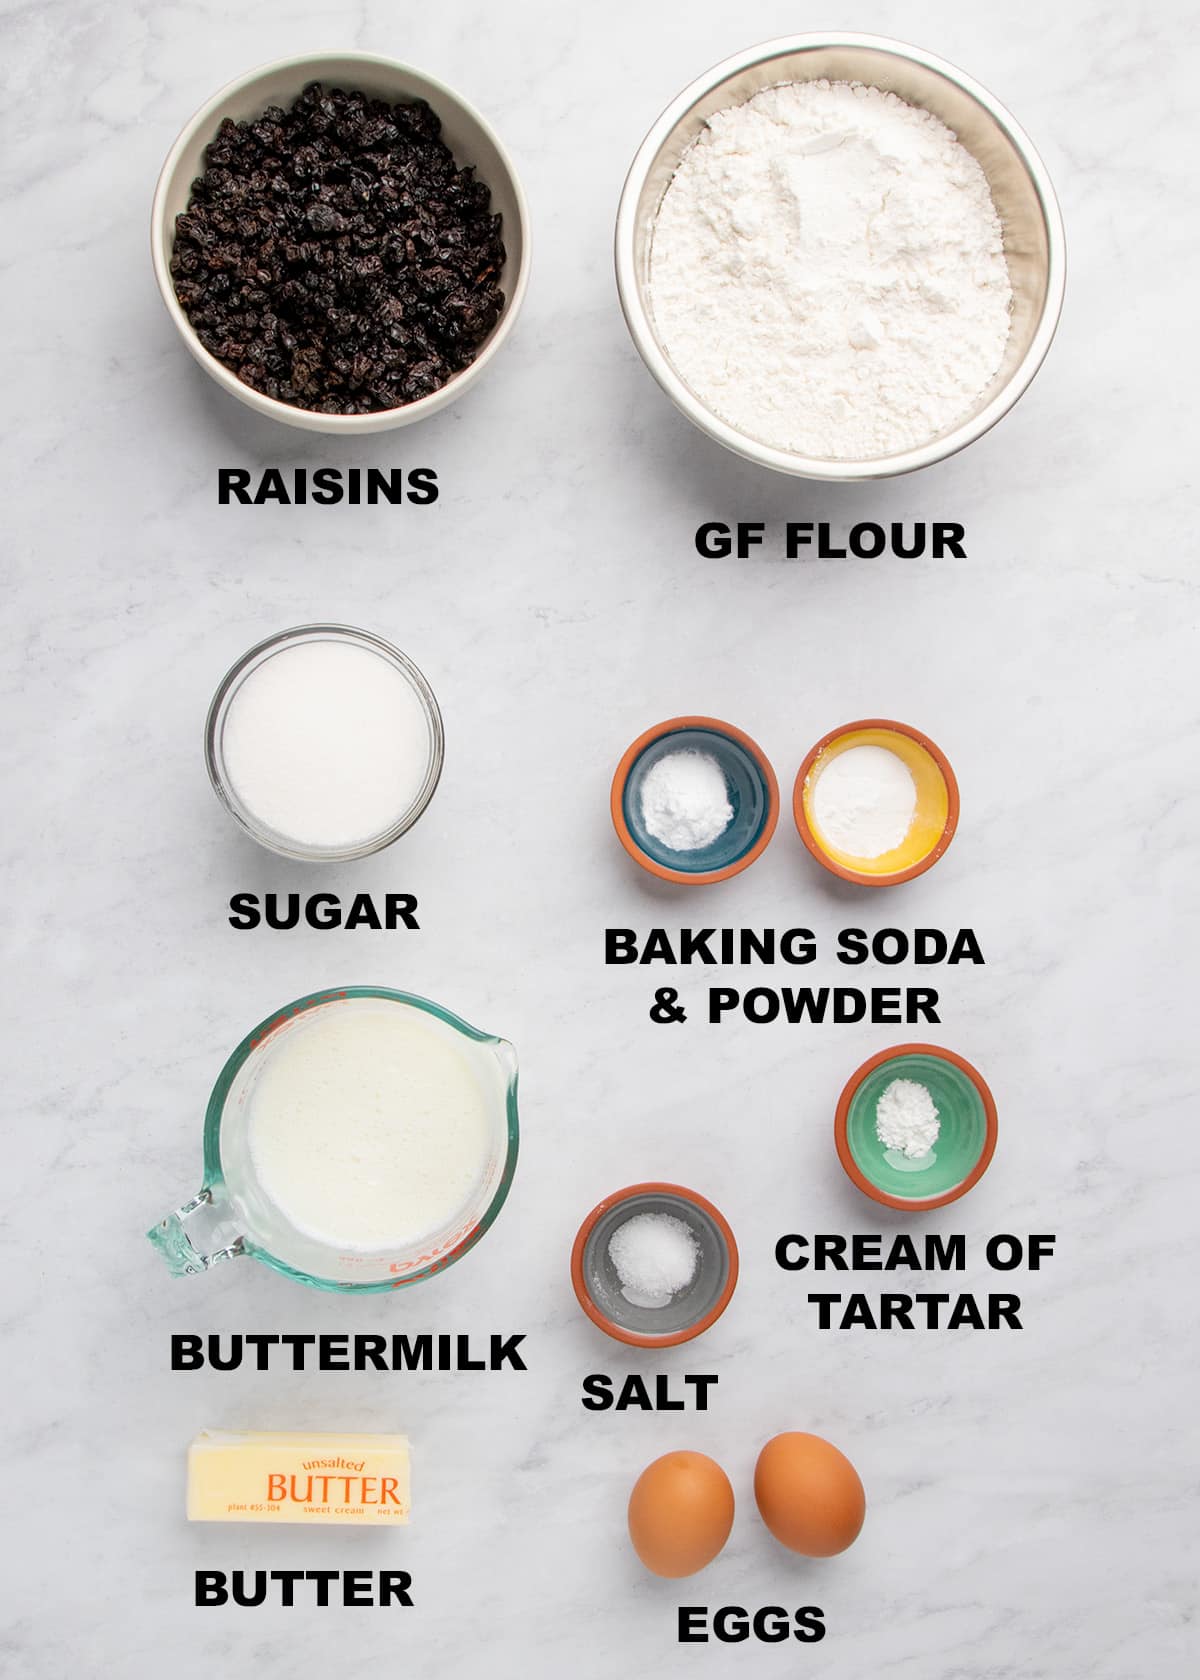
- Gluten free flour: Provides most of the structure for the soda bread. Choose a well-balanced flour blend with a base of superfine rice flour like Better Batter's original blend or Nicole's Best multipurpose with added xanthan gum. Bob's Red Mill 1-to-1 in the blue bag may also work with an additional 1/2 to 3/4 teaspoon xanthan gum since it doesn't contain enough to provide the necessary binding.
- Baking soda and baking powder: Provide rise in the oven and help the soda bread brown.
- Salt: Brightens the other flavors.
- Cream of tartar: Along with the acid in the buttermilk, reacts with baking soda to create a full rise in the oven. Adds a slight tangy flavor, too.
- Sugar: Adds sweetness that complements the dried fruit and locks in moisture for a tender crumb.
- Butter: Adds buttery flavor and creates steam as the clumps of cold fat layered between flour expands, lifting the dough. It also helps the bread brown.
- Raisins: Add sweetness, a bit of moisture, and helps make the bread more festive as a special occasion holiday treat.
- Buttermilk: Adds moisture, tanginess, and reacts with baking soda to create rise.
- Eggs: Help bind the dough together and create structure that helps the bread keep its shape as it cools.
How to make gluten free Irish soda bread (step by step photos)
Here's a visual representation of how to make this recipe in your own kitchen. For full instructions and ingredient amounts, please see the recipe card below.
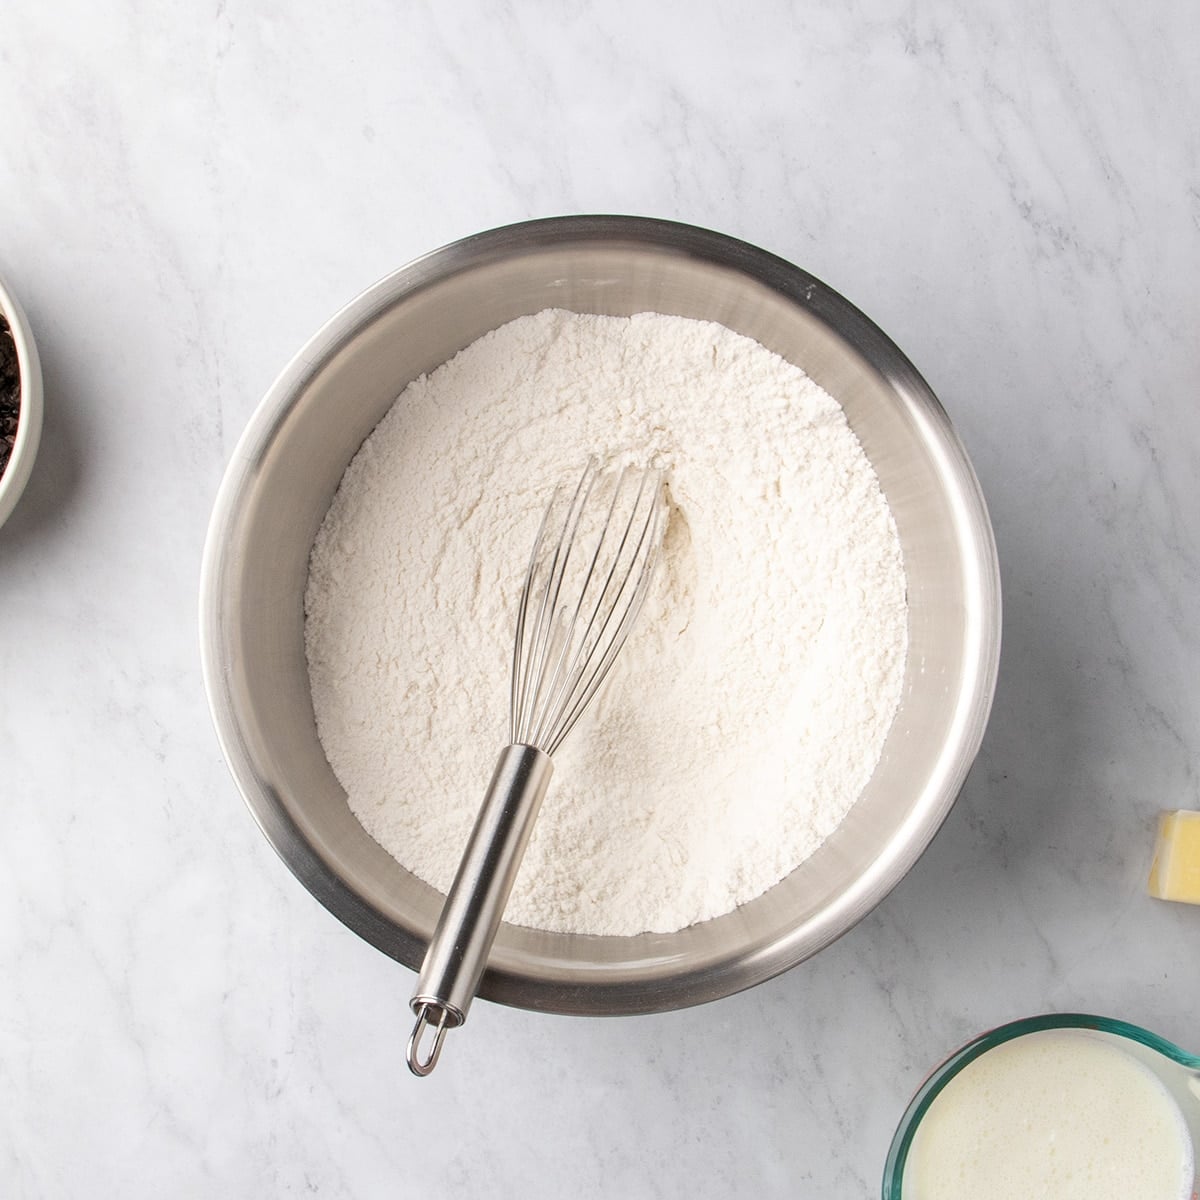
1. Combine dry ingredients
In a large mixing bowl, whisk together the gluten free flour blend with xanthan gum, baking powder and soda, salt, cream of tartar and sugar. Whisk well to avoid any pockets of leavener and create a cohesive dough.
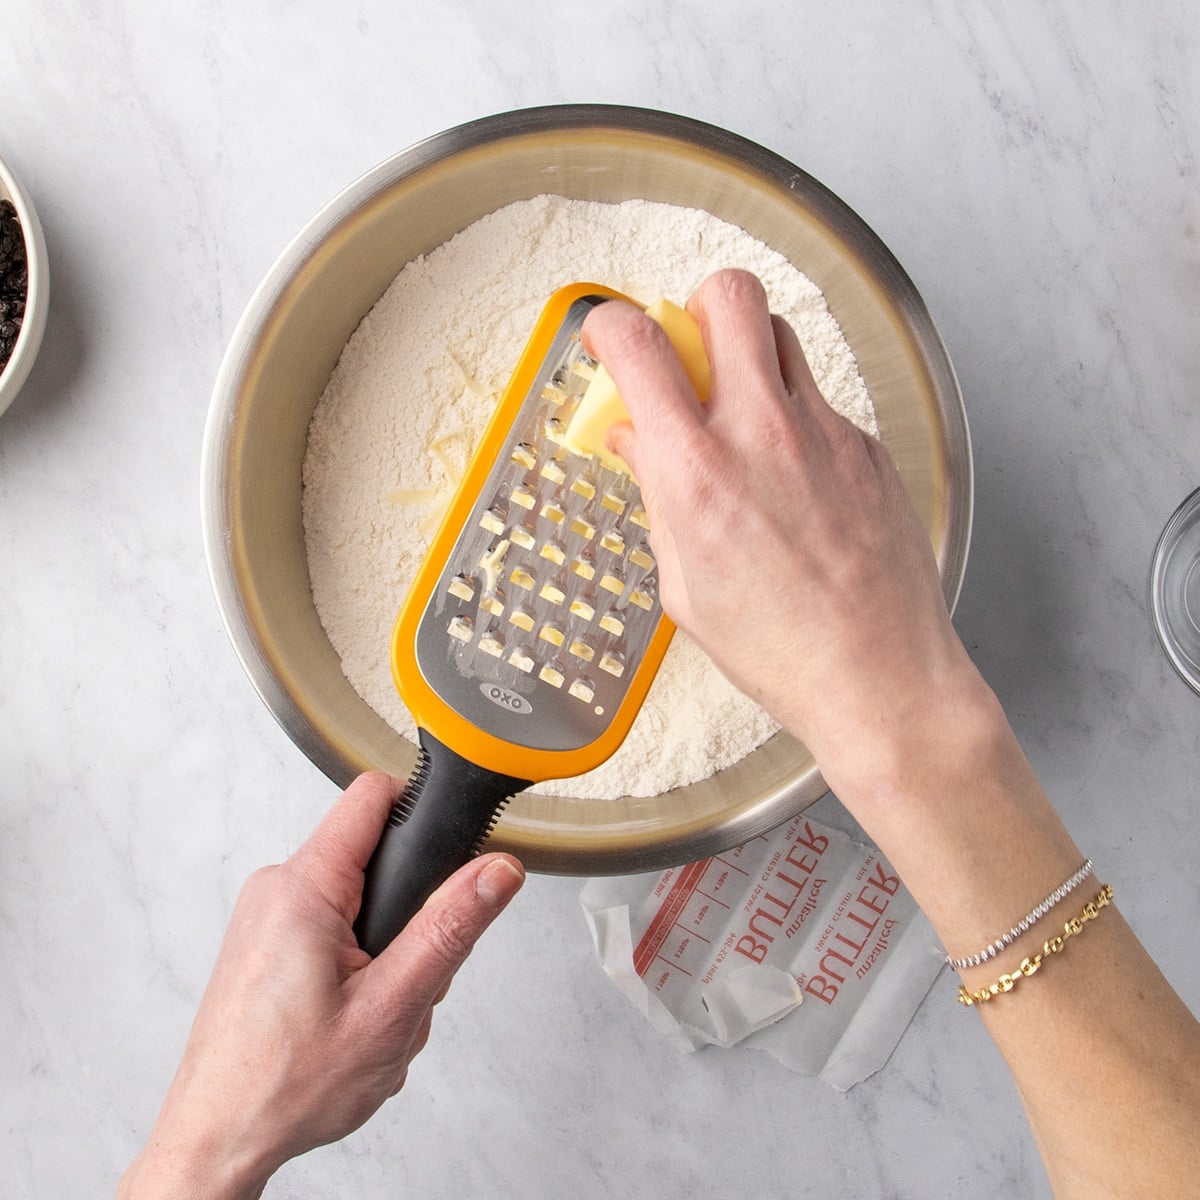
2. Add butter
Starting with very cold butter, use a coarse grater to shred the butter into the bowl of dry ingredients and toss to coat. You can also dice the butter, toss it in the dry ingredients and flatten the pieces into shards between floured fingers. Either way will scatter cold clumps of butter throughout for an even rise.
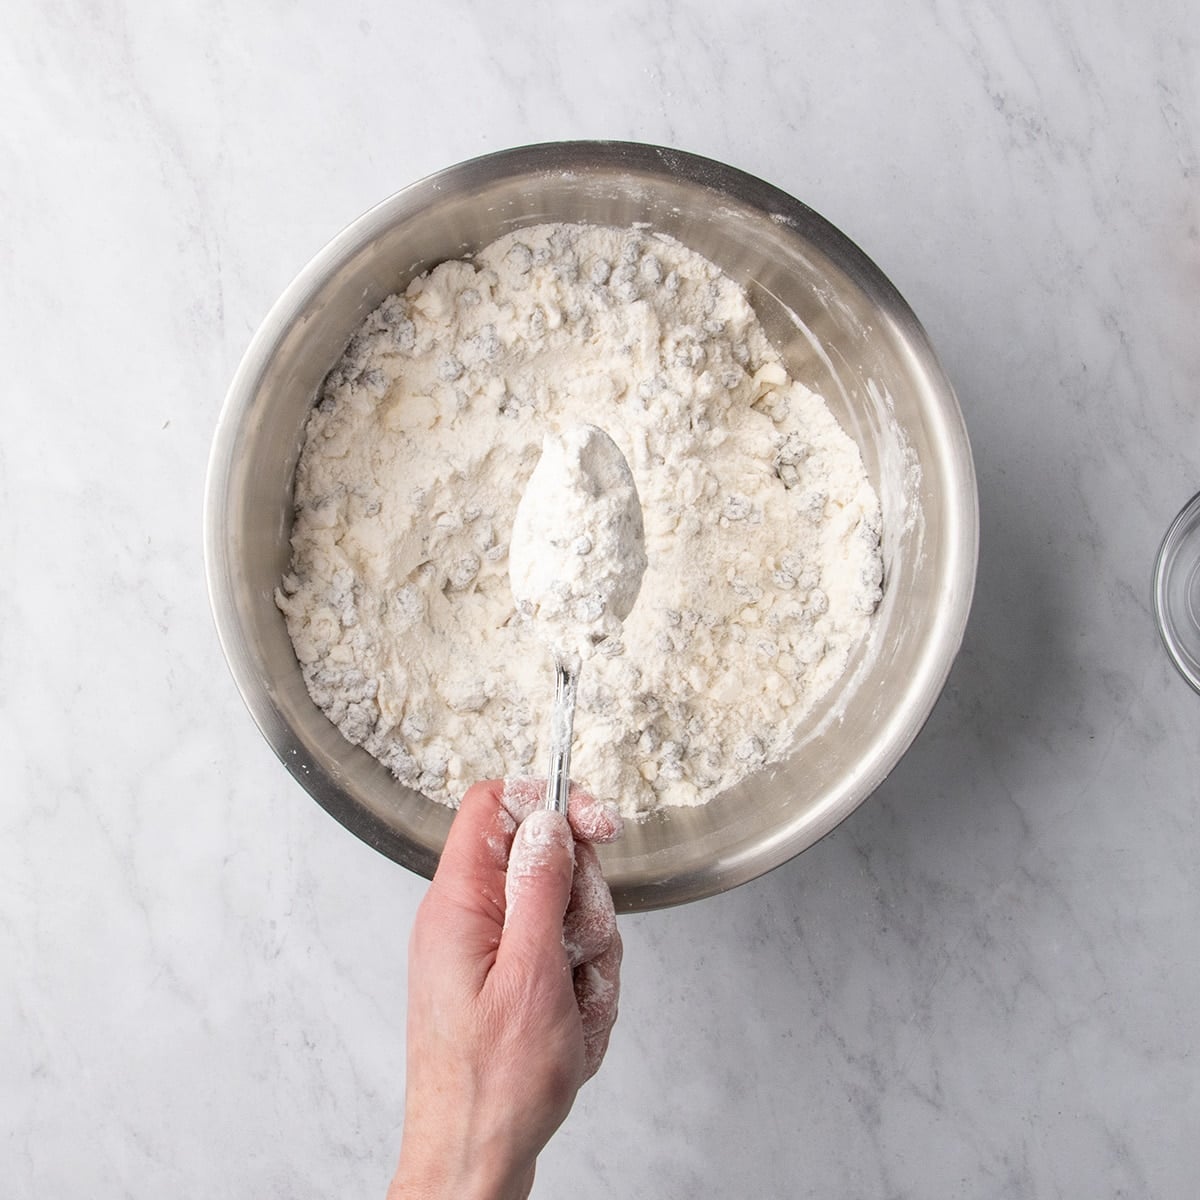
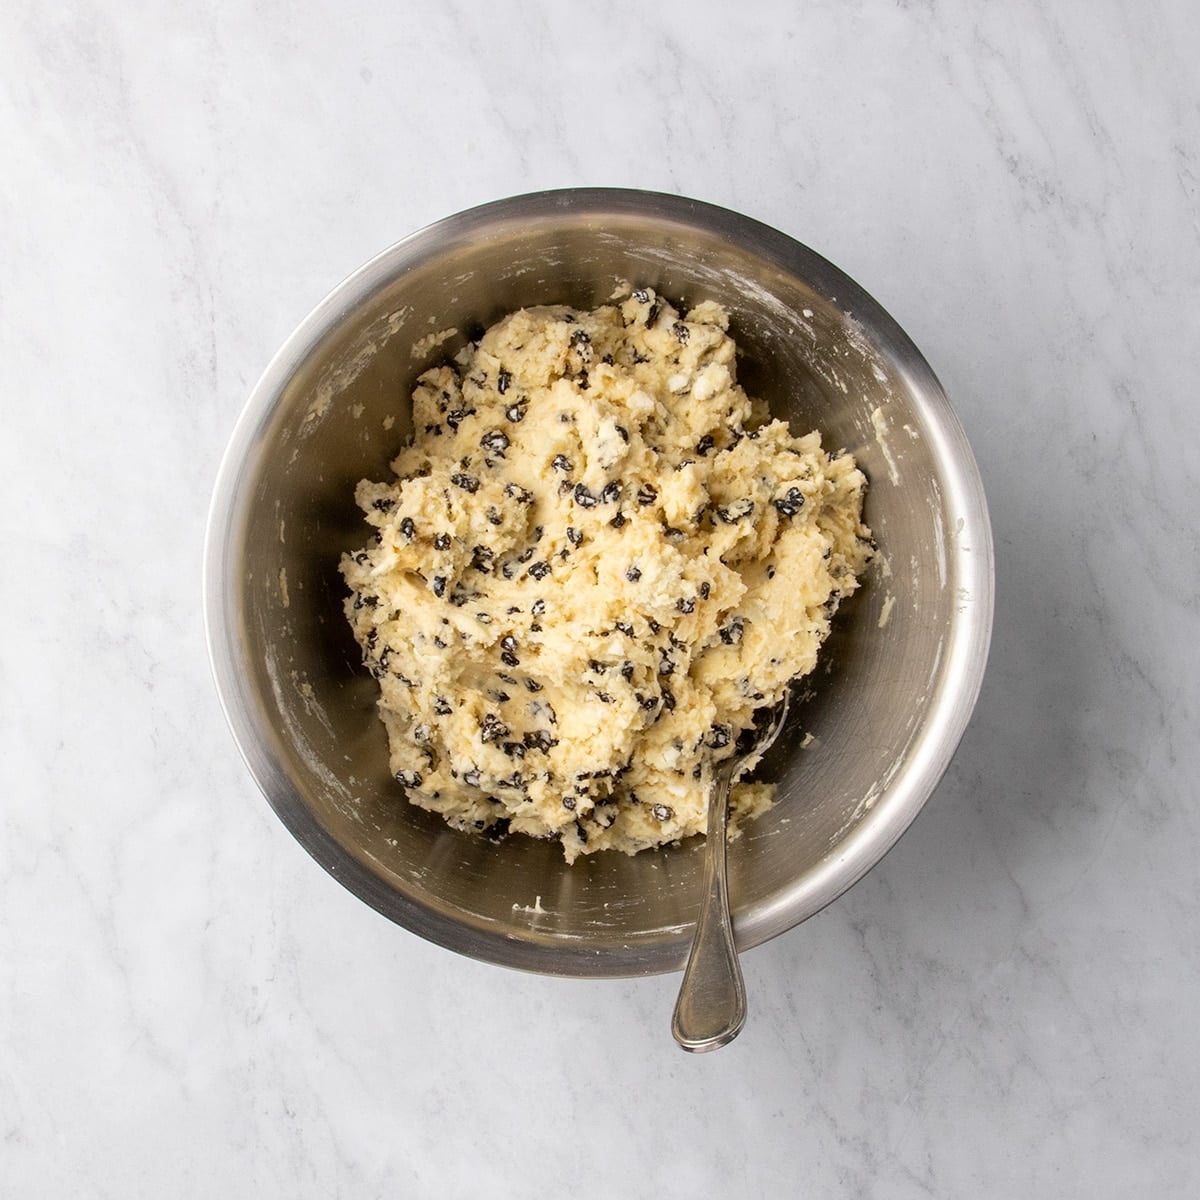
3. Mix in raisins
Add the raisins or other dried fruit pieces to the mixing bowl, and mix gently until evenly scattered in the dry ingredients. The mixture will look dry and clumpy.
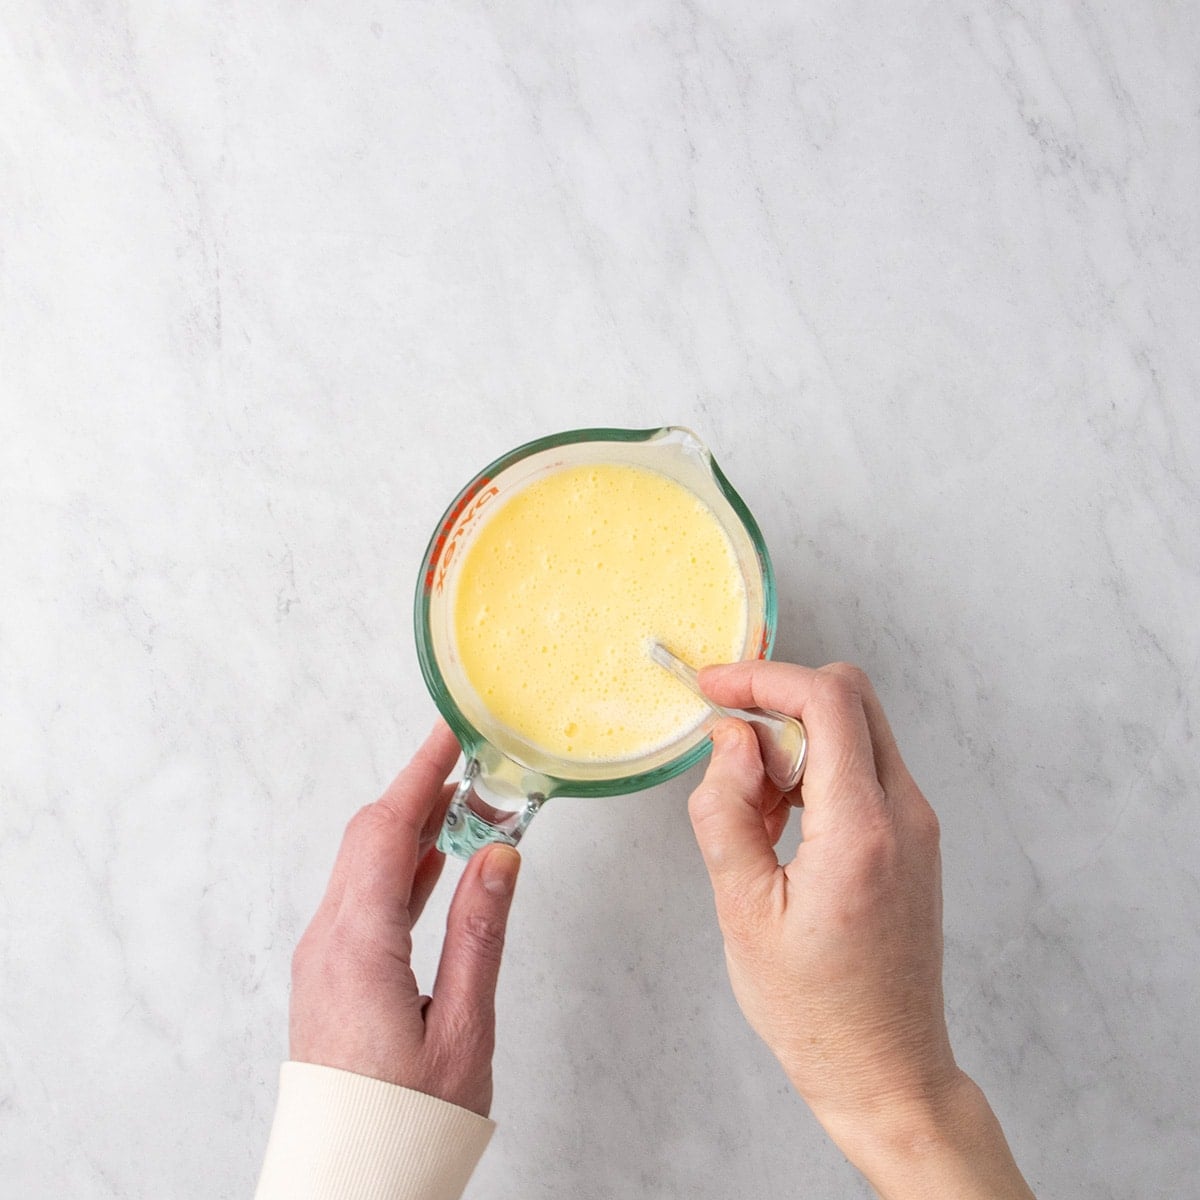
4. Whisk wet ingredients
In a small bowl or 2 cup or larger measuring cup, whisk together cold eggs and buttermilk. It's best to beat the eggs first for about 30 seconds to ensure the yolks and whites are fully combined for a smooth mixture.
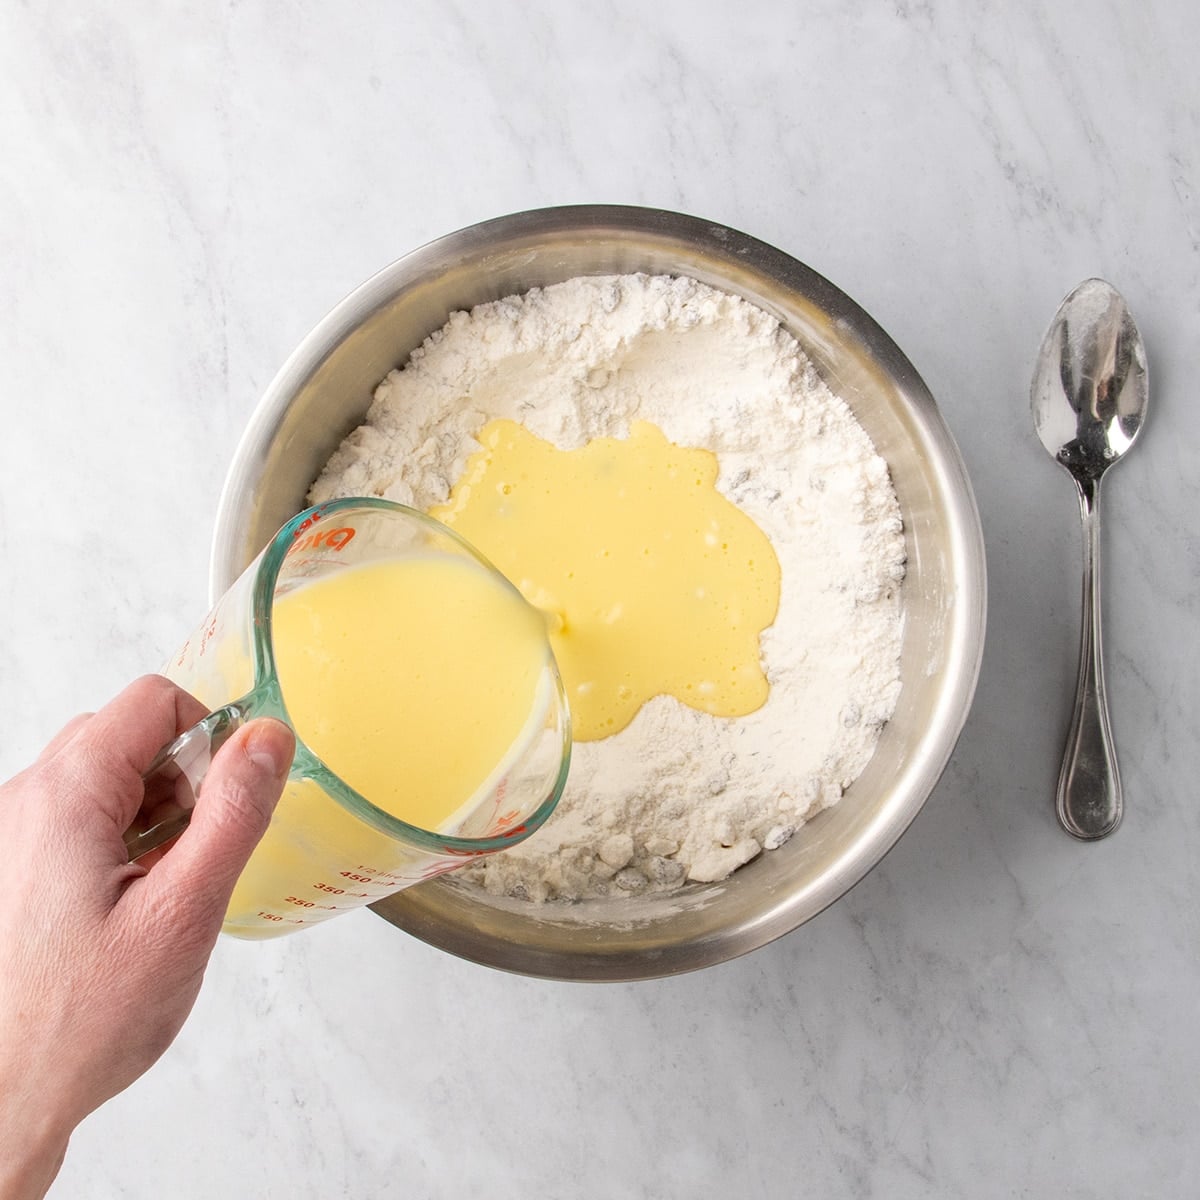
5. Add wet to dry
Create a well in the center of the ingredients in the mixing bowl and pour in the cold buttermilk mixture. That makes it easy to combine with a mixing spoon without overmixing to combine, which can melt the cold butter. If there are any very dry pockets of flour, add a bit more buttermilk sparingly to just those parts until the dough holds together.
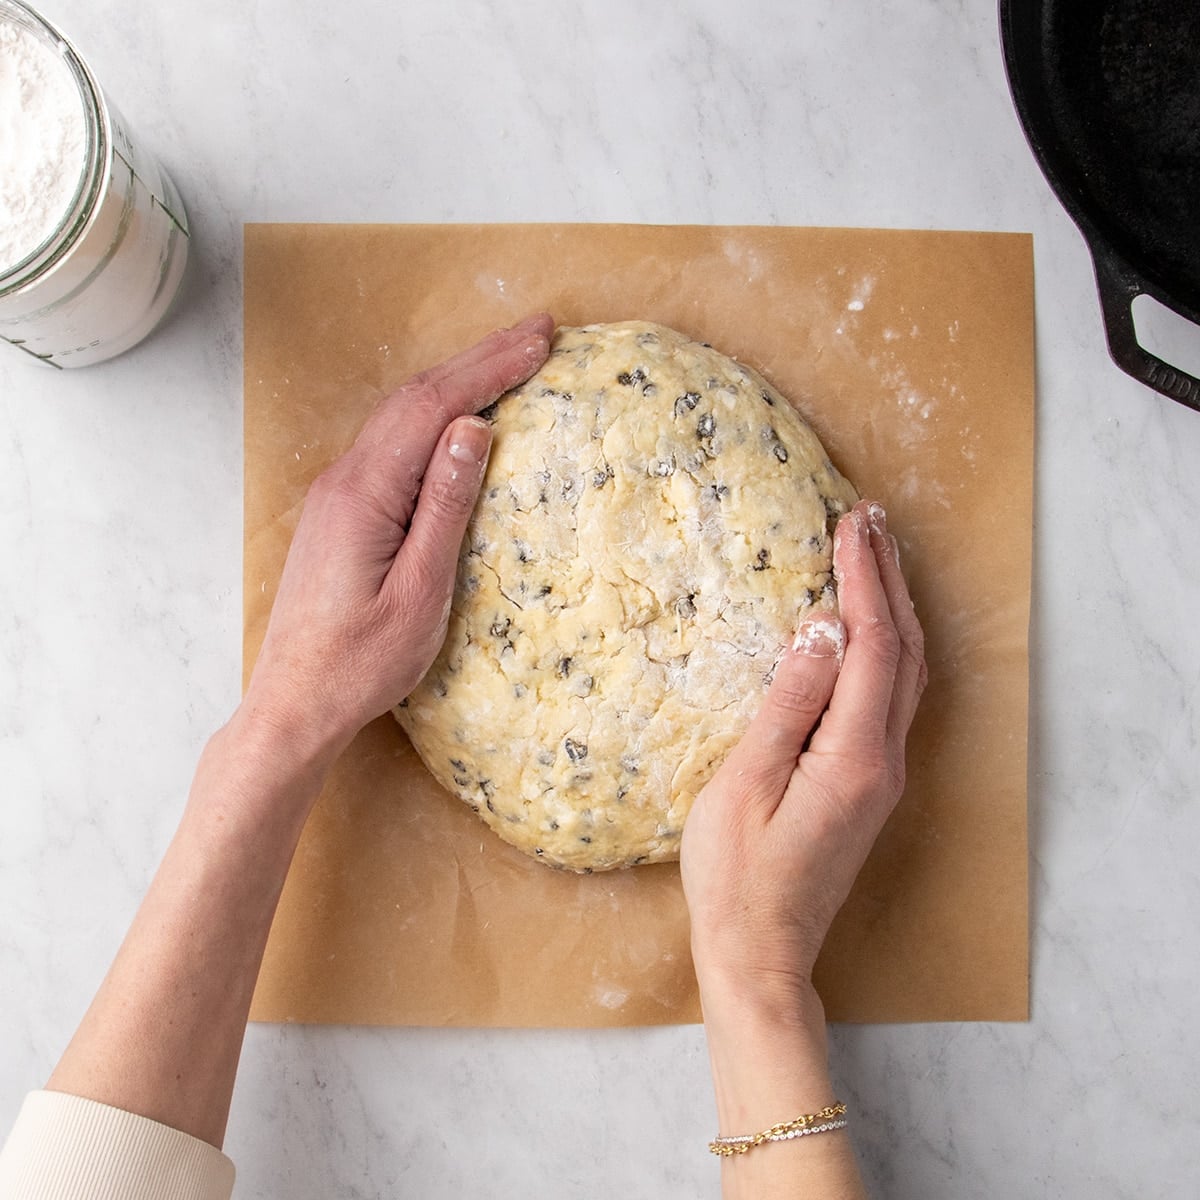
6. Shape the loaf
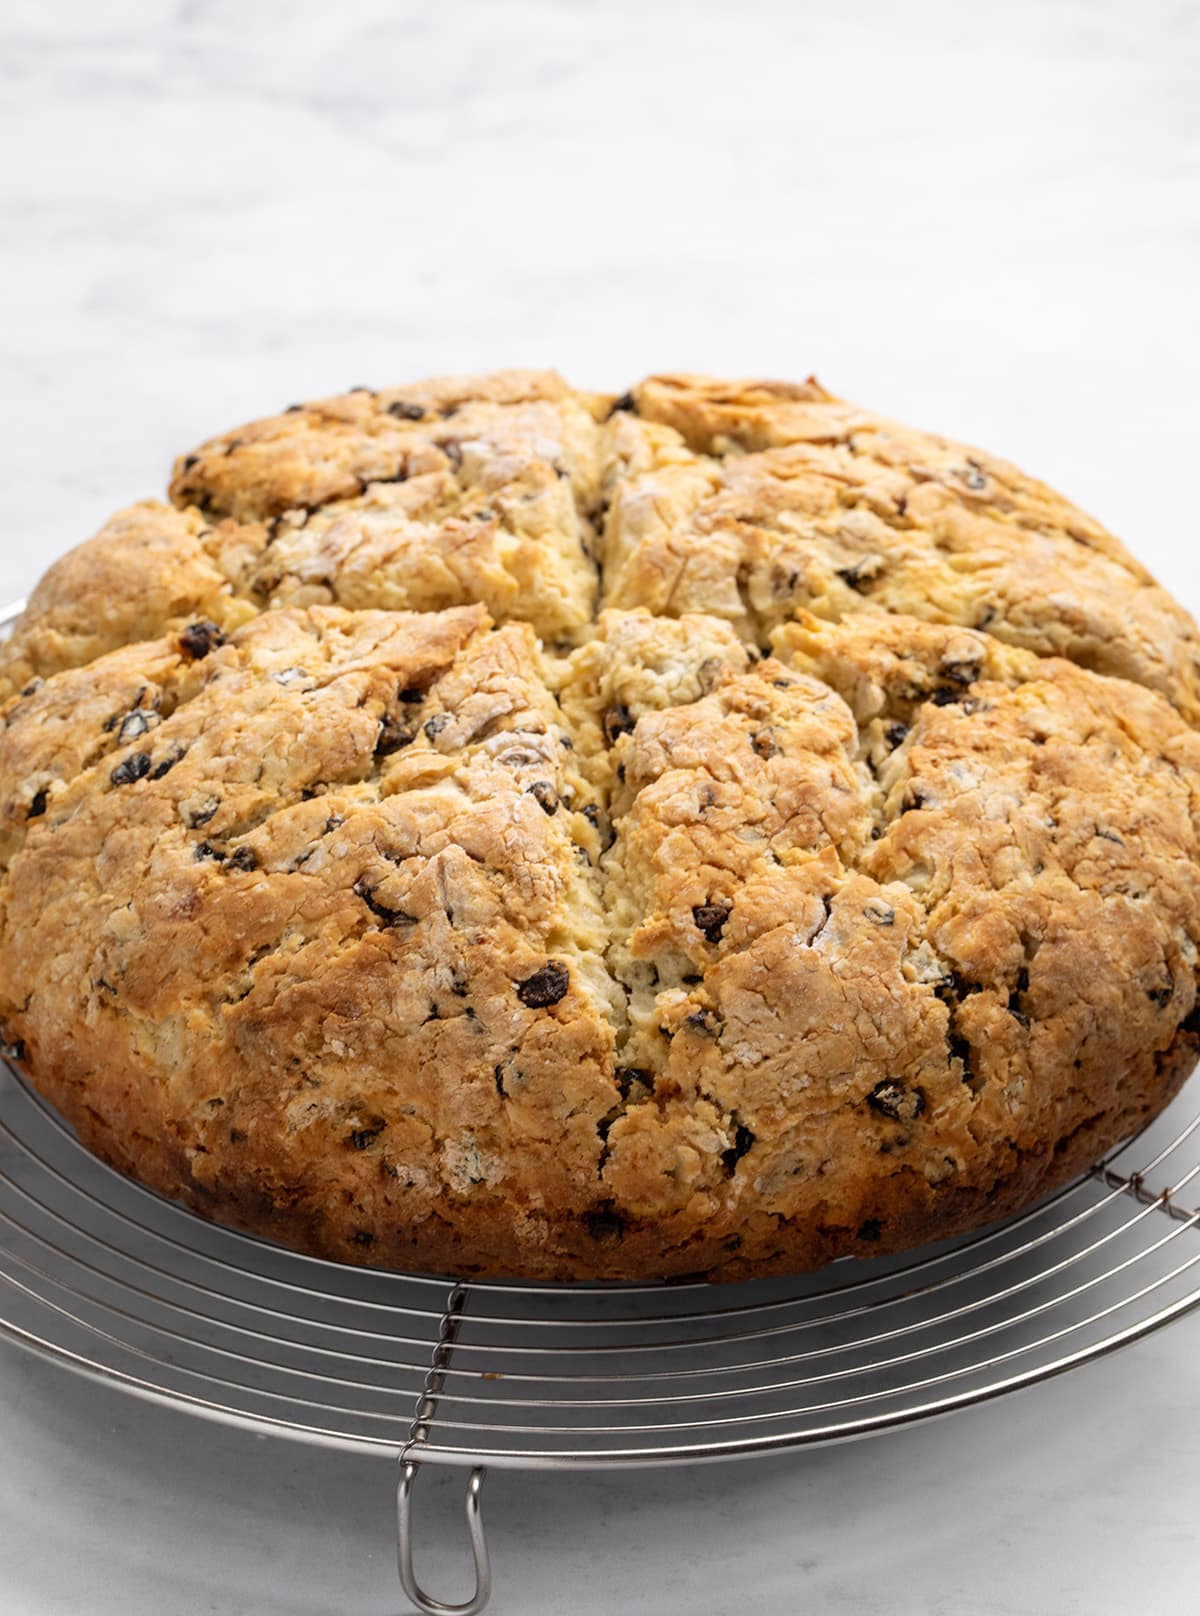
Turn the dough onto a lightly floured surface (on a piece of parchment if you're baking in a cast iron skillet) and shape gently into a round disk about 9-inches in diameter. Handle lightly so you don't melt the butter and don't compress the dough too much.
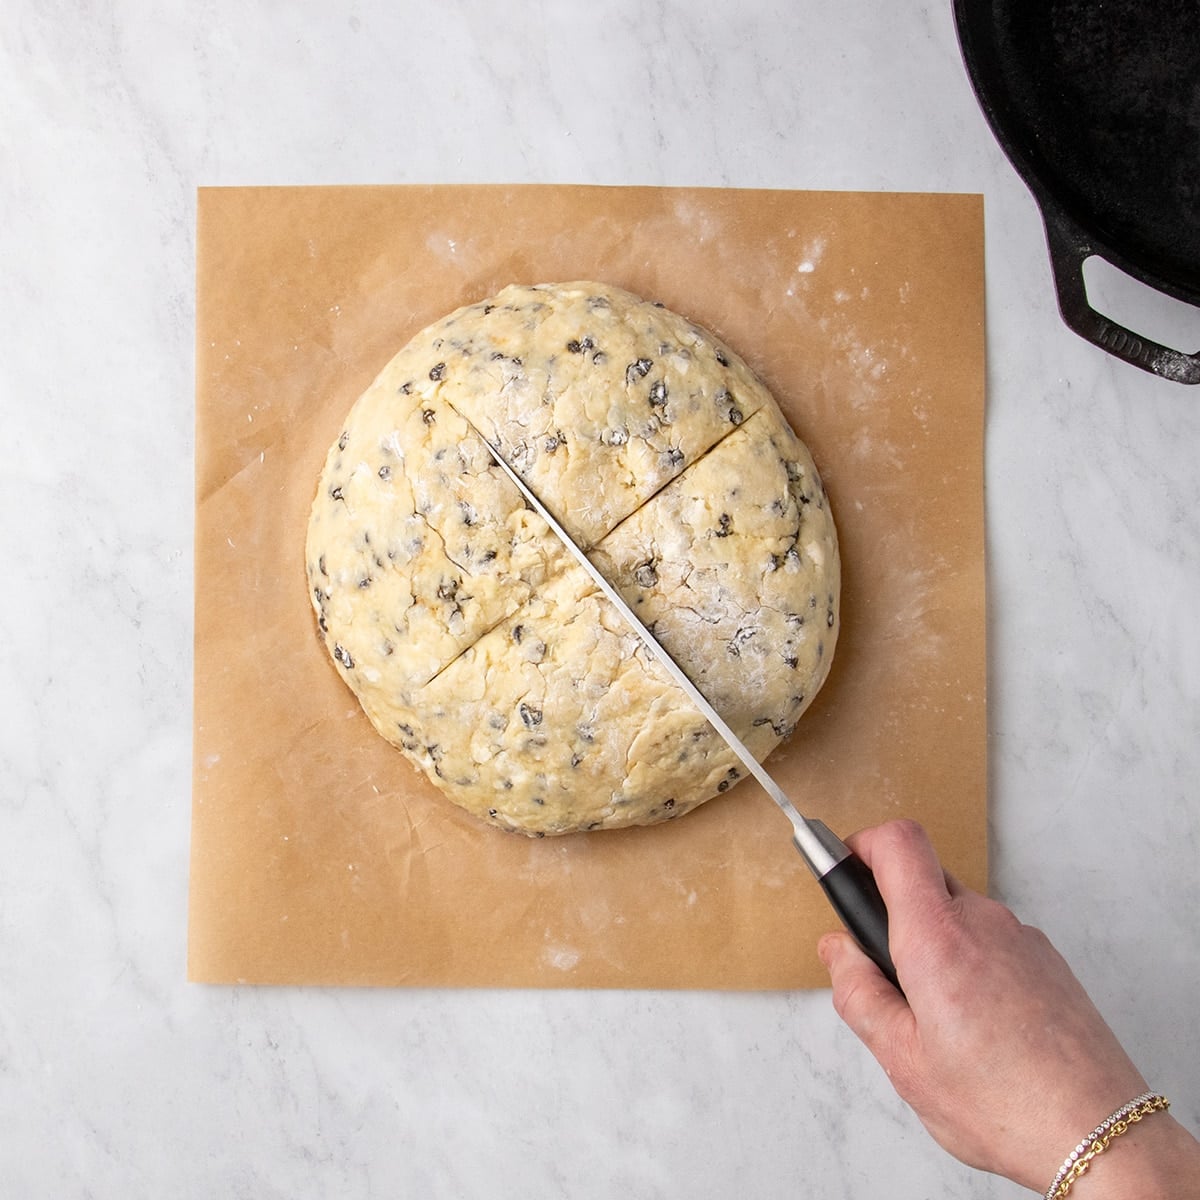
7. Score
Use a large, sharp knife and slice a cross or X about 1-inch deep into the center of the loaf, stopping about 1-inch away from the edges of the disk all around. This will allow steam to escape during baking.
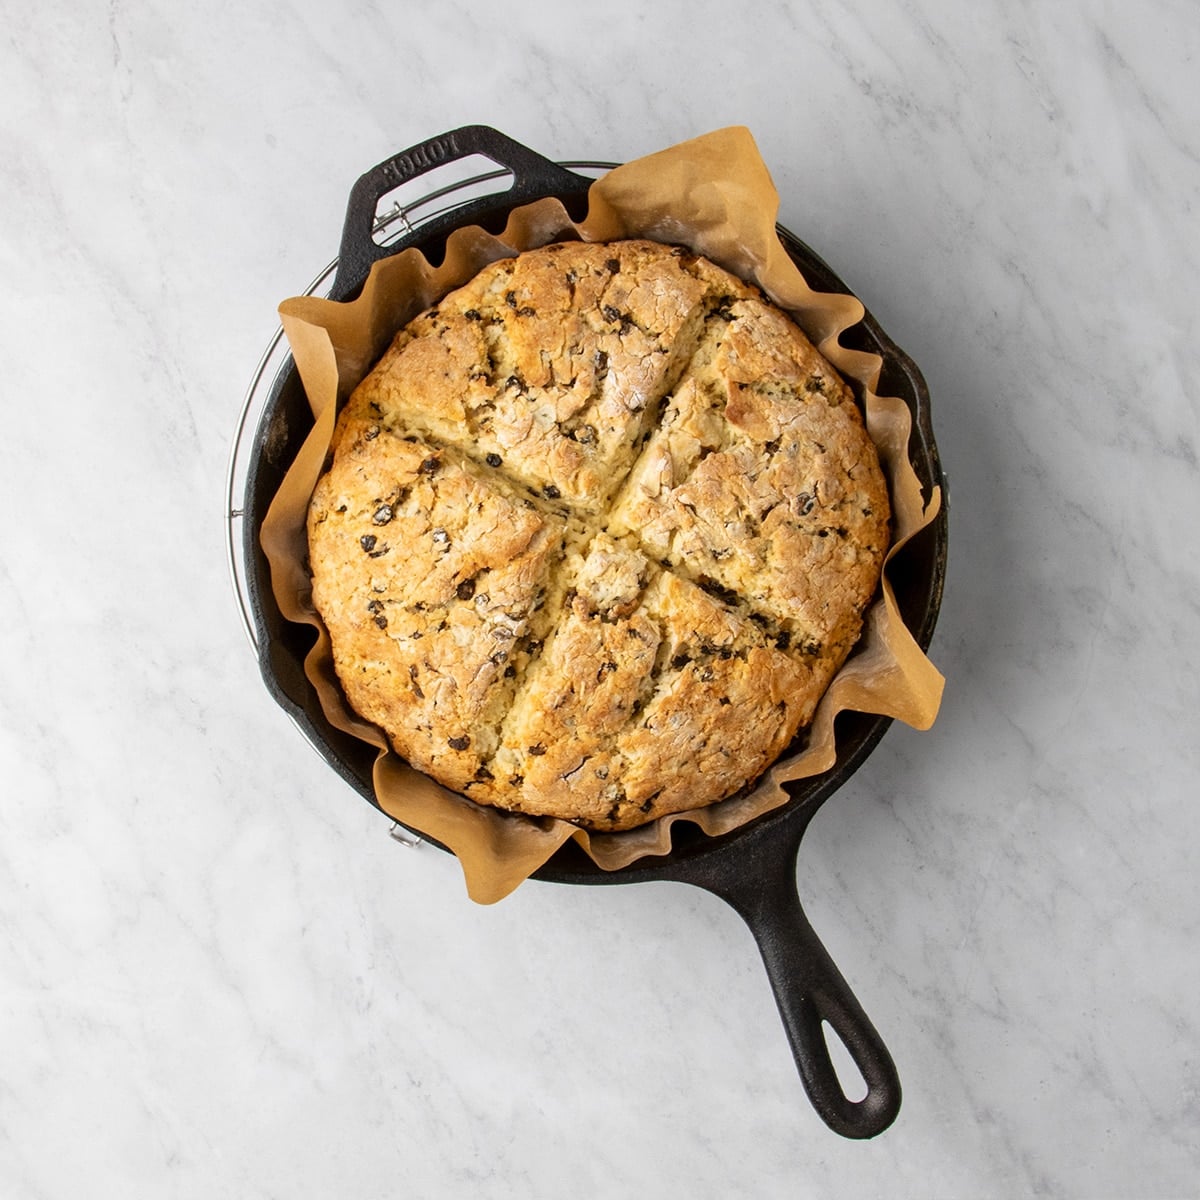
8. Bake
Lift the shaped loaf (on parchment if using) into the center of your baking pan or skillet. Bake in a preheated 375°F oven until the loaf is lightly golden brown all over, firm to the touch in the center, and a tester pressed down into the middle comes out with a few moist crumbs (not wet).
Pay attention to all doneness indicators, not the clock, when determining that the loaf is done baking. If you're baking in a cast iron skillet, the baking time may be shorter and the crust will likely be crisper.

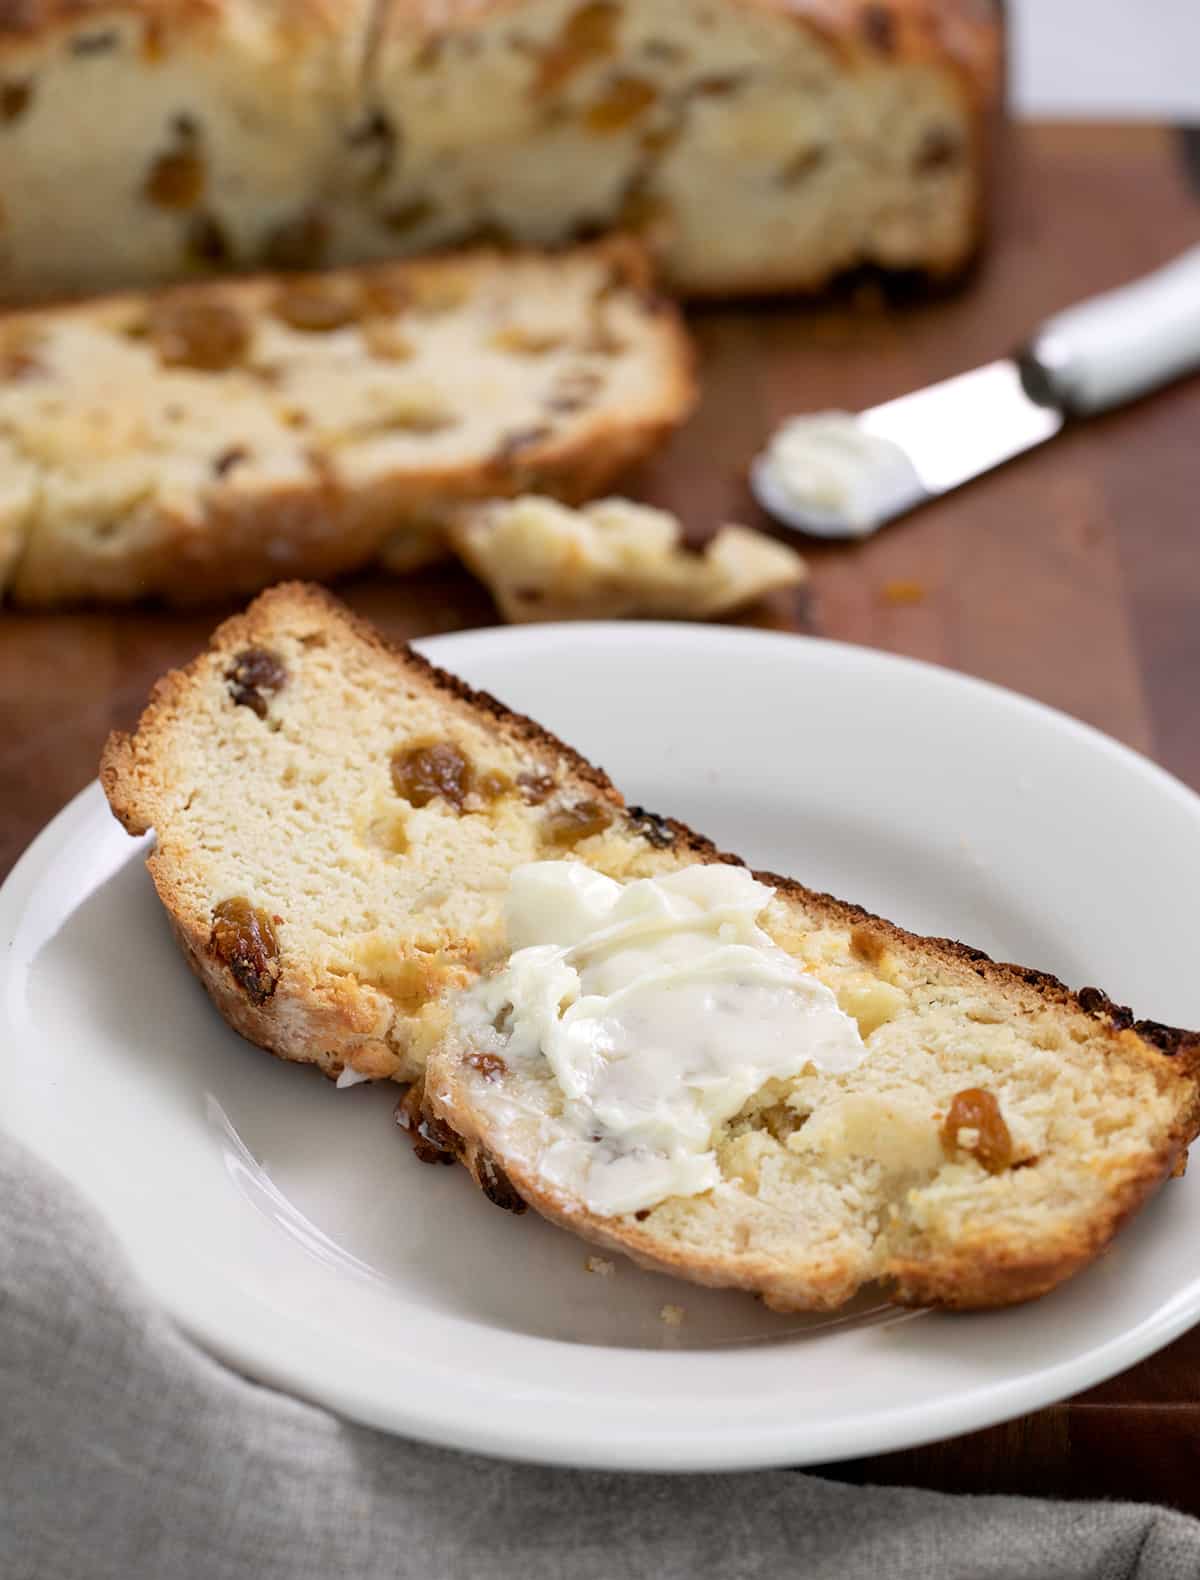
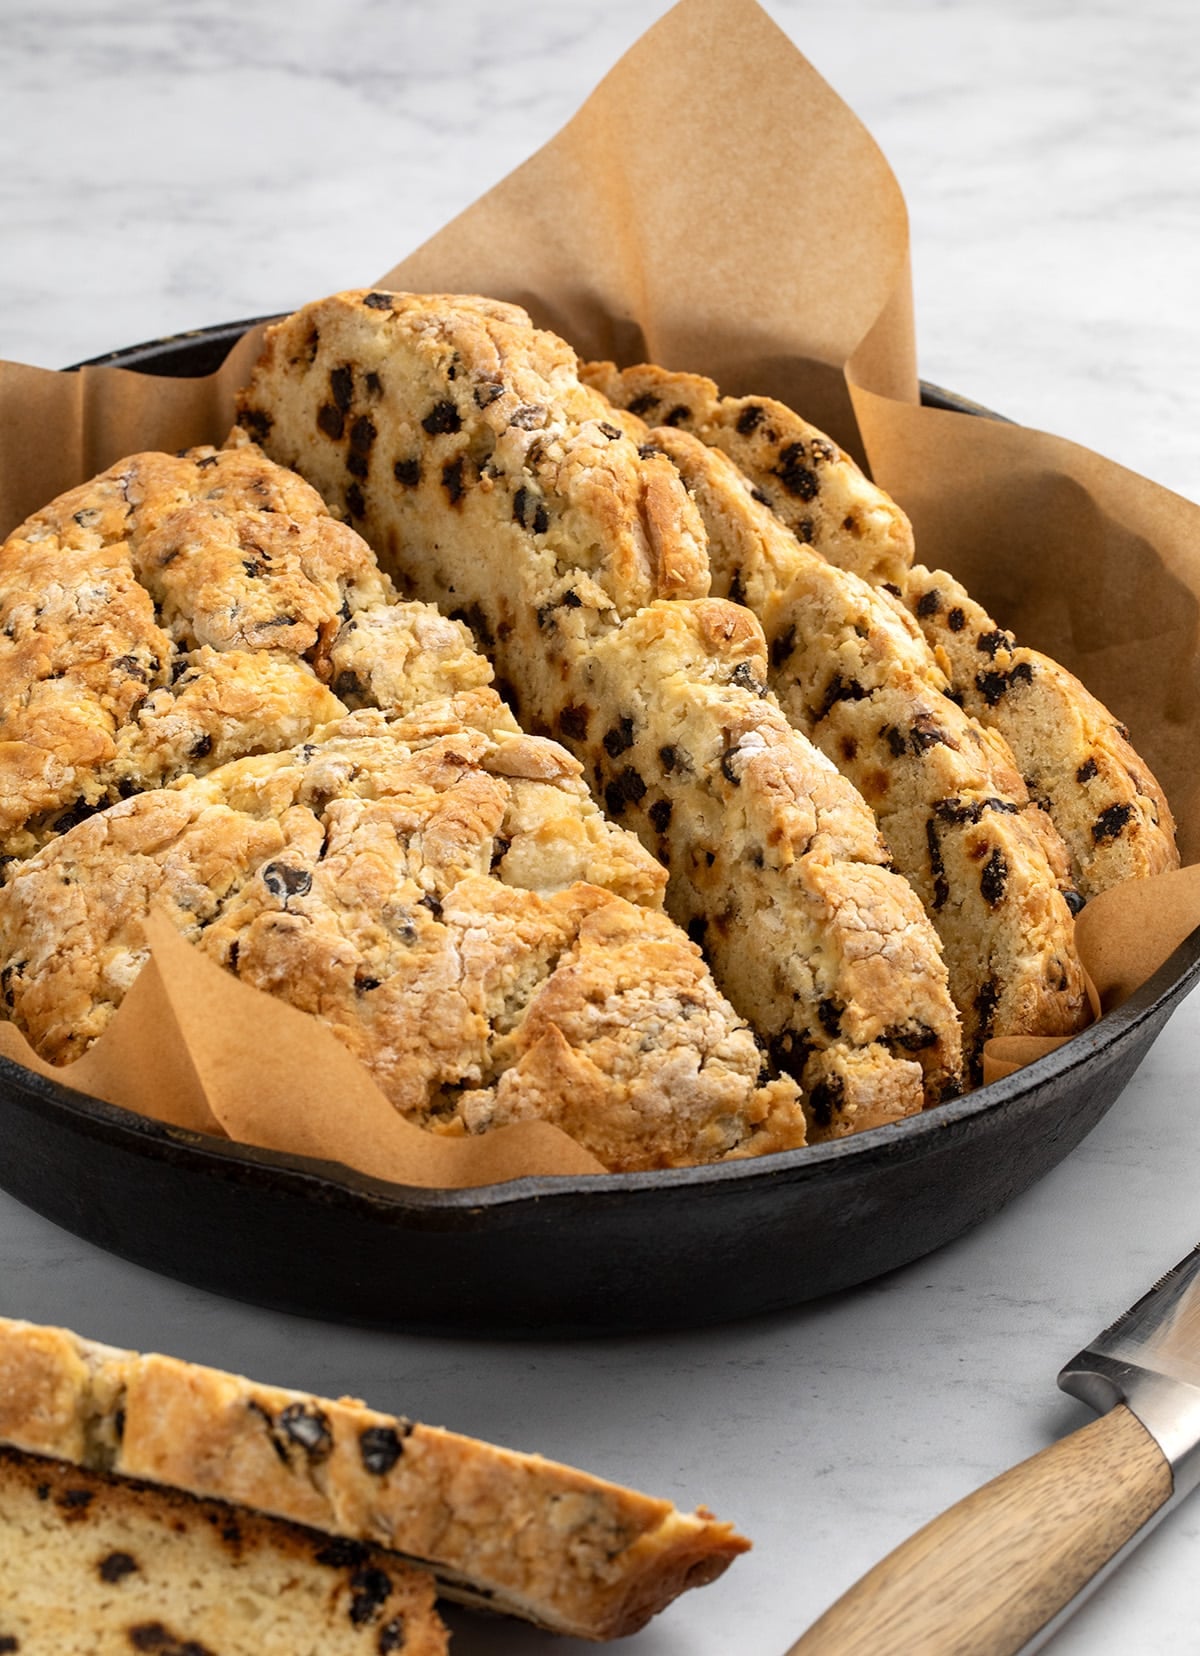
9. Let cool, slice and serve
Allow the loaf to cool in the pan until stable enough to transfer to a wire rack to cool completely before slicing and serving. Slide out any paper lining between the loaf and the wire rack so air can circulate all around during cooling.
Expert tips
Keep your ingredients cold
Keep the butter cold to allow it to expand in the oven and lighten the crumb of the bread. Like with gluten free biscuits, handle the dough lightly so the heat of your hands doesn't melt the butter and begin with very cold buttermilk.
Slice the raw bread fully
The deep cross sliced into the raw soda bread dough lets heat escape during baking. Be sure to slice it about 1-inch thick to allow the bread to bake fully all the way in the center of this large loaf, without splitting haphazardly. Also, slicing the shape of cross into the bread was originally thought to let the devil out of your Irish soda bread!
Use real buttermilk or a proper sub
Real buttermilk is not just acidic and slightly curdled, it thicker than milk, so it has less moisture. Adding some lemon juice or other acid to milk only creates acidity, but does not mimic real buttermilk. If you don't have buttermilk, use plain lowfat kefir, or half plain Greek-style yogurt or sour cream and half whole milk, by volume.
Ingredients and substitutions
Dairy free
Try replacing the cold, chopped butter with Melt brand or Miyoko’s Kitchen brand vegan butter. In place of buttermilk, use half plain nondairy yogurt and half unsweetened nondairy milk with a similar texture to cow's milk, by volume. My favorite nondairy milks here are coconut milk in the carton and soy milk.
Egg free
There are two eggs in this recipe. You might be able to replace each with chia eggs, Bob's Red Mill egg replacer, or JustEgg liquid egg replacer. If you choose to use flax eggs, keep in mind that they will add an earthy flavor.
Raisins
You can use currants or chopped dried apricots or prunes in place of raisins. In place of raisins, you can also try chopped raw unsalted walnuts or pecans, but you may need to add a bit more buttermilk since the dried fruit adds a bit of extra moisture. If you omit the raisins entirely, your loaf will be somewhat smaller and will probably bake a bit faster.
Storage instructions
Once cooled, you can wrap leftover Irish soda bread tightly in plastic wrap or Glad Press ‘n' Seal and store it at room temperature for about 2 days. Refresh slices by sprinkling lightly with lukewarm water and toasting lightly.
For longer storage, wrap tightly in freezer-safe wrap and freeze for up to 3 months. I recommend slicing the loaf before freezing it so you can defrost individual slices rather than the whole remaining loaf. Defrost at room temperature or in the toaster.
Gluten Free Irish Soda Bread Recipe
Ingredients
- 4 cups (560 g) all purpose gluten free flour blend, plus more for sprinkling (See Recipe Notes for choice of blend)
- 2 teaspoons xanthan gum, omit if your blend already contains it
- 2 ¼ teaspoons baking powder
- 1 teaspoon baking soda
- ½ teaspoon kosher salt
- ¼ teaspoon cream of tartar
- ¾ cup (150 g) granulated sugar
- 6 tablespoons (84 g) unsalted butter, kept very cold
- 1 ½ cups (225 g) raisins, or currants (plus up to 1/2 cup more, if desired)
- 2 (100 g out of shell) eggs, chilled and beaten
- 1 ½ cups (12 fluid ounces) buttermilk, chilled (plus more as necessary)
Instructions
- Preheat your oven to 375°F. Grease and line a 9-inch round baking pan or line a 9-inch or 10-inch cast iron skillet with parchment paper, and set it aside.
- In a large bowl, place the flour, xanthan gum, baking powder, baking soda, salt, cream of tartar, and granulated sugar, and whisk to combine well.
- Using a standard coarse grater, grate the cold butter into the dry ingredients, and mix gently to distribute the butter evenly through the mixture. You can also dice the cold butter, toss it in the dry ingredients to coat in flour, then flatten each piece of butter between floured fingers.
- Add the raisins or currants (or up to 1/2 cup more, as desired), and toss to coat the pieces in the dry ingredients.
- Place 1 1/2 cups of the chilled buttermilk in a large measuring cup or bowl with a pour spout, add the eggs, and whisk to combine well.
- Create a well in the center of the dry ingredients, add the buttermilk and egg mixture and mix gently to combine. The dough should come together.
- With clean hands, knead the dough gently. If there are any spots that are dry and crumbly, add more buttermilk sparingly by the tablespoon as necessary to bring the dough together.
- If using a baking pan, turn the dough out onto a lightly floured surface. If using a cast iron skillet, remove the parchment from the pan, sprinkle it lightly with flour, and turn the dough out onto that. Sprinkle the top lightly with more flour.
- Pat the dough into a round that is approximately 9-inches in diameter, piling it slightly higher toward the center. Sprinkle lightly with more flour as necessary to prevent sticking.
- If using a round baking pan, place the dough gently inside of it. If using a cast iron skillet, lift the paper with the dough on it and place back into the skillet.
- With a very sharp knife, slice a large “X” on the top about 1-inch deep (each slash should be about 6-inches long). If the dough seems to have warmed during handling, place the pan or skillet in the freezer to chill for 10 minutes or until the butter is once again firm.
- Place the baking pan in the center of the preheated oven and bake until lightly golden brown all over, a toothpick inserted in the center comes out with a few moist crumbs (not wet), and the bread is firm to the touch (about 45 minutes). If you've used a cast iron skillet, the bread may bake faster than if you've used a cast aluminum round baking pan.
- Remove from the oven and allow to cool in the baking pan for 10 minutes before turning out onto a wire rack to cool until stable (30 to 60 minutes). Remove any paper from below the bread.
- Slice and serve warm, with butter. It's also excellent the next day, toasted.
Video
Notes
Nutrition
Nutrition information is automatically calculated, so should only be used as an approximation.


The first time I made this it was such a hit that I made my 2nd loaf today. Again, it was a huge success. No one could even tell that it was gluten free. My only comment to add is that mine took an hour to bake instead of 45 minutes but as long as you do the toothpick test, you can’t go wrong. I like using a Dutch over for the perfect crust. I’d love to post a picture of it!
That’s so great to hear, Stacie! Unfortunately, there’s no function for you to share a photo in blog comments. I wish there were—I’d love to see it!
I make a different Irish Soda Bread recipe every year, sometimes GF, sometimes white flour, sometimes whole wheat. And every year the family puts on a fake smile and eats the dry, crumbly bread for a day or two until I give up and toss it. NOT THIS YEAR. OMG this was the best Irish Soda Bread I’ve ever had or made. I served it to a small group of about 10 adults and kids and it was gobbled up to rave reviews. So moist and tender with lots of raisins and absolutely perfect slathered in Kerrygold butter. I opted to use Cup4Cup as my flour and followed the recipe to a T. Wow! This one’s a keeper!
Oh no, Tera! I mean, at least they were polite, but still. :) I’m so glad you were able to serve something everyone can enjoy. It’s just not the same when everyone isn’t eating the same soda bread. Thank you so much for sharing your experience!
This was amazing- followed the recipe exactly except that I used only egg yolk instead of the whole egg. Slightly scone like and Very delicious
My friends who can eat gluten loved it! I served this Irish soda bread at our weekly Mahjong game. Joan, who bakes Irish soda bread, told me twice how good it was.
I made two breads. I made the first one with my usual go-to gf flour, Walmart’s Great Value gf flour, which I had in the house. The taste was good but the bread was dense.
I shopped and bought some Cup 4 Cup flour and made the second one. What a difference! The taste was the same, but the second bread rose higher, was much less dense, and came out perfectly.
I followed the recipe exactly for both bakes. My only addition was ground caraway seeds in them. While I like the taste of caraway, I don’t like the seeds so I ground them in my coffee mill.
This will be my regular soda bread recipe, and I will be using the recommended flour.
The first won’t go to waste-I’m making bread pudding with it. Yum!
I’m so glad you enjoyed the bread, Linda, and that you were able to see the difference a high quality all purpose gluten free flour blend makes! Thank you so much for sharing your experience.
Hi has anyone cut the recipe in half?
Thank you
Hi, Carlyn, since there are 2 eggs, you can easily cut this recipe in half. Just reduce the yield in the recipe card to 0.5, but you’ll also have to watch the baking time. I would begin checking at 30 minutes, but I can’t say for sure since I haven’t tried it.
I’m new to gf and can’t wait to make your recipe. I want to use an organic gf flour but I see you don’t recommend Namaste. Would the Arrowhead Mills organic gf blend work for this recipe? Thank you
I’m afraid no, I don’t recommend that blend, Melisa. You can try it, but I can’t promise results unless you use one of my recommended flour blends, as discussed on the all purpose gluten free flour blends page that you visited when you learned that I don’t recommend Namaste. I wish more of the available blends were more reliable, but you can always make your own version of one of my recommended blends by following my “mock” recipes, also explained on that page.
Thank you!
Absolutely Delicious ! Thank you for this !
Has anyone made this with a cast iron skillet? Baking times still the same as in the recipe?
The recipe itself discusses using a round baking pan or cast iron skillet, Rochelle.
Oops that’s what happens when you are excitedly reading a recipe, you overlook that first paragraph – gotta read it a few times hahahaha. Thanks Nicole :)
No worries. I’m glad you’re excited about it!
I love this recipe and the ease in which it is made. It freezes well, I slice the loaf and store it in a container with pieces of parchment paper between the slices as I do all of my gfree breads.
I am wondering if anyone has made this with cinnamon included in the flour mixture?? I love cinnamon.
Great recipe as are all of the recipes that I have tried. I used the all purpose gluten free flour mixture that you provide – Better than Better Batter, it works very well. Thank you
I’m so glad you love this, and that you’re faithful to the right flour blend, Mary Anne! Those tend to go hand in hand. And absolutely you can add some cinnamon to the dry ingredients as you’re making your way through the recipe. I’d start with no more than 3/4 teaspoon, so that it’s not overpowering. Just a suggestion.
i made this with king Arthur measure for measure and it came out perfect. i did add 1 extra tbsp of buttermilk. and it was perfect. thank you.