
This post may contain affiliate links. Please read our disclosure policy.
This giant gluten free Swiss roll cake recipe proves once and for all that it's not too hard to make a beautiful rolled dessert. Dress up any holiday table with this rich gluten free chocolate cake.

Table of Contents
I first published a recipe for gluten free “ho-hos” in 2011. I had been blogging for just over 2 years (a blogging baby!) and I was ridiculously proud of myself for coming up with a copycat recipe for a serious personal favorite treat.
Growing up, my brother and I were obsessed with Yodels. Well, he was way more obsessed than I was. I'll leave out the details of how I know that but it has something to do with saving the foil wrapper from his very first Yodel, but I'm not telling that story to protect the innocent. But when he asked me to bring over a dessert to help celebrate all of the fall birthdays in our family (there are a ton of them!), a giant Swiss roll was basically a no-brainer.
What's a gluten free jelly roll?
As you read through this post, you'll notice that I refer to this delicious treat by several names: Swiss roll, chocolate roll, jelly roll… they all describe this distinct style of rolled cake, but you'll notice that one of these names is not quite like the others.
Jelly roll? There's no jelly in this decadent chocolate Swiss roll cake!
Indeed, there's not, but there could be if you were in the mood for something different.
What's inside a gluten free Swill roll or jelly roll cake?
The beauty of this kind of gluten free cake is that you're free to use all kinds of yummy concoctions as filling.
When you make a chocolate sponge cake and fill it with a type of creme, we call it a Swiss roll cake. When you use vanilla or chocolate sponge cake and fill with jelly or jam, it's a jelly roll.
Here are some popular and interesting filling ideas that you can try sometime in the future, once you've mastered the art of the roll:
- Marshmallow creme filling
- Jam, jelly, or preserves
- Whipped cream filling
- Lemon curd
- Buttercream frosting
- Peanut butter
- Dulce de leche
- Cream cheese frosting

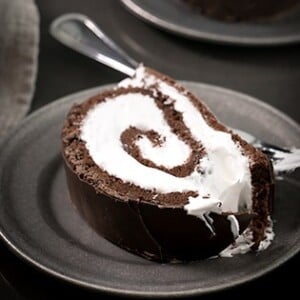
Why this is the best gluten free Swiss roll cake
There are two primary reasons why this is the best gluten free Swiss roll cake recipe you're going to find: the light chocolate sponge cake and the heavenly cream filling.
The best gluten free chocolate sponge cake
To achieve the best chocolate Swiss roll cake, you have to start with the right chocolate sponge cake. From the ingredients to the mixing technique to the baking, each step is important to ensure the right consistency for perfect fluffiness.
The best gluten free Swiss roll filling
I made two versions of this lovely gluten free chocolate cake (more chocolate cakes!) to bring to my brother's house. I think the crowd was kind of split down the middle for favorites. One version was filled with marshmallow creme (the homemade kind has my heart), and the other was filled with no bake cheesecake filling.
In Gluten Free Classic Snacks, the Little Debbie Swiss Rolls are filled with a 7-Minute Creme Filling. That filling is extremely similar to marshmallow creme, as it's made with egg whites, sugar, and water.
To make 7 Minute Creme Filling, rather than cooking the sugar to 240°F on its own and then whipping it with the egg whites while it's still hot, everything is mixed together and then cooked over a double boiler until it reaches 160°F. Then the mixture is beaten for 7 minutes until light and fluffy.
Six of one, half a dozen of the other—except the marshmallow fluff recipe seems somehow easier to me.
Tips for making the best gluten free chocolate roll cake
Keep your batter light and fluffy
If you don't follow my instructions for how to mix up your chocolate cake batter, you may end up with a sponge that isn't very sponge-like.
Be sure to mix the ingredients as long as necessary when it calls for it, and resist the urge to over mix when I call for gentle folding. Follow these instructions, and your cake will come out light, fluffy, moist, and delicious.
Don't overbake your cake
As important as the mixing is the baking. For this particular gluten free cake recipe it's much better to pull your sponge from the oven a minute too early rather than a minute too late.
Overbaking your cake will rob it of the much-needed moisture necessary for a successful roll — and that's when the cracking and breaking happens.
Don't roll your cake too tightly
You may be tempted to roll your chocolate cake as tightly as possible, maybe because you like the idea of multiple spirals or perhaps because you think it will hold better when coiled.
Please resist that urge, because rolling your cake too tightly will only lead to disaster. For starters, you may crack or break the cake from the excessive pulling.
Assuming your sponge cake stays intact, you're going to squeeze out all the filling if you apply too much pressure to the layers.
How to roll this gluten free Swiss roll cake
This general rolled cake technique isn't new to us here. We've made a gluten free pumpkin roll and a gluten free Yule og, but this is the first time you're watching me make it in a video, step by step. Sometimes, a bunch of still photos are enough.
But other times, and I think this is one of those times, you need to see it frame by painstaking frame—especially when the whole video is still super short.
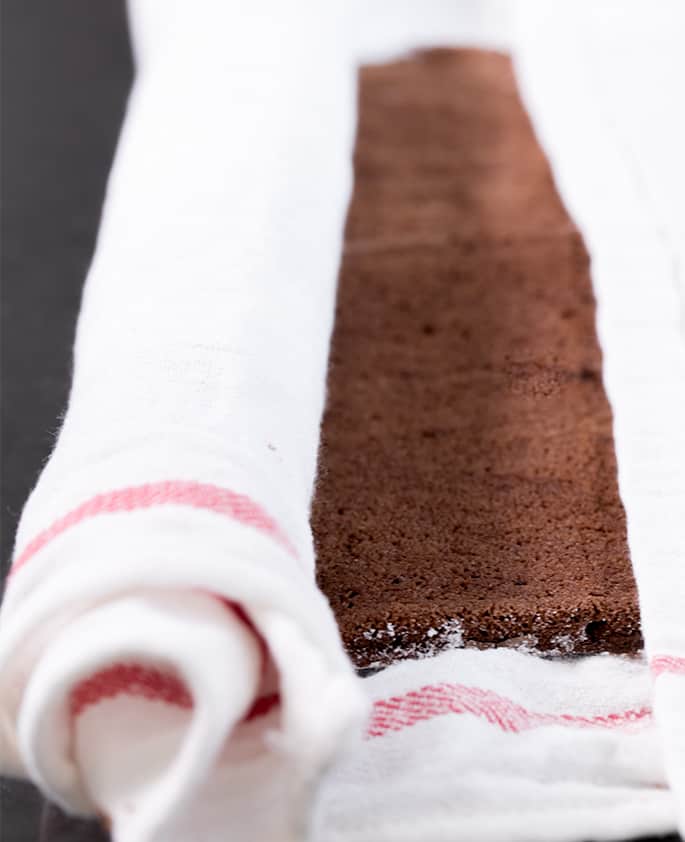
This is the very same technique you'll use for any rolled cake. Bake the cake until it's just done (don't overbake or your cake will crack!), roll it right out of the oven with a flat weave (tea) kitchen towel, and allow it to cool as coiled. The cake develops a “memory” for rolling.
Which way should do you roll a gf chocolate sponge cake roll?
To avoid cracking and breaking, you should roll your chocolate sponge cake starting from the shorter end. Rolling in this direction also allows you the space for plenty of filling, without the need to roll tightly for more layers.
How to store a gluten free roll cake
If you end up with extra gf cake, you can store it tightly covered on your kitchen counter for up to 3 days. I don't like to keep it in the fridge as I've found that it accelerates the drying process, and dry cake is no fun.
I don't recommend freezing a gluten free jelly roll cake as the consistency of the sponge and the filling may change too much.
Gluten free Swiss roll cake: substitutions
As always, unless I specifically state otherwise, I haven't tried this recipe with any of the following substitutions. They're just my educated guesses!
Gluten free, dairy free Swiss roll cake
I think that Earth Balance buttery sticks would work quite well as a butter substitute in this recipe. Or you could always try my favorite vegan butter from Miyoko's Kitchen or Melt brands.
Earth Balance is so salty, though, I'd leave out the salt in the dry ingredients if you use it. Just make sure the chocolate you use for the glaze is dairy-free, and you should be all set.
Can this gluten free Swiss roll cake be made egg-free?
If you can't have eggs, I'm afraid I don't think you can have this cake.
My standard “chia egg” substitution recommendation just won't work when we're talking about 4 eggs. The egg whites could maybe be replaced with aquafaba, but the egg yolks can't.

FAQs
Are Swiss cake rolls gluten free?
Traditional Swiss roll cakes are not gluten free because they're generally made with wheat flour.
This is usually the case for both prepackaged snack cakes and the homemade kind you may find at a grocery store bakery.
Are Little Debbie Swiss rolls gluten free?
No, Little Debbie snack cakes — Swiss roll or otherwise — are not gluten free. The brand doesn't have any gluten free line, and it hasn't indicated that one is in the works.
What kind of cake do you use for a gluten free jelly roll cake recipe?
For this particular recipe, we use a gluten free chocolate sponge cake — a thin cake that's super light and fluffy.
However, you're free to use virtually any flavor sponge and any type of filling to make your own jelly roll.
Do I need gluten free cake flour for this choco roll cake recipe?
While I use both all purpose gluten free flour and corn starch in this gf Swiss roll recipe, I don't use them in the same proportions as my gluten free cake flour recipe.
To make sure your cake roll comes out like mine, be sure to use same flours in the right measurements.
What's the best pan for a gluten free Swiss roll cake?
Either a Swiss roll tin or a jelly roll pan will work for this gluten free sponge cake roll recipe. These pans resemble baking or cookies sheets but have a taller lip (usually an inch tall) for cakes.
What do I do if my cake breaks while rolling?
If your cake breaks while rolling, it's likely that you overbaked it, used a smaller pan so your cake is too thick, or you didn't roll it while it was still warm, so it had already “set”. The cake is still very much edible, but it's not quite suited for what we're trying to achieve here.
Never fear: You don't have to throw away cracked and broken cake. Instead, use it to make cake pops, or top it with frosting for a light and fluffy treat.
Depending on the extent of the cracking, you may still be able to use the cake to make a Swiss log cake. Just assemble the cake, and then cover the imperfections with a thick chocolate ganache. No one will ever know!
Can I use this gf chocolate roll cake recipe to make mini Swiss rolls?
Yes, you can use this chocolate Swiss roll cake recipe to make mini gluten free Swiss rolls. Just follow the instructions through baking, and when you pull the sponge from the oven, quickly slice it into smaller pieces. From there, continue with the instructions for rolling, filling, and topping.
Gluten Free Swiss Roll Cake Recipe
Equipment
- Handheld mixer or stand mixer fitted with whisk attachment
- 13-inch x 18-inch x 1-inch rimmed baking sheet (a half-sheet pan)
Ingredients
For the cake
- ½ cup (70 g) all purpose gluten free flour blend, (I used Better Batter; please click thru for appropriate flour blends)
- ¼ teaspoon xanthan gum, (omit if your blend already contains it)
- 5 tablespoons (25 g) unsweetened natural cocoa powder
- 1 tablespoon (9 g) cornstarch
- ¼ teaspoon kosher salt
- 4 (200 g (weighed out of shell)) eggs, at room temperature, separated into yolks and whites
- ¾ cup (150 g) granulated sugar
- 6 tablespoons (84 g) unsalted butter, melted and cooled
- 1 tablespoon warm water
- Confectioners’ sugar, for rolling
For the filling and topping
- Marshmallow creme, (homemade or store-bought) for filling
- 14 ounces semisweet chocolate, chopped
- 3 tablespoons (42 g) virgin coconut oil
Instructions
Make the cake.
- Preheat your oven to 350°F. Line a 13-inch x 18-inch x 1-inch rimmed baking sheet (a half-sheet pan) with unbleached parchment paper and set it aside.
- In a medium-size bowl, place the flour, xanthan gum, cocoa powder, cornstarch and salt, and whisk to combine. Set the dry ingredients aside.
- In a large bowl, place the egg yolks, 1/2 cup (100 g) of the granulated sugar, the butter, and the water, and whisk vigorously until smooth and pale yellow.
- Add the dry ingredients to the egg yolk mixture, and whisk to combine. The mixture should be thick but smooth. Set it aside.
- In the bowl of a stand mixer fitted with the whisk attachment or a large bowl with a hand mixer, place the egg whites and beat on medium-high speed until soft peaks form.
- Add the remaining 1/4 cup (50 g) of granulated sugar and continue to beat on medium-high speed until glossy peaks form. Add the egg white mixture to the large bowl of egg yolks in two parts.
- After adding the first part, whisk to combine well. After adding the second part, carefully fold in the remaining egg whites until no white streaks remain. The batter will be fluffy.
- Pour the batter into the prepared baking sheet and spread into an even layer with a spatula.
- Lay a flat-weave kitchen towel (a tea towel) flat on a large, clean flat surface and sprinkle it generously with confectioners’ sugar.
- Place the baking sheet in the center of the preheated oven and bake for 12 to 14 minutes, or until the cake springs back when pressed gently.
- Remove the cake from the oven and, working quickly, immediately turn the warm cake onto the center of the prepared tea towel.
- Carefully remove the parchment paper from what was the underside of the cake. You now have a bare cake on a sugared tea towel.
- Fold the exposed ends of the tea towel over the cake and roll it tightly away from you, with the towel.
- Place the cake, as coiled in the towel, on a wire rack to cool completely (about 1 hour).
- Once the cake has cooled, unroll it on a flat surface and spread the marshmallow creme filling on top of the cake, leaving a 1/2-inch clean border all around the cake. Reroll the cake tightly and place seam-side down, on a wire rack.
Prepare the glaze topping.
- Place the chopped chocolate and virgin coconut oil in a small, heat-safe bowl. Melt the chocolate either in the microwave in 30-second bursts, stirring well in between, until melted and smooth or in a double boiler.
- Allow the chocolate to sit at room temperature briefly until it begins to thicken a bit.
- Pour the glaze over the top of the cake on the wire rack. Allow the glaze to set at room temperature before slicing and serving.
Video
Notes
Nutrition
Nutrition information is automatically calculated, so should only be used as an approximation.


Making this into a light saber … have you ever used white chocolate chips for the glaze?
Hi, K, that sounds like an interesting project for some young person! I don’t recommend chips of any kind for melting, as they contain wax to help them keep their shape. In particular, white chocolate chips are very prone to seizing when melted. Instead, I’d recommend a higher quality couverture white chocolate disk like Callebaut or Guittard brand.
Fabulous! I’ve made it twice now and it is fluffy and rich and delicious. Made it for buche de Noel, so first time filled with lightly sweetened whipped cream and it needed something more, second time with a creme diplomat and it was great.
So glad you’ve enjoyed the Swiss roll cake, Bethany. Thanks for sharing your experience!
I usually let my gf batter set for several hours before using but with the whipped egg whites I’m not sure if that’s the best thing to do.
Vicki, there’s no reason to let gluten free batter sit any more than there is to let gluten batter sit (which can be beneficial in some circumstances, like in muffins that you want to rise extra high), but if you are used to doing that and find it necessary, you’re probably using a lower quality gluten free flour blend that uses a gritty rice flour that requires softening. Please see my all purpose gluten free flour blends page for full information on what blends I recommend for (and against).
how can I make this ahead of time? can I store the cake rolled up overnight and then fill it with the cream the next morning so it’s fresh?
Sure, you can do that, Donna. I would actually recommend not refrigerating it, which will make it more prone to breaking when you unroll it. Just wrap it tightly and let it sit at room temperature overnight, then fill and serve the next morning.
5 stars for the dream of having these once again, but I would love to attempt to make this, but there’s an egg allergy in the house as well. What would you suggest as a replacement for this recipe? Thanks!
Hi, Chad, I’m afraid I’m really not sure that egg substitutes would work for this particular recipe. For my thoughts, please see the text of the post under the subheading “Can this gluten free Swiss roll cake be made egg-free?” Every one of my recipes has a “Substitutions” section that anticipates this question, so always look for it!
Would this recipe work with Bob’s Red Mill 1:1 flour? ( that’s what I have on hand) I am looking for a gluten free chocolate roll cake that I can use to make a Yule Log cake for Christmas. We always make one during the holidays but recently had to go Gluten Free. Thank you!
Hi, Nicki, I’m honestly not sure. Bob’s Red Mill’s 1 to 1 gluten free blend has improved considerably recently, but it’s still not a blend I recommend without reservation, and always needs some more xanthan gum as it has too little. For more information, please see my all purpose gluten free flour blends page.
Hi Nicole. Is the video still available? There is no link in the video section. Thank you!
Hi, Gina, I just double-checked and the video is there in the recipe card. If you don’t see it, you’re probably using an ad-blocker, which will eliminate it (and ads are the only way I make money from the free content anyway!).