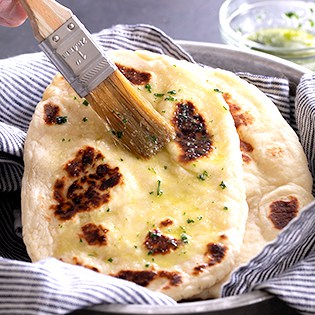
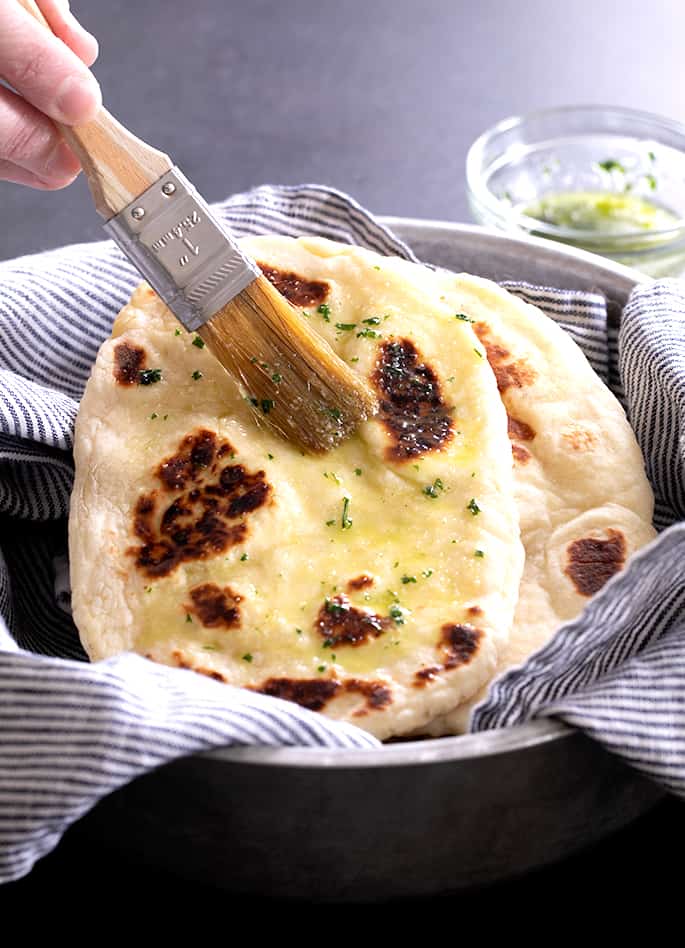
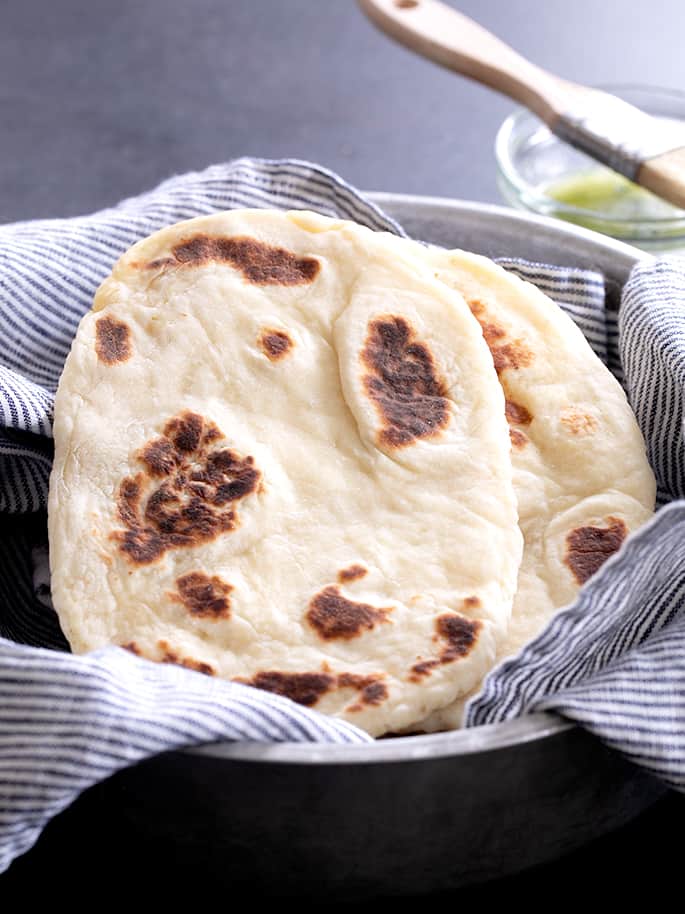
This gluten free naan bread is made extra soft and tender with yogurt, eggs and a bit of butter or ghee in the dough. Make the dough ahead of time, and then fry it up in a pan in minutes!
Why you'll love this gluten free naan bread recipe
Made with plain yogurt for extra tenderness, this smooth, pliable and rich gluten free naan bread makes any meal feel special. Like all naan, it's great for sopping up every last delicious bit of your favorite saucy gluten free dinners.
I'm no expert on Indian cuisine, but I've had tender, pillowy naan bread in an authentic Indian restaurant. I've never seen it made without gluten in a restaurant, though.
I haven't tried it, but I bet you could even use this very gf naan bread recipe to make this in the shaped clay oven called a tandoor. Here, we make ours in a hot skillet, and we're able to get all the browning you need for an authentic-tasting Indian flatbread.
How to make gluten free naan bread
Naan is a flatbread that very similar to pita bread, but it's a pretty highly enriched bread. In bread-baking, enrichments just refer to things like fat (ghee and butter here in this recipe), yogurt or milk, and eggs.
These enrichments, especially the yogurt in this recipe, make this bread dough quite easy to handle—and the resulting naan bread tender, fragrant and delicious.
The dough can be made up to 2 days ahead of time (3 if you're good with some serious yeasted flavor development) and then shaped, rolled, and fried in the few minutes before mealtime. It's a lovely way to complete a simple meal and make it feel really special. ✨
GF Yeast Bread 1.0
This bread recipe is made in the “old style,” the kinds of bread that I think of as the first generation of gluten free yeast bread baking. I've developed plenty of gluten free bread recipes like that, and they work, taste great and are a lovely starting-point.
The first generation of gluten free bread recipes was in the “batter-style,” with dough made with a paddle attachment in a stand mixer that had to be much wetter and more fragile than conventional yeast-bread baking.
Plus, they all require enrichments to compensate for any real replacement for the gluten that is so essential to conventional yeast-bread baking.
The one drawback of the preparation of these “old-style” bread recipes is that they call for using the paddle attachment of a stand mixer. A handheld mixer won't work.
A bowl with a spoon and a lot of elbow grease might work, but I find that it's quite difficult to get the proper consistency that way. The newer style can be made using a handheld mixer with the dough hook attachments.
GF Yeast Bread 2.0
When I wrote my third book (GFOAS Bakes Bread), I set out to break the mold on gluten free bread. I added some special ingredients that really substitute for gluten in the newer yeast bread recipes, and I adore them.
But I do understand that the newer style of gluten free yeast bread baking that I created in Bakes Bread is not a realistic possibility for everyone. It can be more expensive, and more time-consuming.
It requires that you hunt down two new ingredients, Expandex modified tapioca starch and whey protein isolate, both of which thankfully have become much more readily available since the publication of that book in 2013.
Plus, that sort of traditional yeast-bread baking is enough art-plus-science that I created an online course called Gluten Free Yeast Bread Basics for those of you who wanted a deep dive. The beauty of those recipes is that the dough is much more what you'd expect from gluten-containing bread dough, and the bread can be made into any artisan style at all.
The newer style of gluten free bread also stays fresher for longer. Plus, it's more allergy-friendly.
Since the gluten free bread flour blend behaves so much more like conventional flour, it's actually much easier for bakers who can have dairy, but can't have eggs. There are a lot of “lean” recipes in the book that don't require butter, yogurt, milk or eggs.
Tips for preparing this gluten free naan bread recipe
The simpler-style gluten free yeast bread recipes like this one are still really valuable, even in my house where I have all the ingredients to make the “newer” style of gluten free yeast bread. There's a recipe for gluten free naan using the “new” ingredients in Bakes Bread, but this recipe makes such soft, delicious naan that I thought it was time to highlight it.
Let the mixer do the hard work
This type of recipe just really calls for dumping all the dry ingredients (flour, salt, cream of tartar, sugar, yeast) in the mixing bowl, and then whisking them. The wet ingredients (yogurt, butter, eggs, and water) are next, and then the mixer does all the work.
At first, the dough will really look like fluffy batter, but when you scrape down the mixing bowl with a spatula, it should come away clean. The dough will still be tacky to the touch, but hold together really well when you set it to rise.
Don't use too much flour
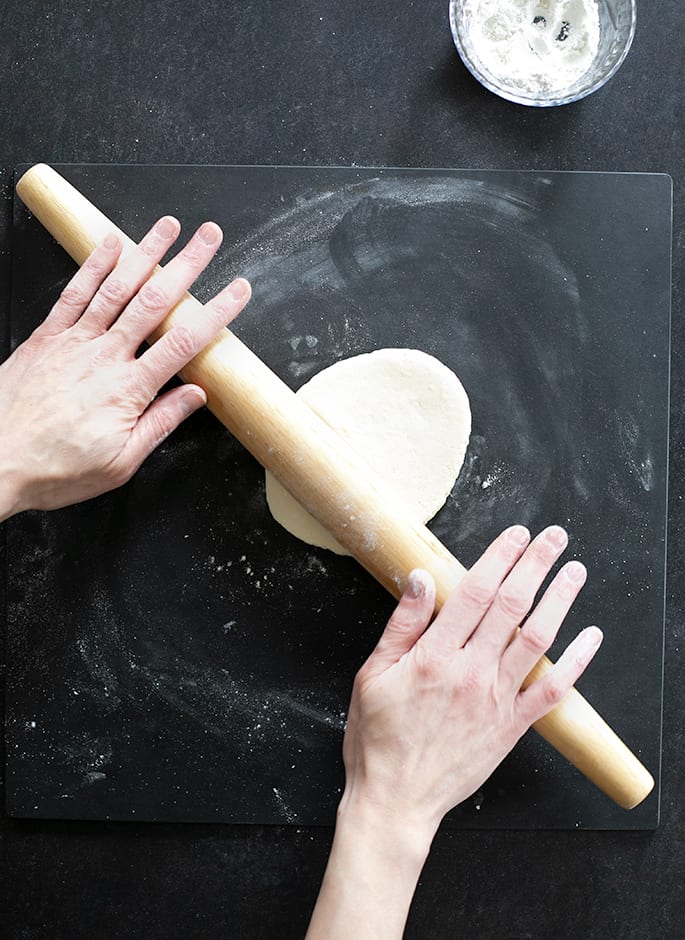
Since the dough itself is quite wet, you can use a fair amount of extra flour to shape it, but work with it using a very light touch, so you don't incorporate too much flour. Yeast bread that is too dry simply won't come out fluffy no matter what else you do.
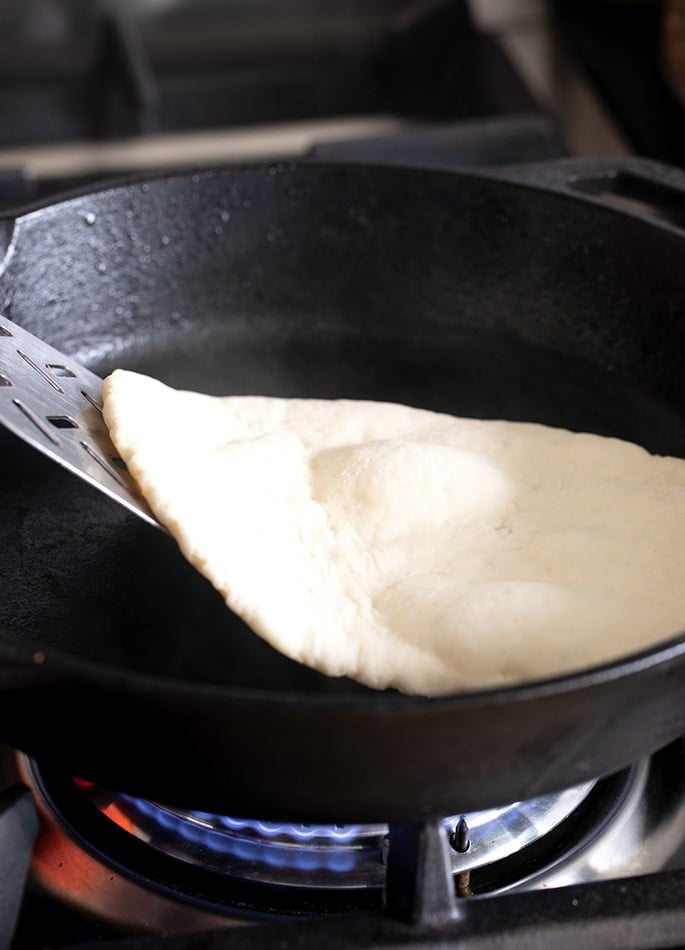
Shape a piece of dough loosely into a round, and then roll it into an elongated oval. While you're shaping the dough, heat a heavy-bottom skillet (preferably cast iron) with a bit of ghee or virgin coconut oil. Place each piece of shaped dough in the hot skillet right away.
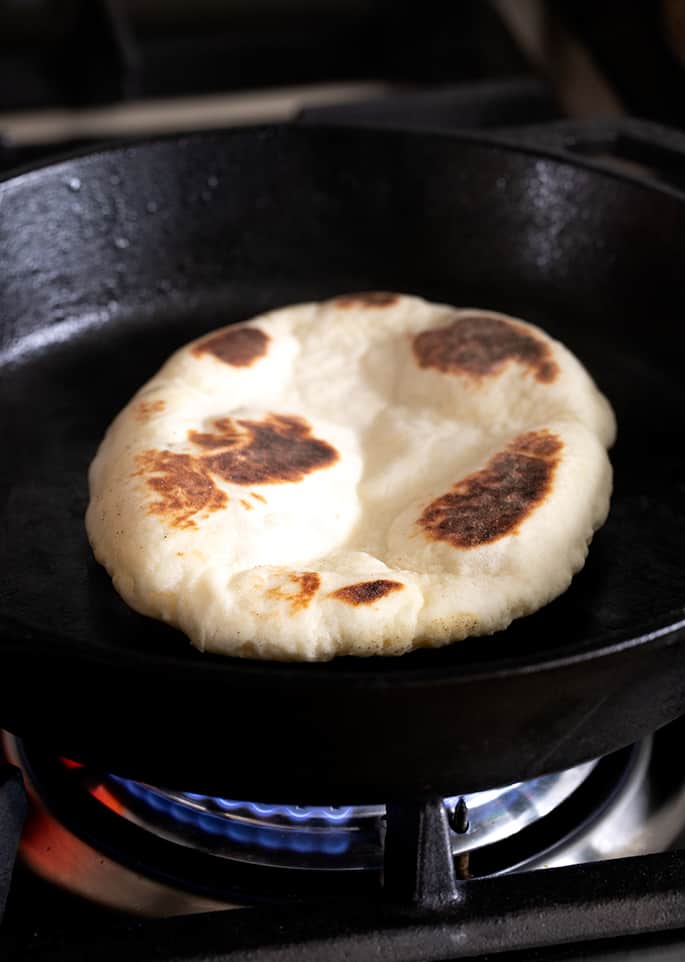
Heat the pan, but not too hot
If the pan isn't hot enough, or the dough is rolled too thick, it won't bubble. If you're concerned, cover the skillet. But don't make the skillet screaming hot, or it'll just burn the bread. Once it bubbles, flip it to the other side.
Use a spatula for even frying
To make sure that all the dough comes into contact with the hot skillet, I'll occasionally press down on the dough with my spatula. It should puff right back up.
Flip and cook a few times until the dough seems puffy at least in spots and cooked through. Serve it right away!
Gluten free naan bread: Ingredients and substitutions
I haven't made this recipe with most of these substitutions, but I feel confident that it can be done successfully here.
Please remember, as always, that the more substitutions you make, the further you are straying from the original recipe and the more unpredictable your result will be.
Dairy free, gluten free naan bread
The dairy in this recipe comes from the plain yogurt and the butter or ghee. I recommend replacing the butter/ghee in the dough with extra virgin olive oil.
I actually have made this recipe with olive oil in the dough in place of the butter or ghee, and I prefer it because it has some depth of flavor that many other butter substitutes I can imagine.
Since olive oil is pure fat and a liquid even at cold room temperature, the dough will be a bit softer and less pleasant to shape, though.
Try replacing the plain yogurt with a nondairy plain yogurt. My favorite nondairy plain yogurt is made by So Delicious. Silk is fine, too. I really don't care for Kite Hill or any of the other almond-based nondairy yogurts I have tried.
Cooking with something you otherwise might eat only serves to intensify the flavor of the ingredient, so if it tastes slightly off to you, don't cook or bake with it.
Egg free, gluten free naan bread
The eggs are harder to replace in this recipe than the dairy. You can try replacing the whole egg with a “chia egg” (1 tablespoon ground white chia seeds + 1 tablespoon lukewarm water, mixed and allowed to gel).
The egg white is a bit more difficult. You can try replacing it with 1/4 cup aquafaba (the brine from a can of chickpeas/garbanzo beans).
Yeast in this recipe
There is no replacement for yeast in a yeast bread recipe. I'm afraid you just need a different recipe entirely if you can't have yeast.
I recommend trying my recipe for yeast-free pita bread, or even my Weight Watchers-style yeast free pizza recipe and shaping it into a naan-style dough.
Active dry yeast instead of instant yeast
If you only have active dry yeast instead of instant yeast, you'll need 25% more yeast by weight. Here, that would mean a total of 10 grams active dry yeast.
If you plan to make the bread dough at least a few hours before shaping and baking, there's no need to proof even the active dry yeast. The extra coating on the active dry yeast will dissolve during that time.
If you plan to make the bread dough with active dry yeast very soon before shaping and cooking, proof the yeast first. If you've never before proofed yeast, it's just a matter of adding liquid to it separately so the coating dissolves.
Before you begin the rest of the recipe, simply place about 1/4 cup of the water called for in the recipe in a small bowl. Add the active dry yeast and stir to combine.
Allow the mixture to sit, and it will activate the yeast. If your yeast is not expired, there's little chance that it needs “proofing” in the classic sense (to see if it's good).
This step is merely to dissolve the thicker coating on the yeast granules, so they become active quickly, like instant yeast would. Add the proofed yeast and liquid to the remaining water, then proceed with the recipe as written, skipping the step that calls for adding the instant yeast to the dry ingredients.
FAQs
No! Traditionally, naan bread is made with wheat flour. We have to change the flours and the proportions entirely to make this gluten free naan.
I really like making this recipe with Better Batter classic blend gluten free flour, but you can use any of my recommended all purpose gluten free flour blends. They are well-balanced blends with smooth ingredients. If you use one of the blends that I don't recommend, and even recommend against, like Bob's Red Mill blends, this recipe will not return good results. They are poorly balanced blends of inconsistent quality made with gritty rice flour.
Yes! You can make the dough up to 3 days ahead of time, and store it in a sealed container in the refrigerator. Shape it right from the refrigerator, and continue with the recipe as directed.
I really like using a cast iron skillet greased with ghee. It gets hot enough and stays that way, but maintains a consistent temperature so your bread doesn't burn.
All bread is fresh right after baking, so it's best to shape and cook this bread right before serving. It will, however, stay fresh for at least a day wrapped in wet paper towels in a sealed container at room temperature.
If your gf naan bread has started to get stale, as all bread does when it's no longer fresh, wet it with tap water and place it in a 300°F oven to refresh. You can also use a hot dry cast iron or nonstick skillet.

Gluten Free Naan Bread
Equipment
Ingredients
- 2 ½ cups (350 g) all purpose gluten-free flour blend (I used Better Batter), plus more for sprinkling
- 1 ¼ teaspoons xanthan gum omit if your blend already contains it
- ½ teaspoon kosher salt
- ¼ teaspoon cream of tartar
- 4 ½ teaspoons (18 g) granulated sugar
- 2 ¼ teaspoons (8 g) instant yeast
- ⅓ cup (76 g) plain yogurt at room temperature
- 3 tablespoons (42 g) butter or ghee melted and cooled
- 1 (50 g (weighed out of shell)) egg at room temperature, beaten
- 1 (25 g) egg white at room temperature
- ¾ cup (6 fluid ounces) warm water about (95°F)
- Ghee or virgin coconut oil for frying
Instructions
- In the bowl of your stand mixer fitted with the paddle attachment, place the flour, xanthan gum, salt, cream of tartar, and sugar, and whisk to combine well. Add the yeast and whisk again to combine.
- Add the yogurt, butter or ghee, egg with egg white, and the water, and mix on low speed with the paddle attachment until just combined. Once the water has been absorbed, turn the mixer up to medium speed and mix for about 3 minutes.
- The dough will most likely be quite fluffy but will come together and thicken, then begin to pull away from the sides of the bowl in spots. It will not turn into a fully integrated ball of dough on its own.
- Turn off the mixer, scrape the dough off the sides of the bowl with a spatula, and gently press it into a ball. Place the dough in a greased bucket with a lid (or a bowl with a lid or one you can cover very tightly), and cover tightly.
- If you plan to make naan the same day, place the dough in a warm, draft-free spot to rise until it is nearly doubled in volume, about 45 minutes.
- Alternatively, place the well-sealed container in the refrigerator for up to 2 to 3 days, and work with the dough straight from the refrigerator.
- Once the dough has finished rising, turn it out onto a lightly floured surface and sprinkle lightly with more flour.
- Divide the dough into 8 pieces, each about 95 grams. Working with one piece of dough at a time, lightly flour it and roll it into a round, then use a rolling pin to roll it into an elongated oval about 3/8 inch thick.
- While you’re shaping the dough, place about 1 tablespoon of ghee or virgin coconut oil in a cast iron skillet, and melt over medium-low heat.
- Place the first piece of shaped dough in the heated skillet and fry on one side until large blisters begin to form (about 30 seconds). Flip and fry until the underside is golden brown.
- Flip the bread again and cook until browned all over, about another minute. Remove to a paper towel or tea towel, and cover the dough to retain the heat and moisture.
- Repeat with the remaining pieces of dough, adding more fat to the skillet as necessary. Stack the pieces of naan one on top of another, keeping them covered with a tea towel to maintain freshness. Serve warm.
Notes
The Best Gluten Free Naan Bread Recipe, step by step


Gluten Free Naan Bread
Equipment
Ingredients
- 2 ½ cups (350 g) all purpose gluten-free flour blend (I used Better Batter), plus more for sprinkling
- 1 ¼ teaspoons xanthan gum omit if your blend already contains it
- ½ teaspoon kosher salt
- ¼ teaspoon cream of tartar
- 4 ½ teaspoons (18 g) granulated sugar
- 2 ¼ teaspoons (8 g) instant yeast
- ⅓ cup (76 g) plain yogurt at room temperature
- 3 tablespoons (42 g) butter or ghee melted and cooled
- 1 (50 g (weighed out of shell)) egg at room temperature, beaten
- 1 (25 g) egg white at room temperature
- ¾ cup (6 fluid ounces) warm water about (95°F)
- Ghee or virgin coconut oil for frying
Instructions
- In the bowl of your stand mixer fitted with the paddle attachment, place the flour, xanthan gum, salt, cream of tartar, and sugar, and whisk to combine well. Add the yeast and whisk again to combine.
- Add the yogurt, butter or ghee, egg with egg white, and the water, and mix on low speed with the paddle attachment until just combined. Once the water has been absorbed, turn the mixer up to medium speed and mix for about 3 minutes.
- The dough will most likely be quite fluffy but will come together and thicken, then begin to pull away from the sides of the bowl in spots. It will not turn into a fully integrated ball of dough on its own.
- Turn off the mixer, scrape the dough off the sides of the bowl with a spatula, and gently press it into a ball. Place the dough in a greased bucket with a lid (or a bowl with a lid or one you can cover very tightly), and cover tightly.
- If you plan to make naan the same day, place the dough in a warm, draft-free spot to rise until it is nearly doubled in volume, about 45 minutes.
- Alternatively, place the well-sealed container in the refrigerator for up to 2 to 3 days, and work with the dough straight from the refrigerator.
- Once the dough has finished rising, turn it out onto a lightly floured surface and sprinkle lightly with more flour.
- Divide the dough into 8 pieces, each about 95 grams. Working with one piece of dough at a time, lightly flour it and roll it into a round, then use a rolling pin to roll it into an elongated oval about 3/8 inch thick.
- While you’re shaping the dough, place about 1 tablespoon of ghee or virgin coconut oil in a cast iron skillet, and melt over medium-low heat.
- Place the first piece of shaped dough in the heated skillet and fry on one side until large blisters begin to form (about 30 seconds). Flip and fry until the underside is golden brown.
- Flip the bread again and cook until browned all over, about another minute. Remove to a paper towel or tea towel, and cover the dough to retain the heat and moisture.
- Repeat with the remaining pieces of dough, adding more fat to the skillet as necessary. Stack the pieces of naan one on top of another, keeping them covered with a tea towel to maintain freshness. Serve warm.
Candace says
Just made this for the first time but had to adjust ingredients due my son’s medical condition and used dairy items but still turned out fantastic. Thank you for this recipe
Sharon says
This naan is so good even my husband loves it, and he is not a fan of the idea of GF. Yeasty, chewy deliciousness!
Nicole Hunn says
That’s so great to hear, Sharon! We aim to please everyone—most of all the GF skeptical. :)
Michelle says
I used Bob’s Red Mill gluten free bread flour and unfortunately this recipe was a fail. Not only was the texture nowhere near a regular naan (does not have that soft and chewy stretchy goodness) but it also could use more salt. We served it to company and most people did not bother finishing their piece. On the positives, it was an easy recipe to make and rolled out easily.
Nicole Hunn says
You simply cannot make this recipe with Bob’s Red Mill, and I suspect that’s why you mentioned that you had used it, since the all purpose gluten free flour blends page that is linked to that ingredient makes that very clear. And the flour blend choice is discussed in the text of the post. Your rating is based on the flour blend, not the recipe.
Ali says
I’ve noticed most of your bread recipes use instant yeast even with a long rise time. Can you explain the reasoning? Would you be willing to speculate if traditional yeast would work if I proofed it in the warm water and a bit of sugar?
Nicole Hunn says
The only difference between instant yeast and active dry yeast is the coating on the outside of the yeast in active dry that prevents it from becoming active without being proofed. It has nothing to do with the length of the rise. It’s much simpler to save the step of proofing, which is why I use instant yeast. If you’d like to use active dry yeast, you’ll need to proof it first, and you’ll need to use more of it (approximately 125% as much yeast, so you’d multiply the amount (by weight) of instant yeast by 1.25).
Julie L says
We made this directly from the book last weekend and I’ve never heard such a satisfying quiet as everyone chewed and occasionally muttered with a full mouth, “this is really good.” Now my Ethiopian cookbook won’t go to waste. While I’m not up to making injera on a regular basis, I could make this a couple times a week and not complain. Thank you again!
Nicole Hunn says
I’m so glad, Julie. Let’s never do without!
Jodi says
Is there a substitute for the sugar that you would recommend?
Nicole Hunn says
Hi, Jodi, I’m afraid I haven’t tried substituting the sugar, and it helps to feed the yeast. I would really recommend leaving it as is, especially since it’s not very much. Sorry!
Marty says
Hi, trying this on Saturday – how early can we make it, we have a warming drawer, can we make it earlier in the day and then keep it warm in the warming drawer in alum foil?
Nicole Hunn says
I’m honestly not sure, Marty. All bread, gluten free or not, is best made soon before it’s served. I am actually concerned that a warming drawer would dry it out. I really recommend keeping the dough raw, in a sealed container in the refrigerator, and fry it before serving. If you want to make it a few hours in advance, seal the naan in a ziptop bag with a moist paper towel and keep at room temp. Then, refresh in a hot skillet right before serving and it will be great.
Jessica Magnuson says
I love naan and I’m supposed to go glutin free to help with inflammation so I’m going to try this recipe it sounds great if i can get a mixer can u make it without one?
Nicole Hunn says
I discuss that in the post, Jessica! Please have a look.
Brett says
This is a fabulous recipe! Loved it.
Diane says
Hi Nicole
Can I use dough hooks instead of paddle (which I don’t have) thanks
Your recipes are fab
Nicole Hunn says
As I discuss in the post, Diane, I’m afraid not!
Kealoha Snow says
Have you tried using coconut oil in the dough itself?
Nicole Hunn says
Actually I have, Kealoha! It’s not my favorite thing, though, since similar to when the butter is replaced by olive oil, the dough is somewhat more difficult to handle.
Diane says
Nicole, Do you have suggestions about how long these can be kept and how they should be stored? Really looking forward to trying them!
Nicole Hunn says
Hi, Diane, I really recommend storing the raw dough in a well-sealed container for up to 3 days and only frying the pieces you plan to use that day. You can keep cooked pieces of dough in a well-sealed plastic bag at room temperature for the following day, and then refresh them in a hot skillet before serving, but they’re best fresh.
Maria Fiore says
Will the recipe work using dairy free yogurt?
Nicole Hunn says
Please see the Ingredients and substitutions section in the post for a detailed discussion, Maria. All of my thoughts are right there!
Kristi says
Making this tonight with curried fish, rice and green beans. Can’t wait!
Nicole says
That sounds great, Kristi!
xoxo Nikki
Martha Rasnake on Facebook says
It’s the bread I crave the most! I have to try this! Hugs and Kisses to you! Woo Hoo! Chicken Tikka Masala here I come!
Dana Coughlin says
I went to the store and grabbed some yogurt, came home and saw that I bought vanilla yogurt instead of plain! :)
Nicole says
Oh, no, Dana! That’s definitely something I would do. Have done. It’s not a good feeling when you get home and read that label…
xoxo Nicole
Peggy says
I’m not a fan of Indian food but Naan sounds like a great choice to go with a bowl of chili. Spread a bit of garlic butter on it & top the chili with some chopped onions & grated cheese. A great cold weather meal!
Nicole says
Hi, Peggy,
Naan isn’t spicy or anything. It’s just a really flavorful, yeasted flatbread. It would be great with a bowl of chili. It’s soft, too, so you can even fill it and fold it over into a sandwich.
xoxo Nicole
Peggy says
I love the sandwich idea! Lots of love from my kitchen to your kitchen! Thanks for all your great recipes & ideas!!!
bookladyDavina says
ooh.. def gonna have to give this a try. Hubby feel in love with Naan while he was stationed in Kosovo a few years ago. I’ve never had it, so trying to recreate it for him hasn’t been going well. All the recipes I’ve found so far, he didn’t like or just weren’t right.. here’s hoping this one will satisfy him!!
Nicole says
Hi, Davina,
This recipe is definitely a keeper. I think you’ll both really like it. But all I can really say for sure is that my family and I loved it. :)
xoxo Nicole
Pamela G says
Naan pizza…mmmmmmmmmmm :) Thank you!!!
Nicole says
Hi, Pam,
Good idea!
xoxo Nicole
Linda says
Ah, you are an enabler! Now I think I need that bread dough proofer! And, having found a bottle of ghee in my pantry – maybe I need to make some naan bread… but first that bread proofer – living in the not so cold wastelands of Ontario, Canada… I need this…
Nicole says
I prefer to think of myself as a facilitator, Linda. Enabler is too mild. :)
If you get that bread proofer, I’m sure you won’t be disappointed. I really love it.
xoxo Nicole
Linda says
Thanks to your facilitation, my bread proofer will soon be on its way to me!
Nicole says
Thank you for upgrading my role, then, Linda. It sounds much more respectable. Enjoy the proofer!
xoxo Nicole
Nicole says
No, sorry, Missy. :(
xoxo Nicole
Pam Grant says
never have enough breads….keep all the recipes coming!! :)
Nicole says
Good to know! Thanks, Pam. :)
xoxo Nicole
Karen Langley says
Can’t wait to try this one Nicole! I love love love naan! My 25lb bag of flour arrives today. Wonder what my afternoon activity will be? Is Ghee the more traditional thing to use? I have Olive Oil but could go out and find some ghee if it adds that little bit extra.
Nicole says
Hi, Karen,
I have sort of fallen out of love with olive oil unless I’m using it raw, to be honest. It degrades quite easily. I really like ghee for its high smoking point, especially for frying. But you can absolutely use olive oil with very good results.
xoxo Nicole
gfnoor says
Wow, another awesome recipe!
I have to make gluten-y stuff for my hubs and kids, and gee eff for me, so last night we had curry and naan. I was too tired after making the gluten full naan, and wiping down and cleaning everything to make any gf ones for me, but I am so going to try this out today. Yum! They look so good. I love naan, we eat it like a snack in my home, my boys love rottis and naans.
Thank you for answering my naan prayers,
regards,
gfnoor.
Nicole says
Hi, gfnoor,
I can’t believe you went to all the trouble of making gluten-full naan for your family! If I’m making it, I need at least be able to eat it. GF naan for all!
xoxo Nicole