This thick crust gluten free pizza dough takes only minutes to make, and has the authentic bite and chew that you've been missing. Make tonight pizza night!
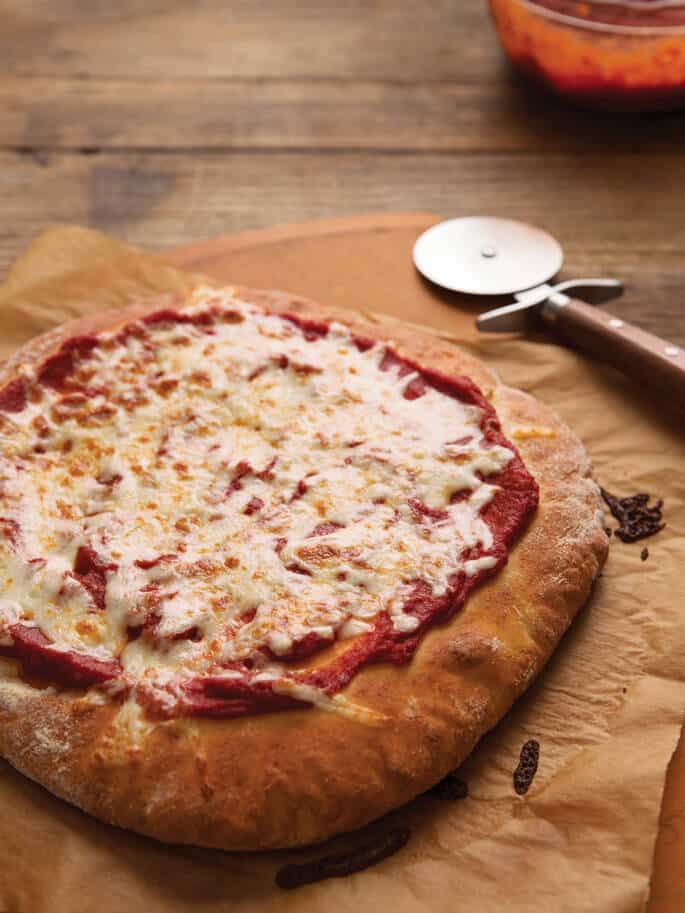
Having a proper recipe for an authentic gluten free pizza crust means so many things to my family. It's only my son who has to be gluten free, but we all eat that way at home (and I eat that way everywhere, whether I'm with my son or not).
When they sell pizza in the school lunchroom on Fridays, my son can come home and expect real pizza at home that night. When he's invited to a birthday party and everyone's having pizza, so can he.
And it looks, smells and tastes like the real deal. If it's a cracked and crumbly crust, it's just not going to cut it. I want my son to be proud, not ashamed.
This gluten free pizza crust recipe comes to you straight from page 187 of my gluten free bread cookbook, Gluten-Free on a Shoestring Bakes Bread. I decided to provide it here on the blog because I know not everyone is going to buy the book (even though of course I wish you would!), but I want everyone to have the chance to have real pizza.
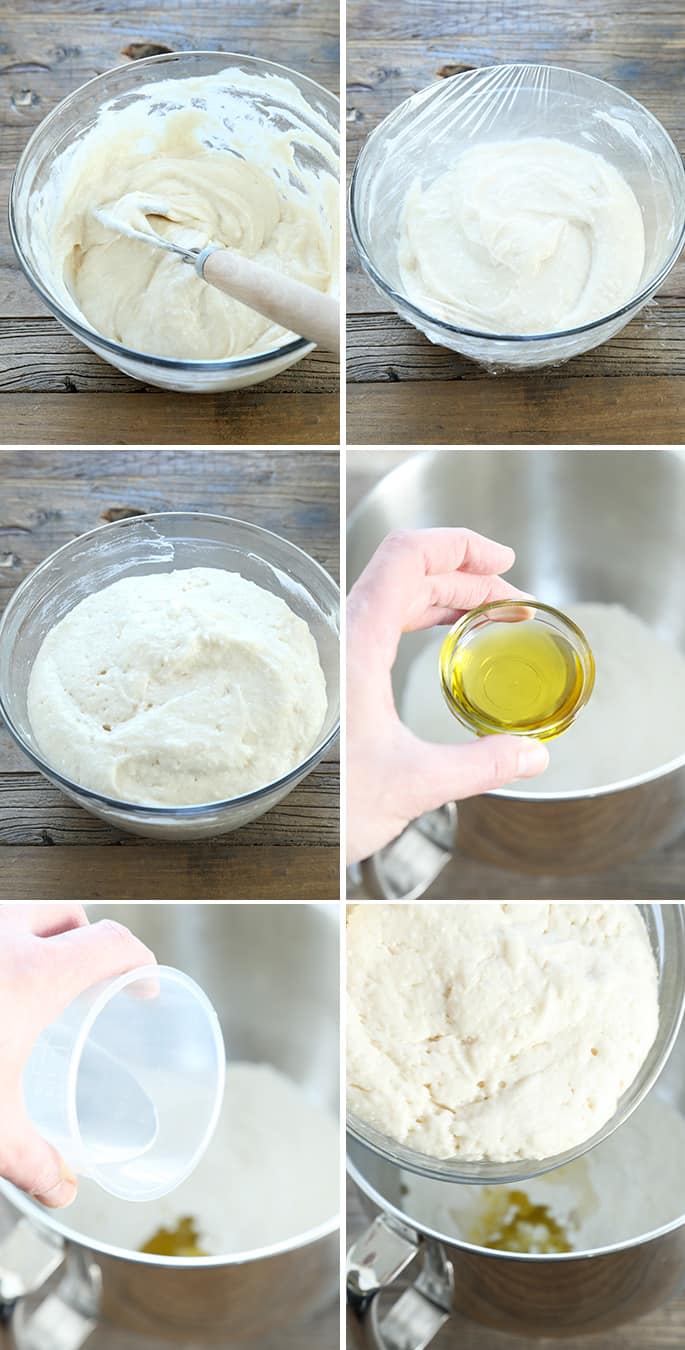
This recipe is so authentic and easy to handle that you can even make it on the grill in the summer—right on the grates. I thought it was time to provide complete step-by-step photos, too, to walk you through how to make and shape the dough, and bake the pizza.
It begins with a starter, which is just a quick-rising flour-yeast-sugar mixture. If I'm being completely honest, sometimes I skip the starter step and just put all the ingredients in the mixer at once. But the dough is always easier to handle when I follow the recipe exactly as written. (Practice what you preach, Nicole!)
If you can't find or can't use all the ingredients in our gluten free bread flour, don't worry! Our classic, old-school recipe for gluten free pizza crust is still available, and it still makes awesome gf pizza!
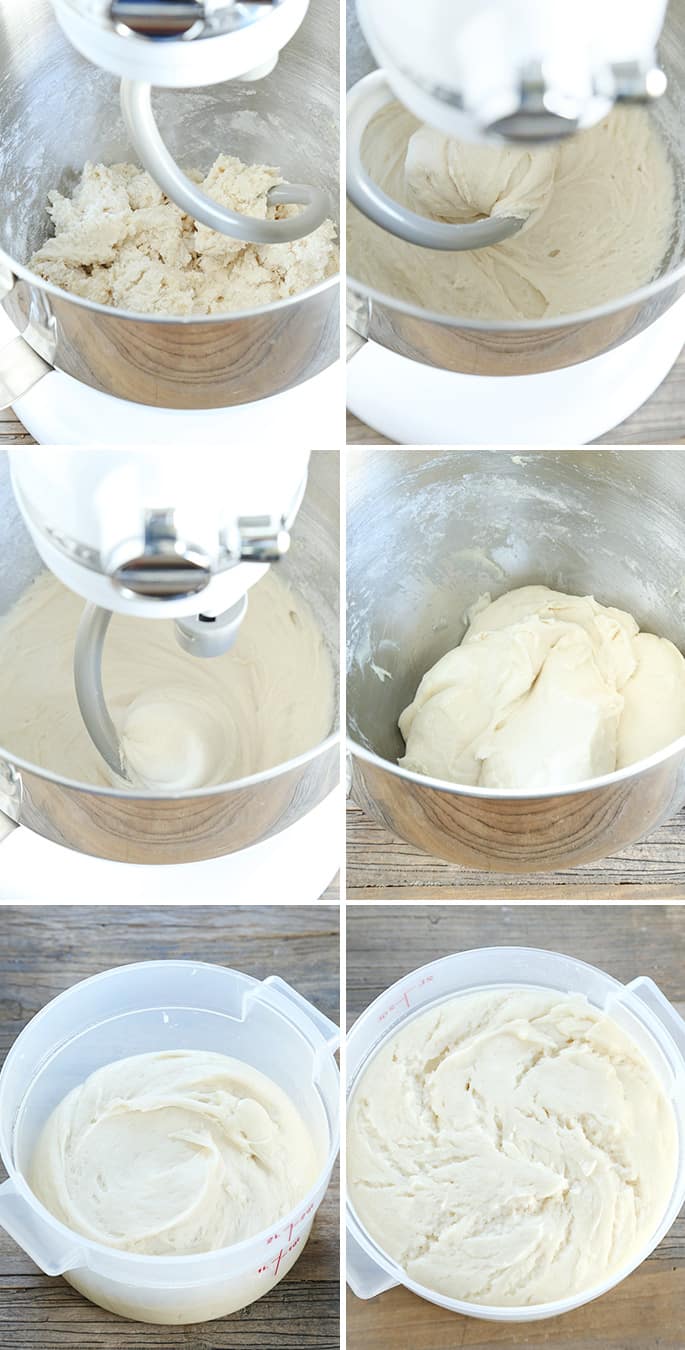
The dough starts off super shaggy, as you can see, but as you knead it with a dough hook (in a stand mixer or a handheld mixer with dough hooks) it becomes smoother and even lightens a bit in color. When you reach the point where it is done being kneaded, the dough will come off the sides of the bowl cleanly when scraped with an oiled spatula. All that's left to do is seal the dough in a proofing bucket or other well-sealed container and pop it in the refrigerator for at least an hour. Closer to 12 hours and the dough will be easier to handle, but as long as the dough is cold, you can work with it.
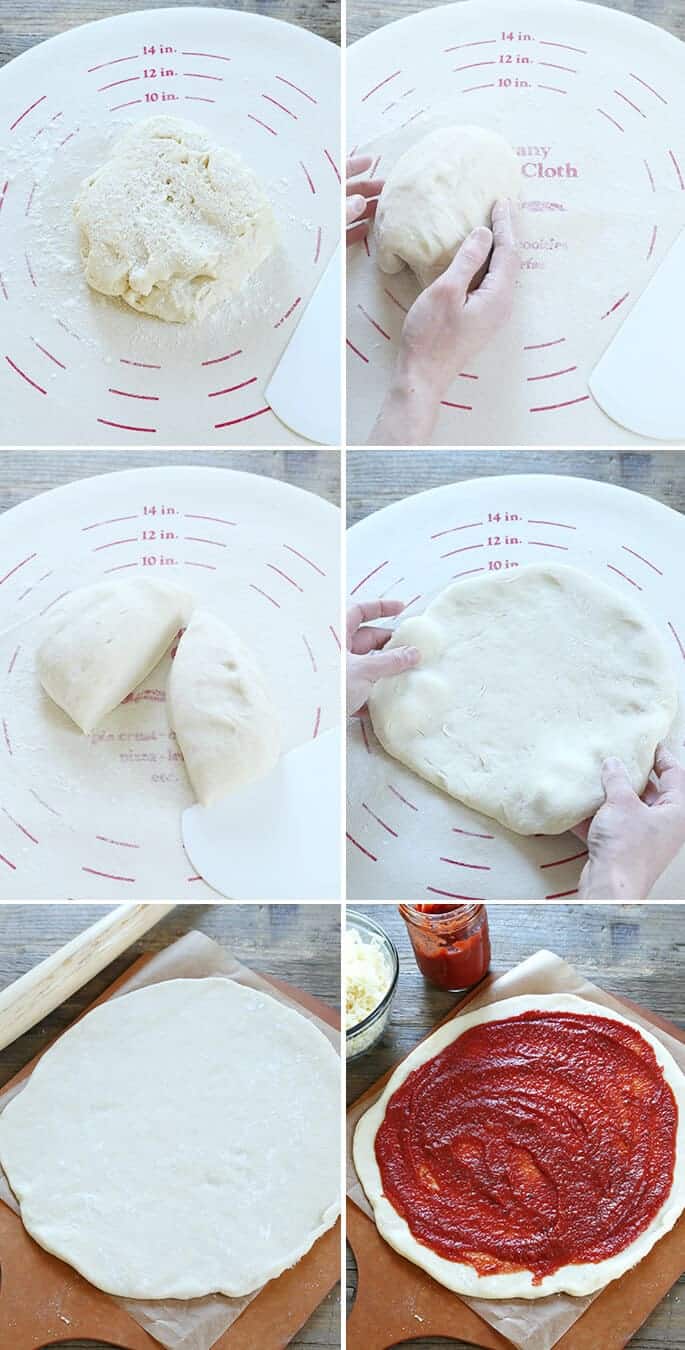
The risen dough will look a bit shaggy again, but kneading it very lightly with some extra gluten free bread flour will smooth it right out. Then it's ready to be patted and rolled into a round.
In case you need it, when the bread book first came out, I filmed a quick iPhone video of me shaping the dough into a round. But really, any way you get it into shape is perfectly fine.
Then just top it with sauce and cheese, and bake it. If you have a pizza stone, great. If not, an overturned baking sheet that allows some more air circulation will work.
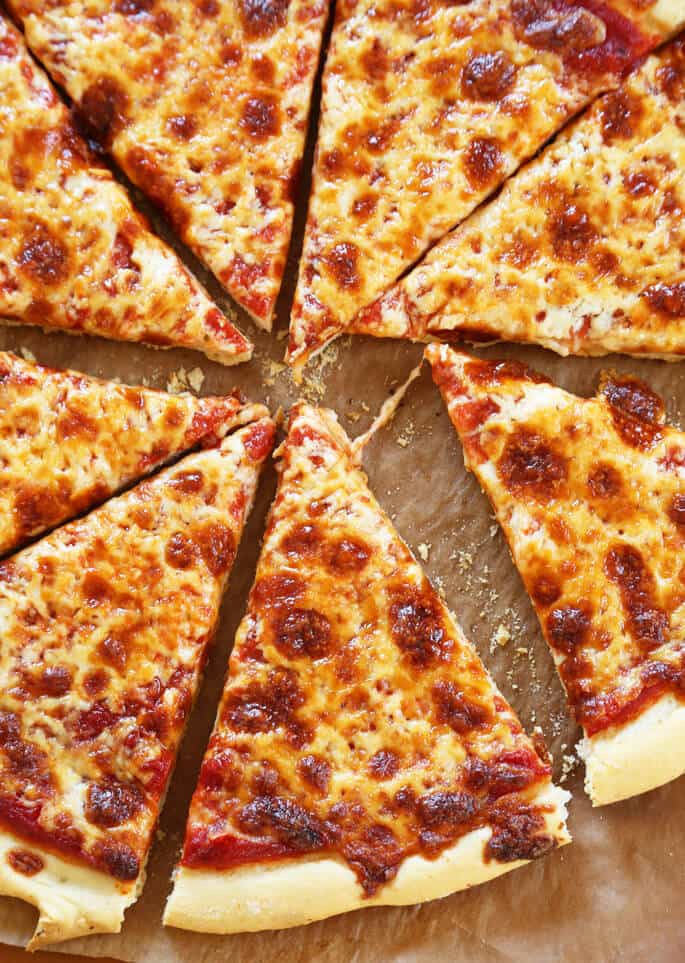
As far as I'm concerned, an authentic gluten free pizza crust recipe is more than just a way to eat bread and cheese (I know, cue the violins ?). It's proof. Proof that, if they can make it with gluten, we can make it without—and demand that it's good.
Proof that we can have Friday night pizza nights (that are even easy on the adults, since the dough takes minutes to prepare and can be made up to five days ahead of time). Proof that we don't have to accept a cracked and crumbled crust as the best we can do. Let's do better.
Gluten Free Pizza Crust from GFOAS Bakes Bread
Ingredients
STARTER
1 1/2 cups (210 g) Gluten Free Bread Flour*
1 teaspoon (3 g) instant yeast
2 teaspoons (8 g) sugar
3/4 cup plus 2 tablespoons (7 ounces, by weight) warm water (about 95°F)
DOUGH
2 cups (280 g) Gluten Free Bread Flour*, plus more for sprinkling
1 1/3 teaspoons (4 g) instant yeast
2 teaspoons (12 g) kosher salt
1 tablespoon (14 g) extra-virgin olive oil
1/4 cup (2 ounces, by weight) water, at room temperature
Starter
*BREAD FLOUR NOTES
- 1 cup (140 g) Gluten Free Bread Flour, as discussed more fully on pages 8 to 10 of GFOAS Bakes Bread, contains 100 grams Mock Better Batter all purpose gluten free flour (or Better Batter itself) + 25 grams whey protein isolate (I use NOW Foods brand) + 15 grams Expandex modified tapioca starch.
- For a calculator that helps you build the flour without math, please see my Gluten Free Flour page.
- If you would like to use Ultratex 3 in place of Expandex, please see #6 on my Resources page for instructions.
- To make a dairy-free pizza crust, use my original gluten free pizza crust recipe. It still works!
Instructions
To make the starter, place all the starter ingredients in a medium-size bowl, and whisk until well combined. The mixture will be thick and shapeless. Cover and set the bowl aside in a warm, draft-free location to rise until doubled (about 40 minutes).
Once the starter has finished rising, make the dough. Place the flour and yeast the bowl of your stand mixer, and use a handheld whisk to combine well. Add the salt, and whisk to combine. Add the olive oil, water, and risen starter to the bowl, and mix on low speed with the dough hook until combined. Raise the mixer speed to medium and knead for about 5 minutes. The dough will begin as a rough ball and become very sticky, but should be smooth and somewhat stretchy. Spray a silicone spatula lightly with cooking oil spray, and scrape down the sides of the bowl. Transfer the dough to a lightly oiled bowl or proofing bucket large enough for the dough to rise to double its size, and cover with an oiled piece of plastic wrap (or the oiled top to your proofing bucket). Place the dough in the refrigerator for at least 12 hours and up to 5 days.**
**Note: If you prefer, you may make and use this dough on the same day. It will not be as easy to handle, however, but you can work with it. To use the dough the same day it is made, after making the dough, set the covered dough to rise in a warm, draft-free environment to allow it to rise to double its size (about 1 hour). Once it has doubled, place it in the refrigerator for at least 15 minutes or until it is chilled. This will make it much easier to handle. Then, continue with the rest of the recipe instructions.
Once the pizza dough has finished rising in the refrigerator, it is best to work with it cold. Place a pizza stone (or overturned rimmed metal baking sheet) on the bottom rack of your oven and preheat the oven to 400°F. On a lightly floured surface, knead the dough until smoother as directed in These General Shaping Tips. Divide the chilled dough into two equal portions, and roll each into a ball. Sprinkle both lightly with flour, and cover one with a moist tea towel so that it doesn’t dry out. Using well-floured hands and a rolling pin, as necessary, pat and roll out the first piece of dough on a lightly floured surface into a 12-inch round, rotating the dough and flouring it frequently, to prevent sticking, as shown in the gluten free pizza shaping video. Roll and pat the dough more thickly as you work from the center of the dough to the edges to create a crust. Transfer the round of dough to a piece of unbleached parchment paper. Repeat with the second piece of dough.
Top your pizza with sauce and cheese, then place the pizza, one at a time, on the pizza stone. Bake until the crust is browned and your toppings are cooked as desired (about 8 minutes, but time will vary depending upon toppings and taste). Allow the pizza to set for a few minutes before slicing and serving.
From the book Gluten-Free on a Shoestring Bakes Bread: Biscuits, Bagels, Buns, and More by Nicole Hunn. Excerpted by arrangement with Da Capo Lifelong, a member of the Perseus Books Group. Copyright © 2013.
Originally published on the blog with one photo in 2014. Lead photo credit Stephen Scott Gross Photography. Food styling by Treva Chadwell.


Meg says
I have had the worst luck with this recipe. I’ve tried it twice and have had the same problem as the poster below (Tonia). I have a feeling that there’s something missing from this reprint. My dough was also dry and crumbly… not shaggy or wet at all! And I even tried using less flour and more water. No success. :( I’m so sad. I have been intrigued by this book but if I can’t get one recipe to work, what are the others going to be like?
Nicole Hunn says
Meg, I understand that you’re frustrated. This is one of the best tested bread recipes in my entire book, and I have made it countless times. As I explained to Tonia below, I have to imagine that your flour blend is the culprit. You must use the flour blend that I specify in the recipe. Particularly in my newer bread recipes, not just any flour will do. The all purpose gluten free flour base + Expandex + whey protein isolate must be used for the recipe to work. All of the recipes in my book are rigorously tested, but must be made as written or you’re essentially creating a new, untested recipe!
Meg says
Nicole, thank you for the response. I can see for sure that the right flour blend can make all the difference. Admittedly, I have been using Jules Flour exclusively (yes, I have read your opinion on that ;) ). However, we’ve been talking about mixing our own and once we get there, I will give this recipe another try. We NEED a go-to thick crust pizza dough!
Nicole Hunn says
Meg, you simply cannot make this with another flour blend, Jules or otherwise. I wouldn’t try again until you have the proper ingredients!
Tonia Blais says
Hi Nicole,
I have made this before and the crust was hard and crumbly. Any ideas on what I did wrong?!?! Thanks.
Nicole Hunn says
Without knowing more, Tonia, I have to assume it was your flour blend and/or you did not measure by weight. You must make the recipe as it is written. The flour blend is the heavy-lifter here!
Tonia Blais says
Hi Nicole,
I followed the recipe exactly. Including the Expandex and weighing everything on a scale.
Nicole Hunn says
Tonia, please see the Bread FAQs here on the blog. Your answer is likely there, but it’s not possible for me to really guess without knowing more. All I can add is that, if you are in a desert or near-desert environment, try adding another tablespoon of water.
Jessie Crooks says
I started this dough on Monday and making pizza tonight! Can’t wait to see how it compares to your recipe from a few years ago. :-)
Mare Masterson says
I have yet to make the pizza because I do not have a pizza stone or peel. When I get those items and I do make pizza, though, it will be your thin crust recipe because that is what we prefer. I cannot wait!
Client sent me HUGE box of Lindt chocolates as a thank you. I ate 4 pieces. Paid for it the next day. Never thought to look it up until after I was sick to my stomach.
Lara says
Thank you so much for the recipes and the guidance! your recipes are a revolution indeed! I just want to ask a question: I have an easier and cheaper access to isolated protein very high quality wheat flour from the Scandinavian countries and I can’t find AT ALL some ingredients as like Expandex or often potatoe starch.. so, can I replace weight to weight the flour mix you have composed by the isolated protein wheat flour that I have at hand?
Jennifer S. says
The braided deal is totally on my menu for this weekend, but I’m using ham, gruyere, spinach, and a creamy mustard yogurt sauce. Cannot wait to have it and I’m so glad you got approval to share this super amazing recipe with the entire Gluten Free world!!
Nicole Hunn says
That sounds amazing, Jennifer! Your family had better realize how lucky they are….
Jennifer S. says
They loved it! and I loved it! It was so delicious!!!!
Do they know how lucky they are? doubtful. What kind of household (besides yours) has gourmet gluten free foods for dinners almost every day? I’m afraid the kids will have a rude awakening when they leave the nest…
Ashley Gay says
Do you have any suggestions for those with a whey allergy for the bread flour? Thanks!
Mare Masterson says
Ashley, she addresses it in the book.
Amber McIntire says
Have you ever tried freezing this? I know you can’t freeze it raw, but do you think I could make some up in advance and then cook it for the 5 mins and freeze? There are just two of us so we move through recipes a lot slower, plus I usually have to do most of my baking on the weekends. Just wondering!
Nicole Hunn says
Hi, Amber, Yup. I have definitely done that. It works great! Since the recipe only makes 2 pies, though, I’d still recommend that you make it on the weekend since that’s your pattern and then bake one early in the week, and the other later in the week. Just divide the dough in half for the first pie, and seal back up the next pie. It’ll keep in the refrigerator all week, just raw!
Anneke says
I use this all the time! It is definitely a recipe that benefits from more time in the fridge. I often use it after 24 hours, but the flavor is much better if it rises for closer to five days. It also doubles easily, but use a larger proofing bucket, because it will get big!
Nicole Hunn says
I love it with lots of yeast flavor development, too, Anneke! Sometimes in a pinch, I’ll make the dough first thing in the morning and then use it that night, but I’m so happy when I have it in the refrig a few days ahead of time. :)
Jessica Hardin says
I made my dough on wed. Today I pulled it out. Real loose and bubbly. No where as solid as your video. Should I add more flour into it?