This post may contain affiliate links. Please read our disclosure policy.
Moon pies made gluten free with cookie-shaped graham crackers, marshmallow filling, all dipped in chocolate. Just like you remember!
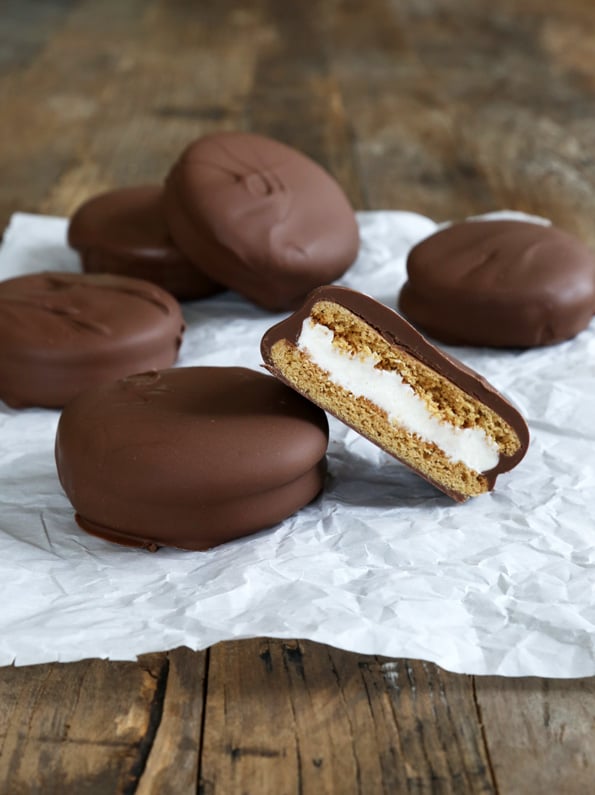
Table of Contents
These Gluten Free Moon Pies could have been in my next gluten free cookbook, Gluten Free Classic Snacks The only reason they're not? I hadn't even thought of developing this recipe until weeks after the photo shoot for the new book had come and gone. And I just didn't want to tell you about these unless I could also show them to you.
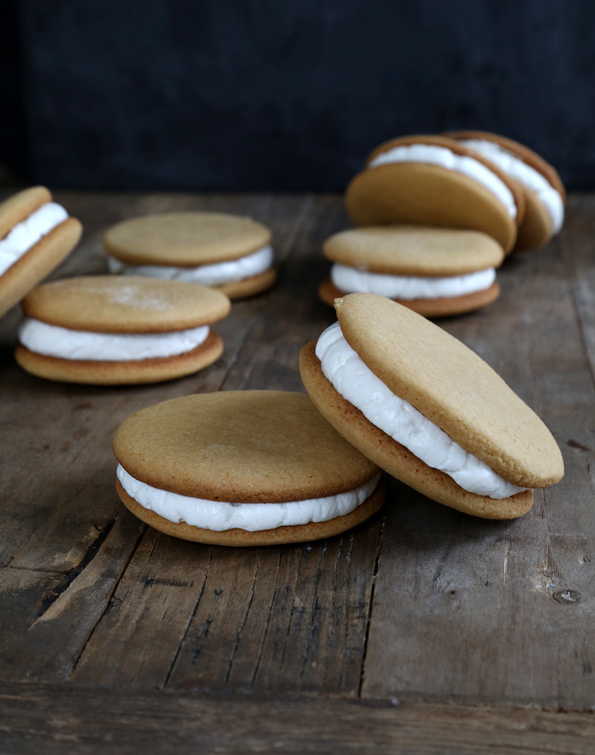
Just like all of the packaged snack cakes we remember so fondly, Moon Pies are simple but extraordinary all at the same time. They have a distinctive texture and a particular flavor, and even though there are other cookies and cakes with similar components, Moon Pies stand alone.
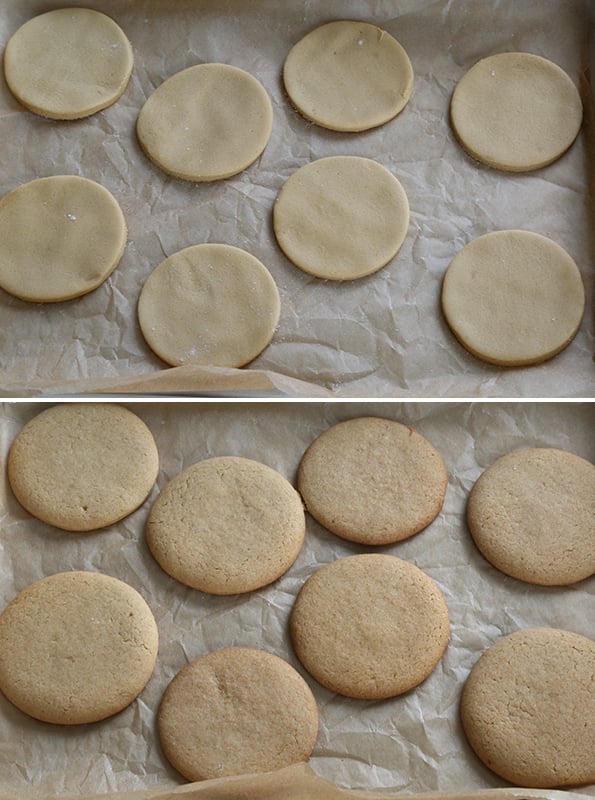
The graham crackers are much softer than, well, how we think of graham crackers—but they do have the honey-molasses taste we expect from graham crackers. See? Moon Pies are special!
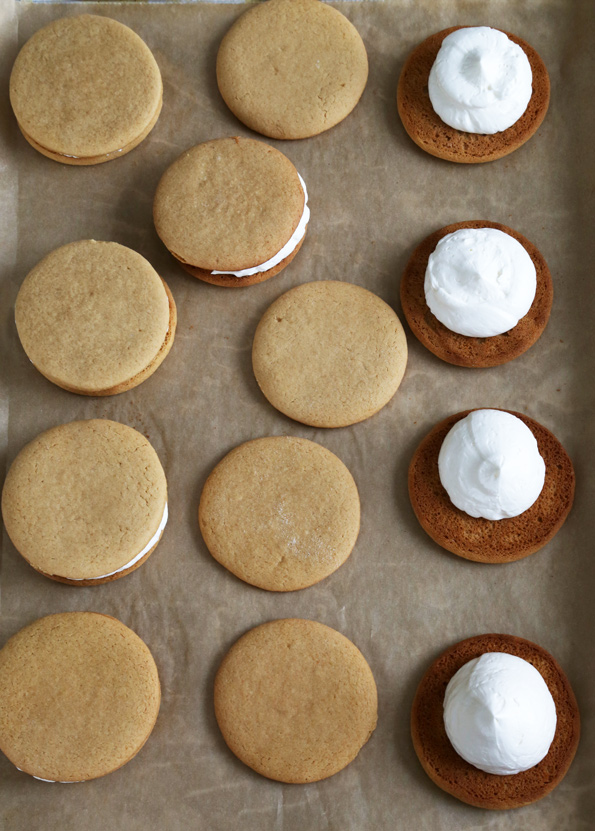
The filling is a cross between a marshmallow fluff and buttercream. Really, it's a modified Swiss Meringue Buttercream. First, you basically make homemade marshmallow fluff (so easy!), and you could stop there and use that as your filling. It would be a bit less stable as filling, and more likely to squish out when you're covering the pie in chocolate. But really? It would be fine.
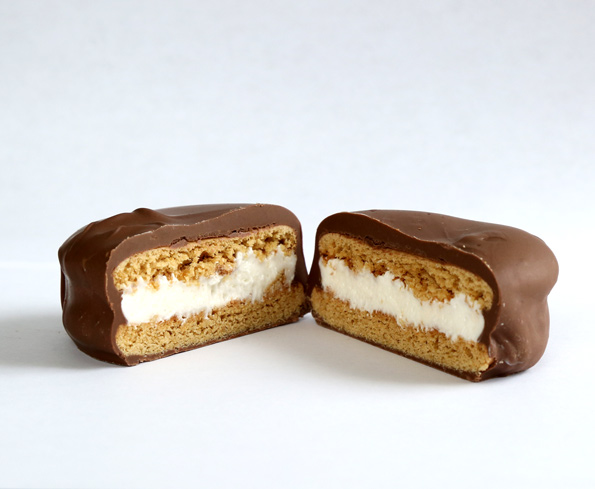
I like it just like this: tender graham crackers with a marshmallow-like buttercream in the center, covered in thick, rich milk chocolate. Mine are the size of the mini Moon Pies, though, since the regular size is about 4-inches and that's really, well, huge! Tell me the truth—doesn't that look like it came from a package? But it came from our very own kitchens! And it's perfectly gluten free. Classic Snacks are where it's at!
Gluten Free Moon Pies
Equipment
- Stand mixer or handheld mixer
- Pastry bag with plain open piping tip
- Candy thermometer
Ingredients
Soft graham cracker cookies
- 2 ⅔ cups (375 g) all purpose gluten free flour blend, plus more for sprinkling (I used Better Batter; please click thru for full info on appropriate blends)
- 1 ½ teaspoons xanthan gum
- ¼ teaspoon baking soda
- ½ teaspoon baking powder
- ¼ teaspoon kosher salt
- ⅓ cup (67 g) granulated sugar
- ⅔ cup (145 g) packed light brown sugar
- 8 tablespoons (112 g) unsalted butter, at room temperature
- 3 tablespoons (63 g) honey
- 2 tablespoons (42 g) unsulphured molasses
- ½ teaspoon pure vanilla extract
- 1 (50 g (weighed out of shell)) egg, at room temperature, beaten
- 1 (25 g) egg yolk, at room temperature, beaten
- 2 to 3 tablespoons milk, at room temperature
Swiss Meringue Filling
- 1 ¼ cups (250 g) granulated sugar
- ½ cup (4 fluid ounces) water
- ⅛ teaspoon kosher salt
- 2 (50 g) egg whites, at room temperature
- ⅛ teaspoon cream of tartar
- 1 teaspoon pure vanilla extract
- 12 tablespoons (168 g) unsalted butter, cubed and kept cool (but not cold)
Chocolate Glaze
- 20 ounces milk chocolate, chopped
- 5 tablespoons (70 g) virgin coconut oil
Instructions
Make the cookie dough.
- Preheat your oven to 325°F. Line rimmed baking sheets with unbleached parchment paper and set them aside. In a large bowl, place the flour, xanthan gum, baking soda, baking powder, salt and granulated sugar, and whisk to combine well. Add the brown sugar and whisk again, breaking up any lumps.
- Create a well in the center of the dry ingredients, and add the butter, honey, molasses, vanilla, egg and egg yolk, and 2 tablespoons milk, mixing to combine after each addition. The dough should come together and be thick but soft. Add more milk by the teaspoonful as necessary to bring the dough together.
- Place the dough on a lightly floured piece of unbleached parchment paper and roll it out into a rectangle about 1/4-inch thick, sprinkling lightly with flour as necessary to keep the dough from sticking to the rolling pin.
- Place the rolled out dough, still on the parchment, on a baking sheet or cutting board, and place it in the refrigerator for 10 minutes, or the freezer for 3 to 5 minutes or until firm.
- Remove from the refrigerator or freezer and, using a 2-inch round cookie cutter, cut out rounds of dough and place on the prepared baking sheets about 1-inch apart from one another. Gather and reroll scraps, sprinkling lightly with flour and chilling as necessary to make the dough easier to handle.
Bake the cookies.
- Place the cookies in the center of the preheated oven and bake until very lightly golden brown and set in the center (about 8 minutes). Do not over bake.
- Remove from the oven and allow to cool on the baking sheet for about 10 minutes or until stable enough to move before transferring to a wire rack to cool completely.
Make the filling.
- In a medium-size, heavy-bottom saucepan, place the sugar, water and salt, and whisk to combine. Clip a candy thermometer to the side of the saucepan and cook the sugar mixture over medium-high heat, without stirring it, until it reaches the softball stage, 240°F. Remove from the heat and set it aside to cool briefly.
- Place the egg whites in the bowl of your stand mixer fitted with the whisk attachment attachment or a large bowl with a hand mixer.
- Whip the egg whites on medium-high speed until beginning to thicken. Add the cream of tartar, and continue to whip until stiff, but not dry, peaks form. With the mixer speed on low, pour the warm sugar mixture down the side of the mixer (making sure the sugar doesn’t hit the whisk).
- Once all of the sugar mixture has been added, turn the mixer speed up to high and beat until the mixture is thick, glossy, at least doubled in size and holds a stiff peak (about 5 minutes).
- This is Marshmallow Fluff, and can be used on its own as filling. To make a modified Swiss Meringue Buttercream (a more stable filling), continue to the next step.
- Once the outside of the mixing bowl is cool to the touch, switch to the paddle attachment and begin adding the cubed, cool butter while the mixer is on medium speed.
- Continue to beat until all of the butter is added and the mixture is silky smooth and thick. If the mixture looks curdled, continue to beat for a while longer until the butter is smooth (the “curdles” are actually butter that is too cold). If the mixture is runny, place the bowl in the refrigerator for 15 minutes and beat again.
Assemble the pies.
- Pair the cooled cookies together, and invert one cookie of each pair. Transfer the filling to a pastry bag fitted with a large plain piping tip, and pipe about 2 tablespoons of filling onto each inverted cookie.
- Top with the other cookie of each pair and press down to sandwich.
Chocolate glaze.
- Place the chopped chocolate and coconut oil in a large, deep bowl with high sides.
- Melt over a double boiler or in the microwave, stirring occasionally, in 30-second increments at 60% power. Allow the chocolate to sit at room temperature until it begins to thicken a bit.
- Immerse the assembled moon pies, one at a time, in the glaze. Press down on the pie with the tines of a fork, then flip it gently in the chocolate.
- Pull the pie out of the chocolate by slipping the fork under it and bobbing the pie on the surface of the chocolate a few times before pulling it along the edge of the bowl and carefully placing it on a clean sheet of wax or parchment paper.
- Allow the chocolate glaze to set at room temperature.
Nutrition information is automatically calculated, so should only be used as an approximation.



Can I put the dough in the freezer first then roll out my freezer is to small for my tray??? bit like you do with the choco chip biscuit recipes.. :)
My sister, her kiddos and I (with my toddler assisting in the eating department) all made these yesterday. Soooo great. We dunked half of them in white chocolate coating with banana flavoring (which was always my favorite flavor of moon pies.) Absolutely ridiculously delicious! Thank you for all your hard work.
These look so yummy Nicole! Thanks so much for all your work! My pile of ‘I have to make these soon’ just keeps getting bigger and bigger. I have no idea how you find the time!
I was just wondering if you need to add the extra xanthan gum even if the flour contains it?
Nicole, they look like they freeze pretty well and are easy to defrost for those last minute school birthday parties. Have you any experience with how well they freeze?
I haven’t frozen these, Gina, but I have frozen many other things like them and they would do great. If the chocolate isn’t properly tempered, they might show some “bloom” on the chocolate, but that’s just cosmetic. I’d go for it!
CONGRATULATIONS!!!!! I am so proud of you for making your deadline. I’m already telling people about your newest cookbook. I cannot wait!
I’m a little selfishly bummed, sad, angry, crabby, and tortured that today’s recipe was not the oreo cakesters. I miss those guys terribly. Tomorrow?
Thanks, Jennifer! I’m so sorry that you’re disappointed about the Cakesters! I promise that recipe will go up very soon. I have something else already in the hopper for tomorrow, but probably Thursday for the Cakesters. I can only torture you for so long, right? ;)
Wow, Nicole! These look so yummy! I never tried a moon pie, or ever heard of moon pies… I guess they are similar to wagon wheels?
I really love this recipe, I know the wagon wheel lovers here would do back flips :)
I have a question regarding the Pomonas Universal Pectin. Do you also add the calcium packet? I didn’t see the packet originally and missed adding it to the Mock Better Batter mix recipe.
Thanks again for the fab recipe! HUGS!
I think these are very similar to Wagon Wheels, Lucy! Let the backflips commence. :)
And toss the calcium packet (Bread FAQ#11). You only need the pectin!
Okay that’s good because the calcium packet went into recycle oops… :)