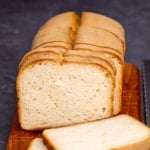
Gluten Free Sourdough Bread Recipe
Make this crusty gluten free sourdough bread with a soft crumb and bake it on the same day. No special ingredients or confusing instructions!
Servings: 10 slices bread
Equipment
- Stand mixer fitted with paddle attachment (or try pulsing in a food processor)
- Glass jar for starter with loose-fitting or cloth lid
- Nonreactive (no metal) spoon or spatula silicone, plastic, wood all work
Ingredients
- 3 cups (420 g) all purpose gluten free flour blend (See Recipe Notes)
- 3 teaspoons xanthan gum omit if your blend already contains it
- 9 tablespoons (68 g) tapioca starch/flour
- 2 tablespoons (25 g) granulated sugar
- 1 ½ teaspoons (9 g) kosher salt
- ¾ cup (165 g) gluten free wild yeast sourdough starter fed within previous 12 hours (See Recipe Notes)
- 1 ½ cups (12 fluid ounces) warm milk (about 95°F), plus more by the tablespoon
- 4 tablespoons (56 g) unsalted butter at room temperature
- Melted butter for brushing on top to help browning (optional)
Instructions
- Grease a standard 9-inch x 5-inch loaf pan and line with parchment paper. Set the pan aside.
- In the bowl of a stand mixer fitted with the paddle attachment or a large bowl with a hand mixer fitted with dough hooks, place the all purpose flour, xanthan gum, tapioca starch/flour, granulated sugar, and salt, and mix or whisk to combine well.
- Add the starter, 1 1/2 cups of milk, and the butter, and beat on medium speed to combine. This is a batter-style bread dough, so it won’t resemble traditional bread dough, but rather a soft cookie dough.
- Turn the mixer up to medium-high speed and beat until the dough has taken on a whipped appearance (about 5 minutes). The dough should be tacky to the touch, but should hold its shape when scooped.
- If your dough feels at all dry to the touch, add more milk by the tablespoon, beating it in until well-combined, until the dough reaches the proper consistency.
- Transfer the bread dough to the prepared loaf pan. Using a moistened spatula, press the dough into every corner of the loaf pan and spread the top into an even layer.
- For a more traditional loaf shape, pile the dough a bit more toward the center in a dome.
- Cover the loaf pan with lightly oiled plastic wrap and allow it to rise in a warm, draft-free place until it’s reached about 150% of its original size, at least 4 hours. It will not fully double in volume, and will rise more in the oven than it does raw.
- Even traditional yeast bread dough will take longer to rise properly in colder, drier weather and less time in warmer, more humid weather.
- This wild yeast sourdough bread will take longer to rise than any other, and will depend in part upon the age of your starter.
- This bread dough is much less likely to overproof and take on that pock-marked appearance than bread made with conventional yeast. If you’re unsure about whether the bread has proofed enough, allow it to keep rising.
- When the bread is nearing the end of its rise, preheat your oven to 400°F.
- Remove the plastic wrap and, using a sharp knife or lame, slash the top of the loaf from one short end to the other about 1/4-inch deep.
- Brush the top of the risen loaf generously with melted butter before baking as an optional step to aid the loaf in browning.
- Place the pan in the center of the preheated oven and allow to bake for 30 minutes.
- Reduce the oven temp to 350°F, rotate the pan 180° around, and continue to bake until center of the loaf reads 200°F on an instant read thermometer (about 30 minutes more).
- The crust may not darken as much as you expect, but the loaf should sound hollow when thumped quickly with a finger.
- Remove the pan from the oven and allow the bread to cool for about 10 minutes in the pan before transferring to a wire rack to cool completely before slicing and serving.
- To freeze the bread, cool the loaf completely, then slice, wrap tightly and freeze the slices. Defrost as many slices at a time as you need in the toaster.
Video
Notes
Flour blend choices
My favorite gluten free flour blends are Better Batter's original blend gluten free flour and Nicole's Best multipurpose blend (with 3 teaspoons added xanthan gum as directed in the recipe). King Arthur Flour's gluten free bread flour should also work here, but KAF Measure for Measure blend will not work. Caputo Fioreglut flour should also work well, but place the wet ingredients in the mixer bowl first or the flour blend will stick too much to the bowl.
I don't recommend Bob's Red Mill 1-to-1 Gluten Free Baking Flour for yeast, but I have been able to make a passable loaf adding an extra 1 1/2 teaspoons xanthan gum to the dry ingredients.
To make your own blend using one of my “mock” recipes, please see the all purpose gluten free flour blends page.
Whatever you choose, please measure your ingredients by weight, not volume (cups) for consistently good results.
Feeding the sourdough starter
If your mature gluten free sourdough starter is active, but hasn't been fed within the last 8 to 10 hours, feed it first before you bake:
- Discard 1/3 of the volume
- Mix in 4 fluid ounces spring or distilled water and 70 grams gum-free gluten free flour or another gluten free flour blend without xanthan gum (Nicole's Best works great) with a stainless steel or wooden spoon or silicone spatula. Avoid aluminum.
- Close the lid loosely
- Let it sit for about 2 hours or until bubbling again
Nutrition
Serving: 1slice | Calories: 265kcal | Carbohydrates: 48g | Protein: 3g | Fat: 6g | Saturated Fat: 4g | Polyunsaturated Fat: 0.2g | Monounsaturated Fat: 1g | Trans Fat: 0.2g | Cholesterol: 16mg | Sodium: 412mg | Potassium: 61mg | Fiber: 2g | Sugar: 4g | Vitamin A: 199IU | Calcium: 47mg | Iron: 0.1mg
