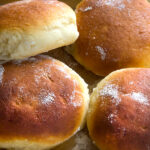
Gluten Free Hawaiian Rolls Recipe
Super soft, lightly sweet gluten free Hawaiian rolls are highly enriched, impossibly tender rolls with the most tender crumb. Use them as sandwich rolls, or just enjoy a toasted roll with butter.
Servings: 8 bun-size rolls
Equipment
- Stand mixer with dough hook (gf bread flour) or paddle attachment (all purpose gf flour)
Ingredients
- 2 ½ cups (350 g) all purpose gluten free flour blend See Recipe Notes for help choosing
- 2 teaspoons xanthan gum omit if your blend already contains it
- ½ cup (60 g) tapioca starch/flour plus more for sprinkling
- 2 ⅓ teaspoons (7 g) instant yeast
- ¼ cup (50 g) granulated sugar
- 1 teaspoon kosher salt
- 5 tablespoons (70 g) unsalted butter softened
- 1 egg (50 g (weighed out of shell)) at room temperature
- 1 teaspoon vanilla extract
- 1 ¼ cups (10 fluid ounces) pineapple juice at room temperature
- Egg wash 1 egg, at room temperature, beaten with 1 tablespoon water
Instructions
Make the bread dough
- Place the all purpose gluten free flour blend, xanthan gum, and tapioca starch, yeast, and sugar in the bowl of your stand mixer, and use a handheld whisk to combine well. Add the salt, and whisk to combine again.
- Add the butter, egg, vanilla, and pineapple juice, and mix on low speed with the paddle attachment until just combined. Raise the mixer speed to medium and beat for about 3 minutes or until it begins to take on a whipped appearance, sticking to the sides of the bowl and stretching from the paddle to the sides.
- Spray a silicone spatula lightly with cooking oil spray, and scrape down the sides of the bowl.
- Transfer the dough to a lightly oiled bowl or proofing bucket large enough for the dough to rise to double its size, and cover with an oiled piece of plastic wrap (or the oiled top of your proofing bucket).
- Place the dough in the refrigerator for at least 12 hours and up to 3 days.
Shape the rolls
- On baking day, line a large rimmed baking sheet and set it aside. Remove the dough from the refrigerator and turn it out onto a lightly floured surface. Sprinkle the dough lightly with more flour, and turn over a few times until it appears smoother and is less sticky.
- Use a floured bench scraper, cake turner or large sharp knife to divide the dough into 8 pieces of equal size, each weighing about 4 ounces.
- Working with one piece of dough at a time, shape it into a round by rolling it with a floured palm in circles on the lightly floured surface. Handle the dough lightly and keep it moving in a circle with your palm, keeping your pinky and that side of your hand in contact with the surface all the time.
- Pinch together any cracks and keep shaping, sprinkling lightly with flour as necessary to prevent sticking. Use your palm or 4 fingers of your hand to press down the round of dough into a disk for even rising.
- Place the first roll in the prepared baking pan. Repeat with the remaining pieces of dough, placing the rolls less than an inch apart from one another.
Let the shaped rolls rise
- Cover the baking pan with oiled plastic wrap and set it aside in a warm, draft-free location to rise for 30 minutes.
- Uncover the pan and brush the rolls generously with the egg wash. Allow the rolls to finish rising, uncovered, until at least 50% larger than when you began, about 20 to 30 minutes more.
- Preheat your oven 375°F, while the rolls finish rising. If they begin to take on a dimpled appearance, they have begun to overproof and should begin baking immediately.
Bake
- Place the baking pan on the lower rack of the preheated oven and bake until golden brown all over, appear taut across the top, and the inside of the rolls registers at least 185°F on an instant-read thermometer, about 25 minutes.
- To maintain the softest crust on the rolls, cover them loosely with a tea towel while still hot out of the oven. Allow the rolls to cool for at least 10 minutes before slicing and serving.
Video
Notes
Flour blend choice
I highly recommend Nicole's Best multipurpose gluten free flour blend or Vitacost's Multi-Blend Gluten Free Flour with added xanthan gum, or Better Batter's original all purpose blend without additional xanthan gum. Poorer quality flour blends that aren't balanced well will not work in shaped yeast bread like this.
To build your own blend or learn more about this important subject, please see the all purpose gluten free flour blends page here on the blog.
Nutrition
Serving: 1roll | Calories: 344kcal | Carbohydrates: 54g | Protein: 7g | Fat: 10g | Saturated Fat: 5g | Polyunsaturated Fat: 1g | Monounsaturated Fat: 3g | Trans Fat: 0.3g | Cholesterol: 132mg | Sodium: 361mg | Potassium: 128mg | Fiber: 3g | Sugar: 10g | Vitamin A: 385IU | Vitamin C: 4mg | Calcium: 25mg | Iron: 1mg
