Gluten Free Bread Recipe For Bread Machine
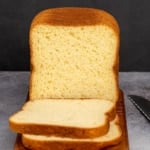
This gluten free bread recipe for the bread machine makes a tall, crusty loaf with a soft, flexible crumb. Made with gluten free flour, yeast, milk, and eggs—or easily made dairy free.
Servings: 8 slices
Equipment
- Bread machine with "homemade" adjustable setting or at least a "gluten free" setting (See Recipe Notes)
Ingredients
- 1 ½ cups (12 fluid ounces) whole milk warm (about 95°F)
- 3 tablespoons (42 g) unsalted butter melted and cooled
- 1 teaspoon apple cider vinegar
- 2 (100 g (weighed out of shell)) eggs at room temperature
- 2 ⅝ cups (368 g) all purpose gluten free flour blend (See Recipe Notes)
- 3 teaspoons xanthan gum omit if your blend already contains it
- ½ cup (72 g) tapioca starch/flour
- ¼ teaspoon cream of tartar
- ½ teaspoon baking powder
- 2 tablespoons (24 g) granulated sugar
- 2 teaspoons (12 g) kosher salt
- 2 ½ teaspoons (8 g) instant yeast (See Recipe Notes)
Instructions
- Remove the loaf pan from your bread machine and attach the mixing paddle. Set the pan aside.
- In a large liquid measuring cup or mixing bowl, whisk together the warm milk, melted butter, vinegar, and eggs until fully combined.
- In a separate bowl, whisk together the gluten free flour blend, xanthan gum, tapioca starch, cream of tartar, baking powder, sugar, and salt.
- Pour the wet ingredients into the loaf pan. Carefully spoon the dry mixture on top in an even layer—do not mix. Use a clean finger to make a small well in the center and add the yeast to the well.
- Plug in and set up your bread machine for use.
- If your machine has a “homemade” or custom setting, set it for:• 1.5 pound loaf setting• 20 minutes of mixing/keading (1 cycle only)• 1 hour rise (one rise only)• 1.5 hours baking• Dark crust (if available)Otherwise, choose a “gluten free,” “basic,” or “one rise” cycle.
- Place the bread pan securely in the machine and close the lid. Press the start button.
- Listen for when the mixing/keading cycle is done or nearly done, and use a silicone spatula to scrape down the sides of the pan to mix in any loose flour.
- Wet the spatula, and smooth the top of the raw dough into an even layer.
- Close the lid and allow the bread to rise fully and bake for 1 hour.
- Open the lid and use an instant read thermometer to check the internal temperature at the center of the loaf. It should read at least 205°F.
- If your machine browns the top, let it bake until the top is browned and feels firm on top (another 15 to 20 minutes).
- When baking is complete, check that the internal temperature reaches 205°F. If the top isn’t fully browned, remove the bread from the pan and bake in a 400°F oven for 10 more minutes.
- Let the bread cool on a wire rack for at least 1 hour (ideally 2) before slicing.
Notes
Recipe Notes: Bread Machines, Flour Blends, and Yeast
Many modern bread machines now offer a “homemade” or custom setting that lets you control the knead, rise, and bake stages. I’ve used and recommend the KitchenArm 29-in-1 SMART Bread Machine for this recipe, but any model with a 1-rise cycle will work. I’ve also tested the Zojirushi, but note that it requires a 2-pound loaf and comes at a premium price.
Flour blend choices
Recommended gluten free flour blends for this recipe:
- Better Batter Original Blend – Works beautifully
- Nicole’s Best Blend – Be sure to add 3 tsp xanthan gum
- King Arthur GF Bread Flour – Works, but loaf may be denser
- Caputo Fioreglut – Loaf may be shorter and pale
- KAF Measure for Measure – Not suitable for yeast recipes
- Cup4Cup – Formula changed and I no longer recommend it.
- Bob’s Red Mill 1-to-1 – I can usually use it somewhat effectively in yeast bread by adding an extra 1 1/2 teaspoons xanthan gum to the dry ingredients, but it's not a recommended blend here
Nutrition
Serving: 1slice | Calories: 298kcal | Carbohydrates: 50g | Protein: 6g | Fat: 7g | Saturated Fat: 4g | Polyunsaturated Fat: 0.4g | Monounsaturated Fat: 2g | Trans Fat: 0.2g | Cholesterol: 58mg | Sodium: 701mg | Potassium: 142mg | Fiber: 4g | Sugar: 5g | Vitamin A: 265IU | Vitamin C: 0.01mg | Calcium: 80mg | Iron: 0.4mg
