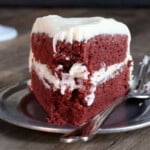
Classic Gluten Free Red Velvet Cake
Classic gluten free red velvet cake isn't just for Valentine's Day, but for any day of the year! It's the light chocolate-flavored cake that's perfect for chocolate- and vanilla-lovers alike. With gf cream cheese frosting.
Servings: 1 9-inch double layer cake
Equipment
- Electric mixer
Ingredients
For the red velvet cake
- 2 cups (280 g) all purpose gluten free flour blend (I used Better Batter; please click thru for full info on appropriate blends)
- 1 teaspoon xanthan gum omit if your blend already contains it
- 6 tablespoons (54 g) cornstarch (or try arrowroot)
- 1 teaspoon kosher salt
- 1 ¼ teaspoons baking powder
- ½ teaspoon baking soda
- 6 tablespoons (30 g) natural unsweetened cocoa powder
- 11 tablespoons (154 g) unsalted butter at room temperature
- 1 ¼ cups (250 g) granulated sugar
- 3 (150 g (weighed out of shell)) eggs at room temperature, beaten
- 1 ½ teaspoons pure vanilla extract
- 1 ¼ teaspoons apple cider vinegar
- 1 cup (8 fluid ounces) milk at room temperature
- Red soft gel paste food coloring optional
For the cream cheese frosting
- 16 ounces cream cheese at room temperature
- 4 tablespoons (56 g) unsalted butter at room temperature
- ½ teaspoon kosher salt
- 1 teaspoon pure vanilla extract
- 5 cups (575 g) confectioners’ sugar
Instructions
- Preheat your oven to 350°F. Grease two 9-inch round baking pans, and set them aside. (See Recipe Notes.)
Make the cake batter.
- In a medium-size bowl, place the flour, xanthan gum, cornstarch, salt, baking powder, baking soda and cocoa powder, and whisk to combine well. Set the bowl aside.
- In the bowl of a stand mixer fitted with the paddle attachment (or a large bowl with a handheld mixer), beat the butter on medium-high speed until light and fluffy.
- Add the granulated sugar, followed by the eggs and vanilla, beating to combine well on medium-high speed after each addition.
- Add the vinegar and then about a scant 1/8 teaspoon of the food coloring, if using, and beat to combine very well. The mixture may look a bit curdled, and that’s fine.
- Add the dry ingredients, alternating with the milk, and beginning and ending with the dry ingredients, mixing to combine after each addition. The batter should be smooth and relatively thick.
Bake the cakes.
- Divide the cake batter evenly between the two prepared pans, and smooth into an even layer with a wet spatula.
- Place both pans in the center of the preheated oven and bake, rotating once during baking, for 25 minutes, or until a toothpick inserted in the center of each cake comes out mostly clean, or with a few moist crumbs attached.
- Remove from the oven and allow to cool in the pans for 10 minutes before inverting the cakes onto a wire rack to cool completely.
Make the frosting.
- While the cakes are cooling, in the clean bowl of a stand mixer or a clean large bowl with a hand mixer, place the cream cheese and butter. Beat on medium-high speed until light and fluffy.
- Add the vanilla and salt, and beat to combine. Add about half of the confectioners’ sugar, and beat on medium-low speed until the sugar has been absorbed by the butter and cream cheese mixture.
- Add the rest of the confectioners’ sugar about 1 cup at a time, beating on medium speed to combine after each addition.
- Once all the sugar has been absorbed into the mixture, increase the mixer speed to high and beat until light and fluffy. The frosting should hold its shape when scooped, but should not be completely stiff.
Assemble the cake.
- Place one of the cooled cakes upside down on a serving platter. Place about 1 1/4 cups of frosting on top and spread into an even layer. Invert the second cake place on top of the frosting and press gently to adhere.
- For the neatest frosted cake, cover the entire top and sides of the cake in a very thin layer of frosting (this is called the crumb coat), and place in the freezer until very firm (about 15 minutes).
- Remove the cake from the freezer and cover the top and sides with the remaining frosting, spreading into an even layer.
- Swirl the frosting around randomly with a butter knife or offset spatula. Refrigerate the frosted cake for at least 15 minutes before slicing with a sharp knife into generous slices, and serving.
Notes
Note about size of cake pans.
You can of course use 8-inch round cake pans. You will need to increase the baking time slightly (by a few minutes, likely). You could also use 8-inch or 9-inch square pans, too. If you are baking the cakes in 8-inch round cake pans, you may need to increase the baking time by a few minutes as your cakes are thicker.
You can of course use 8-inch round cake pans. You will need to increase the baking time slightly (by a few minutes, likely). You could also use 8-inch or 9-inch square pans, too. If you are baking the cakes in 8-inch round cake pans, you may need to increase the baking time by a few minutes as your cakes are thicker.
