
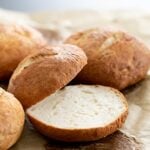
Gluten Free Pretzel Rolls
These gluten free pretzel rolls have the taste and texture of a soft pretzel, with the convenience of a round roll. Use them for sandwiches and they'll quickly become everyone's favorite!
Yield: 8 rolls
Ingredients
- 3 ¼ cups (455 g) all purpose gluten free flour blend plus more for sprinkling (click thru for full info on appropriate blends)
- 1 ½ teaspoons xanthan gum (omit if your blend already contains it)
- ½ cup (43 g) Scant 1/2 cup (43 g) cultured buttermilk blend powder You can replace this with 1/3 cup (40 g) dry milk powder
- 1 tablespoon (9 g) instant yeast
- ¼ teaspoon cream of tartar
- ¼ teaspoon baking soda
- 1 tablespoon (13 g) packed light brown sugar
- 1 teaspoon kosher salt
- 1 teaspoon apple cider vinegar
- 2 tablespoons (28 g) unsalted butter at room temperature
- 2 (50 g) egg whites at room temperature
- 1 ½ cups (12 fluid ounces) warm water (about 95°F)
- Baking soda bath for boiling (6 cups water + 1 tablespoon baking soda + 1 teaspoon salt)
- Coarse salt for sprinkling (optional)
Instructions
Make the dough.
- Place the flour, xanthan gum, buttermilk powder, yeast, cream of tartar, baking soda and sugar in the bowl of your stand mixer fitted with the paddle attachment.
- Whisk to combine well with a handheld whisk. Add the salt, and whisk again to combine well.
- Add the cider vinegar, butter, and egg whites, and beat to combine well.
- With the mixer on low speed, add the water in a slow but steady stream.
- Once you have added all the water, turn the mixer up to high and beat for about 3 minutes or until the dough takes on a whipped appearance.
Chill the dough.
- Transfer the dough to a lightly greased bucket with a tight-fitting lid, cover, and place in the refrigerator for at least 30 minutes and up to 3 days.
Shape the dough.
- Turn the chilled dough out onto a piece of lightly floured flat surface. Dust the top with flour, and divide into 8 equal portions.
- Work with one piece of dough at a time, dusting lightly with more flour as necessary to prevent sticking. Form each into a round.
- Using the palm of your hand, press the ball down into a flat disk about 1/2-inch thick.
- Place a couple inches apart on a parchment lined baking sheet.
Let the rolls rise.
- Cover with lightly greased plastic wrap and place in a warm, draft-free environment and allow to rise until risen to about 150% of its original size.
- Rising will take longer in a dry, cool environment, and less time in a warm, humid environment. Do not place it in a heated oven, to any temperature, to rise or you risk killing the yeast.
Boil the rolls.
- While the dough is nearing the end of its rise, preheat your oven to 375°F and place the baking soda bath in a large heavy-bottom pot on the stovetop to boil over high heat.
- Once the dough is done rising, place the rolls one or two at a time into the boiling baking soda bath for less than one minute per side. Do not crowd them; they should move freely in the boiling water.
- Remove the rolls with a strainer and return them to the same baking sheet.
Prepare to bake and bake the rolls.
- Using a small sharp knife or lame, slice 2 parallel lines in the top of each roll at a 45° angle, about 1/4-inch deep.
- If you plan to serve the rolls soon after baking, sprinkle the tops with coarse salt to taste. If you don’t plan to serve the rolls soon after baking, don’t add the salt as it will draw moisture out of the rolls as they cool.
- Place the rolls in the center of the preheated oven and bake until golden brown all over, about 30 minutes. Allow to cool on the pan before slicing and serving.
- If you haven’t salted the rolls before baking, brush the tops lightly with water and sprinkle with coarse salt before serving.
Store any leftover rolls.
- Slice and place any leftover, cooled rolls in a tightly sealed bag, eliminating as much air as possible.
- Place in the freezer. Defrost in the microwave briefly, or at room temperature. To crisp the rolls, wet the outside with about 1 tablespoon of water for each roll and refresh in a 300°F toaster oven before serving.
Notes
Originally published on the blog in 2012. In 2020, recipe unchanged; most photos and text new; video new.