
Gluten Free Cookie Cake | A Giant, Frosted Chocolate Chip Cookie
Use a gluten free cookie cake to celebrate birthdays, anniversaries, holidays, and more. Enjoy the deliciousness of a chocolate chip cookie in a larger, sliceable size, with a frosted message!
Yield: 8 generous servings
Equipment
- Stand mixer or handheld mixer
- Pastry bag with open star piping tips
Ingredients
For the cake
- 6 tablespoons (84 g) unsalted butter at room temperature
- 6 tablespoons (72 g) Spectrum nonhydrogenated vegetable shortening at room temperature
- ⅜ cup (27 g) granulated sugar
- ¾ cup (164 g) packed light brown sugar
- 1 tablespoon pure vanilla extract
- 1 (50 g (weighed out of shell)) egg at room temperature, beaten
- 2 (50 g) egg yolks at room temperature, beaten
- 1 teaspoon baking soda
- ½ teaspoon kosher salt
- 1 ½ cups (10 ounces) semisweet chocolate chips
- 2 cups (280 g) all purpose gluten free flour blend (I used Better Batter; please click thru for appropriate blends)
- 1 teaspoon xanthan gum (omit if your blend already contains it)
For the frosting
- 10 tablespoons (140 g) unsalted butter at room temperature
- ¼ cup (2 fluid ounces) milk at room temperature
- 1 tablespoon pure vanilla extract
- ⅛ teaspoon kosher salt
- 2 teaspoons meringue powder
- 4 cups (460 g) confectioners’ sugar
- Blue gel food coloring
Instructions
Make the cookie cake.
- Preheat your oven to 325°F. Line a 12-inch pizza pan with unbleached parchment paper and set it aside.
- In a large bowl, place the butter, shortening, granulated sugar, brown sugar, and vanilla, and beat until well-combined with a handheld mixer.
- Add the beaten egg and yolks, baking soda, and salt, and beat again until well-combined.
- Add the chocolate chips to the flour blend, toss the chips in the flour to coat them in flour, and then add them both to the bowl.
- Mix until combined. The dough will be thick but soft.
- Scrape the dough out onto the prepared pizza pan, and, with wet hands, press it into a disk.
- Slide the parchment with the cookie dough on it off of the pizza pan, cover with another piece of unbleached parchment paper, and roll out the dough between the parchment until it is a round about 1/2 inch thick, about 10 inches in diameter.
- Remove the top sheet of parchment paper and slide the bottom parchment with the cookie dough back onto the pizza pan.
- There should be a 2-inch wide border all around the perimeter of the cookie dough between the dough and the edge of the pizza pan. The cookie will spread during baking.
- Place the pizza pan in the center of the preheated oven and bake, rotating once, for about 20 minutes or until lightly golden brown all over.
- Remove the cookie cake from the oven and allow it to cool on the baking sheet until firm, about 5 minutes. Transfer to a wire rack to cool completely.
Make the frosting.
- In the bowl of your stand mixer fitted with the paddle attachment or a large bowl with a handheld mixer, place the butter and mix on medium speed until light and fluffy.
- Add the milk and vanilla, and turn the speed to mix until very creamy.
- Add the salt, meringue powder and about 3 1/2 cups of confectioners’ sugar. Mix slowly until the sugar is incorporated, then turn the mixer up to high and beat until it becomes uniformly thick.
- Add the rest of the confectioners’ sugar if necessary to thicken the frosting.
- Leave about 2/3 of the frosting white. Transfer the remaining 1/3 of the frosting to a medium-size bowl, add blue gel food coloring, and mix to combine fully.
Decorate the cake.
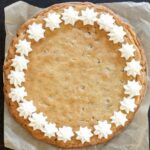
- Once the cookie cake is completely cool, transfer the white frosting to a piping bag fitted with a large open star tip.
- Use the white frosting to make the stars around the border of the cookie cake.
- Place the blue frosting in a piping bag fitted with a small open round tip. Use the blue frosting for writing a message in the center of the cake, and then fill in the rest of the open spaces with more stars using the remaining white frosting.
- Allow the frosting to set at room temperature until it hardens a bit. Store any leftovers in an airtight container at room temperature.
Notes
Originally posted on the blog in 2013. In 2019, photos, much of the text, and video all new; recipe largely unchanged (method altered); in 2022, more text resources added.