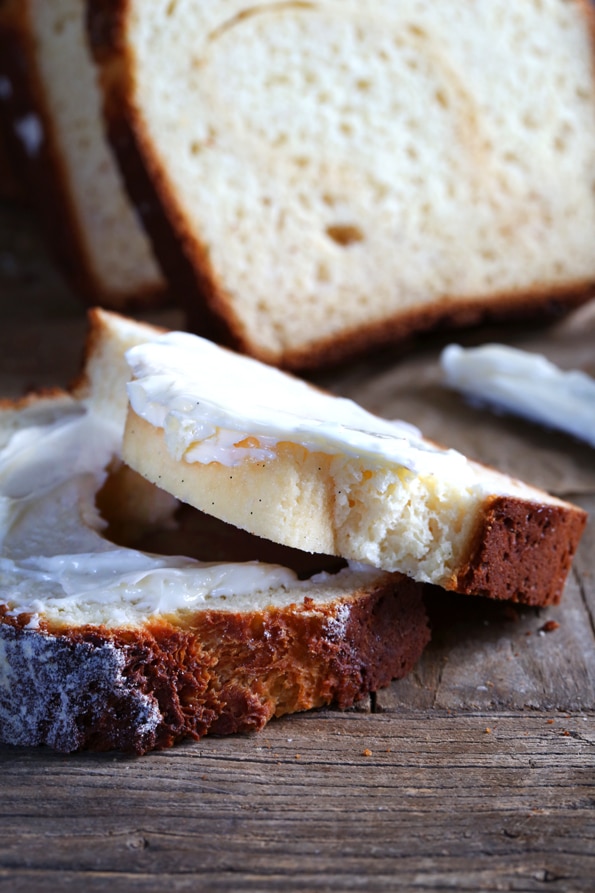
Soft, tender, and fragrant gluten free vanilla swirl bread that's perfect for breakfast with some butter or jam.


It's amazing what a little vanilla sugar can do for some soft enriched bread. Understand, though, that this is not really making-sandwich bread. It's more breakfast bread, since even the best swirl of this kind creates some gaps.
That's why the Cinnamon Swirl Bread in Bakes Bread goes about this in a completely different way, creating a swirl made of dough instead of just cinnamon sugar filling. But this one is tender, fragrant, lightly sweet breakfast bread.


There are three more Gluten Free Bread Facts I would like to share today, and I will consider adding them to the Bread FAQs list if you think they're worthy:
- Measuring Water: When you are measuring water to use in a bread recipe, consider measuring it by weight instead of volume. Wait wait! Hear me out, man. I know that all of the water measurements in Bakes Bread are by volume, not weight. In fact, all of the liquids are indicated in volume. But that is only because my editor insisted upon it. Like, really insisted. But water is the only liquid that boasts a 1:1 equivalency between weight and volume: 1 fluid ounce of water = 1 weighted ounce of water. So, since 1 cup of water = 8 fluid ounces of water, it also = 8 weighted ounces of water. Here are the conversions, if you're willing to give this a shot, since liquid measuring cups can be off by a significant amount. Please note that these values only apply to water, not any other liquids:
• 1 cup = 8 ounces
• 3/4 cup = 6 ounces
• 1/2 cup = 4 ounces
• 1/4 cup = 2 ounces
• 2 tablespoons = 1 ounce
• 1 tablespoon = 1/2 ounce - Refrigerator Rise: Some of you have written to me and said that you have had problems getting your bread to rise in the refrigerator. First, please see page 25 of Bakes Bread for Troubleshooting with respect to getting yeast bread to rise (freshness of yeast, etc.). Beyond that, a few other things will affect outcome:
• If your refrigerator runs quite cold (some of you have even mentioned using industrial refrigerators, and those do tend to run very cold), it may force the yeast into dormancy, where it won't ferment, or even potentially kill the yeast so it won't ferment even once it reaches temperature. Try turning up the temp in your refrigerator a touch.
• If you are making flour blend substitutions, if you are using a high starch blend, it absorbs a lot of moisture and will make rising difficult if not impossible.
• If your proofing container is not well-sealed, the dry air of the refrigerator will leach water out of the bread. That will lower the hydration ratio, which makes rising difficult if not impossible. If you don't have a proofing bucket, use something else with a lid that snaps in place and seals well or a stronger plastic wrap.
• The refrigerator rise is important for two reasons: First, slow-rising yeast creates proper flavor development. Second, it allows the flour to absorb more of the moisture in the dough, which makes handling the dough significantly easier. - Final Rise: This one's a simple addition to my list of tips (this has been covered quite extensively both in the book and in the Bread FAQs here on the blog): Be patient! Over the weekend, I spent the day with the winners of the Gluten Free Bread Book Bake with Me Contest, and it took absolutely forever for us to get 3 loaves of the Lean Crusty White Sandwich Bread from page 43 to rise fully. It was cold (we were in Minnesota!), they were crowded into their proofing area (3 loaves at once) and since I had used them to teach how to shape loaves of lean bread, they weren't shaped juuuuust right. It must have taken them 3 hours to rise fully. 3 hours! But they finally did rise fully and we baked them and they were amazing. That's the way it goes with baking yeast bread, gluten free or not. It is very, very environmentally-dependent. But we can account for that. Don't be afraid to allow your bread a long final rise if that's what it needs.

Oh, And A Few Notes About the Vanilla Sugar: You can definitely make this bread without either buying or making your own vanilla sugar (and I explain just what to do in the recipe below). It will still be delicious, since this bread could be made without the swirl entirely and still be tender and fabulous, but between us it won't really be the same. I have also used vanilla bean paste many times in the past, but that is expensive, too. There are so many places to buy whole vanilla beans these days for a decent price. I have gotten them at my wholesale club and from Olivenation.com, but there are also tons of shops on eBay that sell them for a great price. I can't credibly recommend one over the other, but a quick google search will turn up lots of information and reviews on eBay shops. Long live the Internet and all of its resources!
Gluten Free Vanilla Swirl Bread
Ingredients
For the bread
3 1/2 cups (490 g) Gluten Free Bread Flour, plus more for sprinkling
2/3 cup (40 g) milk powder
1/2 teaspoon cream of tartar
2 1/3 teaspoons (7 g) instant yeast
1/4 cup (50 g) granulated vanilla sugar (See Recipe Notes)
1 teaspoon (6 g) kosher salt
1 cup (8 ounces/8 fluid ounces) warm water (about 95°F)
2 eggs (120 g, out of shell) at room temperature, beaten
4 tablespoons (56 g) unsalted butter, melted and cooled
For the filling
2 tablespoons milk (any kind), for brushing
1/3 cup (67 g) vanilla sugar (See Recipe Notes)
Notes
Vanilla Sugar can be purchased, but it’s crazy expensive. I make it by combining 2 cups (400 g) granulated sugar with the seeds from inside 1 whole vanilla bean, and then adding the bean itself and mixing well to combine. Store the mixture in a sealed glass jar at room temperature for at least a few days before using the vanilla sugar for maximum flavor.
Instructions
In the bowl of your stand mixer, place the flour, nonfat dry milk, cream of tartar, instant yeast and sugar, and use a handheld whisk to combine well. Add the salt and whisk to combine well. Add the water, eggs and butter, and mix on low speed with the dough hook until combined. Raise the mixer speed to medium and knead for about 5 minutes. The dough is a lovely, smooth, enriched dough. It climbs up the dough hook during kneading but remains intact and smooth. Spray a silicone spatula lightly with cooking oil spray, and scrape down the sides of the bowl. Transfer the dough to a lightly oiled bowl or proofing bucket large enough for the dough to rise to double its size, spray the top of the dough with cooking oil spray, and cover with an oiled piece of plastic wrap (or the oiled top to your proofing bucket). Place the dough in the refrigerator for at least 12 hours and up to 3 days.
Preparing the dough for shaping. On baking day, grease a standard loaf pan (approximately 9-inches x 5-inches—mine are 8 1/2-inches x 4 1/2-inches) and set it aside. Turn out the chilled dough onto a lightly floured surface and, using the scrape and fold kneading method and using a very light touch, sprinkle the dough with more flour and knead it lightly, sprinkling with flour when necessary to prevent it from sticking, scrape the dough off the floured surface with a floured bench scraper, then fold it over on itself. Repeat scraping and folding until the dough has become smoother. Do not overwork the dough or you will incorporate too much flour and it will not rise properly.
Shaping and filling the dough. On a lightly floured piece of parchment paper, pat the dough into a rectangle about 10-inches x 12-inches. Brush the entire surface of the dough with milk, and sprinkle with the vanilla sugar from the filling. Gently press the vanilla sugar into the dough to help it adhere. Beginning at a 10-inch side and using the parchment paper to guide it, roll the dough tightly into a coil and place it seam side down in the prepared loaf pan. Sprinkle the top of the loaf generously with flour to give it a cloak to rise into. Cover the loaf pan with an oiled piece of plastic wrap, and place in a warm, draft-free location until the dough has risen to nearly 1-inch above the lip of the pan (about 1 1/2 hours, but rising time can vary greatly depending upon your kitchen environment).
About 20 minutes before your dough has finished its final rise, preheat your oven to 350°F. Once the dough has finished rising, remove the plastic wrap and place the pan in the center of the preheated oven. Bake for about 45 minutes, or until the bread reaches an internal temperature of 185°F on an instant-read thermometer. Allow to cool for about 10 minutes in the pan before running a thin spatula around the edge of the loaf pan and turning out the bread onto a wire rack to finish cooling until no longer hot to the touch. Serve immediately.
Linda says
This bread looks amazing, but I was most excited to read the water measuring instructions. I’ve been doing a lot of experimenting with Bakes Bread recipes and I’m being so careful and precise with all my measurements…and then the water measurements just felt so imprecise! Your editors shouldn’t have second guessed you on that, Nicole. But one more question – for the recipes that call for a certain measurement (like 1/4 cup) and then plus 1 or plus 2 tablespoons – how much should a tablespoon weigh?? Thanks!
Nicole Hunn says
Hi, Linda,
I’m so glad that the water measuring instructions are helpful to you. My editor is so smart, but I knew she was wrong on this. I think she just thought that it would be confusing to readers, and she might be right that it would be confusing to some, but I would have also included volume measurements. Oh well!
To answer your question, that’s why I listed the weight equivalents for everything from 1 cup all the way down to 1 tablespoon. You just add the values together. So, for example, 1/4 cup + 1 tablespoon = 2 ounces + 1/2 ounce = 2 1/2 ounces. Make sense? Here’s the list again:
• 1 cup = 8 ounces
• 3/4 cup = 6 ounces
• 1/2 cup = 4 ounces
• 1/4 cup = 2 ounces
• 2 tablespoons = 1 ounce
• 1 tablespoon = 1/2 ounce
Hope that’s helpful. It takes some time to wrap your mind around, but once you do it’s worth it. :)
Linda says
Oops….I guess I should have read the chart more carefully. Sorry about that – I should have known that you are always so thorough and would have included it! :) I think I’m going to print that out and tape it into the front of my cookbook.
Karen Tolar says
4th try and I finally have a refrigerator rise. My mom is on her 3rd try with no luck. For this attempt, I weighed the water as you suggested (would have been .6 oz over), raised the temp of my water from 95 to 105 for starter, barely let my oven heat up before putting in starter, and took starter out after 20 minutes as I used a large measuring cup so I could monitor “doubling” progress. Hoping final rise is a success! I want the hoagie rolls so badly!
Nicole Hunn says
Karen, you are setting your dough to rise in the oven? That is likely your issue. As I discuss in the cookbook on page 25 (Troubleshooting section), that can easily kill yeast!
Karen Tolar says
Yes, I would turn it on the lowest temp for 1-2 minutes then crack the door with it in there. I think you are right, that may have been it. This time I turned it on for like about 30-0 seconds. My mom is doing the microwave with a pan of warm water and she still hasn’t gotten a rise. We are determined though! Thursday is bake day for me – hopefully will be sending you a pretty picture!
Nicole Hunn says
Karen, I do not recommend that at all. Your first rise should be in the refrigerator. The starter is active enough that it shouldn’t take too much work to get it to double rather quickly. Beyond that, your first rise should be in the refrigerator. If you are having trouble with a final rise, it is most likely due to how you are shaping the bread. Please see this Bread FAQ: http://glutenfreeonashoestring.com/gluten-free-bread-questions-answered/#6
Lydia M. says
We are a low dairy household. So I do not have powdered milk on my shelf (seems silly to just buy it for one recipe, and the possibly tummy ache). I do use coconut milk and have found this to be very good in fluffy pancakes. I am going to do a bit of experimenting, but just wanted to ask – am I setting myself up for failure by not using powdered milk? I do not want to waste ingredients, but it looks so good!
Jennifer S. says
I think the fact that it is ‘powdered” means it has to be a dry ingredient and not a wet one. Maybe you can use a powdered non-dairy milk? I’m not even sure they make that kind of thing though…..
Susan S says
Looks like you are using a metal loaf pan to bake your breads. In your experience does one type of pan bake breads better than another?
Nicole Hunn says
Susan, are you asking about glass loaf pans? They get considerably hotter than metal, and I do not recommend them. Breads burn quite easily in metal.
Carole says
Am finally feeling well enough to order the ingredients for bread making.
What I can’t find is teff flour and also tapioca starch .Can find tapioca starch flour, is it the same thing?
Boy is my husband going to be in for a shock when he sees the credit card bill for the ingredients needed.
Any help on these two items would be helpful..
Thank you for everything you’ve done for us. I’m sure when he tastes the results it will be worth it.
Nicole Hunn says
Carole, yes, as the book states, tapioca starch and tapioca flour are the same thing. You don’t have to buy the ingredients in large amounts, and I get whey protein isolate for 73¢ an ounce. Try using Better Batter for the “high quality all purpose gluten free flour.” Good luck!
Donia Robinson says
I generally can’t find teff in flour form, but can find whole teff. Then I just grind it in a Magic Bullet. You could grind it in a spice grinder, food processor, etc.
Tania Woodruff says
Thank you for the notes on rising! I think having my refrigerator too cold has been my issue…since after 5 days I’m still not getting much rise. I’ll definitely try kicking the temp up a bit!
Kelly says
Hey Nicole this bread sounds so good. Finally assembled all ingredients and tools to try your new recipes. Yesterday I made the English Muffin Bread, but I’m afraid I jumped the gun on the second rise- it has great flavor but it’s a little heavier than expected. I wish I would have remembered it could take more than an hour to rise. Just scraped the Thin Crust Pizza Dough out of the mixer. I was afraid it was ruined because it came together into a ball perfectly, then the pit in the bottom of my stomach appeared as the dough thinned out- then I remembered to breathe and reread your directions! I can’t wait to get my hands (with a light touch) on the risen dough! Wish me luck!!
Nicole Hunn says
You were probably too aggressive in stirring it after the first rise of the English Muffin Bread, Kelly. Relax and follow the directions and you’ll be fine!
Donia Robinson says
Relaxing is the hardest thing to do!!!!
Deborah says
When sprinkling the flour while scraping and folding, is there a typical amount of flour that you need? I know this will probably vary, but is it usually very little (less than a tablespoon) or quite a bit (more than half a cup)?
Nicole Hunn says
Hi, Deborah, It’s much more about how much (and how) you handle the dough, not about the amount of flour you use. You can use a lot more than a couple tablespoons if you handle the dough lightly and use the scrape and fold kneading method. When you handle it properly, very little of the flour you used gets incorporated into the dough. It just helps guide the bread dough into shape. I suggest you watch the videos of me doing it in this post: http://glutenfreeonashoestring.com/gluten-free-hawaiian-rolls-with-bread-shaping-videos/
anna says
Loving the make your coworkers jealous at 3p idea.. My coworkers usually get the overbaked, leftover, and stale bits if there are any :) Unless im in a “share my gluten free goodies” type of mood. I finally got my Expandex and my first batch of slow rise bread is in the fridge as we speak. The honey loaf from last week is next on my list followed by the english muffin loaf. I need to find somewhere to fit in this vanilla swirl! So many options! So little time!
Nicole Hunn says
Let them make their own goodies, anna! ;)
Mare Masterson says
Thank you, Nicole for clarifying that we can let the rise prior to baking (after the refrigerator proof be longer). I wondered about that but forgot to ask. Do you have a temperature setting you can suggest for fridge. My normal one is on 5. Not sure what the large refrigerator is on. Can’t really read that dial too well. I am baking hoagie rolls tonight. Is it okay to have 2 pans of 4 in oven at the same time?
Nicole Hunn says
Hi, Mare,
I’m afraid that “5” doesn’t tell me anything about the temperature of your refrigerator. Mine is set to 37°F. Hope that helps!
Yes, you can have 2 pans of 4 loaves of bread in the oven at the same time as long as they are not crowded on the pans!
Mare Masterson says
It is the dial that the refrigerator is set on. I will get refrigerator thermometers for both.
Nicole Hunn says
Those dials are not universal, Mare. That is what I meant by the fact that it doesn’t tell me anything. Thermometers are a good idea!
Sheree says
Alright …this will be started today then I get a day or two to let my vanilla sugar set up . I just happen to have one vanilla bean waiting to be used up and this recipe has inspired me .
Thanks again . You are amazing .
One quick question . I am making French onion soup and need to know what bread I could make ( I have all three of your books ) to use in the soup ?
Mare Masterson says
You did not ask me, but I vote a baguette.
Nicole Hunn says
Sounds good to me, Mare! Love when readers jump in to help each other. I can’t do it alone!
Jennifer S. says
Looks fantastic and thank you for a wonderful day! I learned so much and am way less anxious about forging ahead on my own!!! Oh and what about the mixer tip??? :)
Nicole Hunn says
You bet, Jennifer. I’m so glad you feel empowered. That’s what it is all about. The tip about raising the mixer bowl on a professional series Kitchen Aid stand mixer? Let’s let Donia tell that one. It’s her tip!
Donia Robinson says
If anyone reads this far in the comments! (besides me, that is)
So, for anyone who has the 6-quart mixer, if your paddle/whisk/dough hook does not reach to the bottom of your bowl, there is an adjustment screw that can move the beater lower. Put the bowl lever in the down position, and you’ll see the screw by looking straight at the mixer on the vertical surface (above where the bowl clicks into). Very hard to explain, obviously! If these instructions seem mysterious, just Google “kitchenaid adjustment screw” and it will give you all the details!