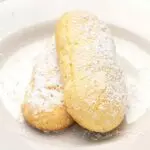
How to Make Gluten Free Ladyfingers From Scratch - Perfect Every Time!
Making perfect gluten free ladyfingers is way easier than you may think, and it's all in the technique. Use them to make gf tiramisu, or serve them with a special cup of tea!
Yield: 9 ladyfingers
Equipment
- Stand or handheld mixer
Ingredients
- 3 (150 g (weighed out of shell)) eggs weighed out of shell, separated into yolks and whites
- 1 (25 g) egg white 25 g
- ⅛ teaspoon cream of tartar
- ¾ cup (86 g) confectioners’ sugar plus more for sprinkling
- 2 teaspoons pure vanilla extract
- ½ teaspoon kosher salt
- ⅞ cup (123 g) all purpose gluten free flour blend sifted
- ½ teaspoon xanthan gum omit if your blend already contains it
Instructions
- Preheat your oven to 400°F. Line two baking sheets with unbleached parchment paper and set them aside.
- In the bowl of your stand mixer fitted with the whisk attachment or a large bowl with a handheld mixer, place the 4 egg whites and cream of tartar.
- Beat on medium-high speed until soft peaks form (about 3 minutes in a stand mixer). Add about 1/4 cup of the confectioners’ sugar, and beat again until shiny, stiff peaks form (about another 2 minutes).
- Gently scrape the beaten egg whites out of the mixing bowl into another medium-size bowl. Set the whites aside.
- In the original mixing bowl, place the egg yolks and the remaining confectioners’ sugar. Turn the mixer on medium-high speed and beat until the sugar is absorbed into the yolks (about 1 minute).
- Turn the mixer speed up to high and continue to beat for 8 to 10 minutes on medium speed, or until the mixture is pale yellow, thick, and nearly tripled in volume. Don’t skip or cut short this step! This is what will allow this mixture to absorb the flour without clumping much.
- In a separate bowl, whisk together the gluten free flour blend and the xanthan gum, if your blend didn't already contain it.
- Into the yolk mixture, add the vanilla and salt, and then about 1/4 of the gluten free flour blend fold, and fold in the flour blend until fully incorporated.
- Add the rest of the gf flour blend in 2 or 3 more batches, folding in carefully until smooth. and whisk to combine.
- The mixture will get a bit stiffer with each addition of flour, but be sure to scrape all dry bits from the bottom and sides of the bowl. If you are concerned that the mixture is getting too thick, stop adding the flour blend and add some of the whipped egg whites to loosen it. Then continue with the remaining flour blend.
- Add the whipped egg white mixture to the batter in 2 or 3 portions, folding it in carefully until smooth after each addition.
- Fill a pastry bag fitted with a 1/2-inch plain piping tip (or a zip top plastic bag with a hole cut in the corner) with the raw ladyfinger dough.
- Pipe “fingers” onto the prepared baking sheet that are 3- to 4-inches long, about 2 inches apart from one another, on the prepared baking sheet.
- If you'd like a slightly sweeter cookie, dust the tops of the raw cookies with confectioners' sugar. It's entirely optional.
- Place the baking sheet in the preheated oven and bake for about 12 minutes or until the cookies are puffed and pale golden.
- Remove the baking sheet from the oven and allow the ladyfingers to cool until no longer hot to the touch on the baking sheet (about 10 minutes).
- Dust the fingers evenly with more confectioners’ sugar and allow to finish cooling until firm on the baking sheet.
- To maintain texture for a day or so, store in a sealed glass container at room temperature. They will not maintain their texture when frozen.