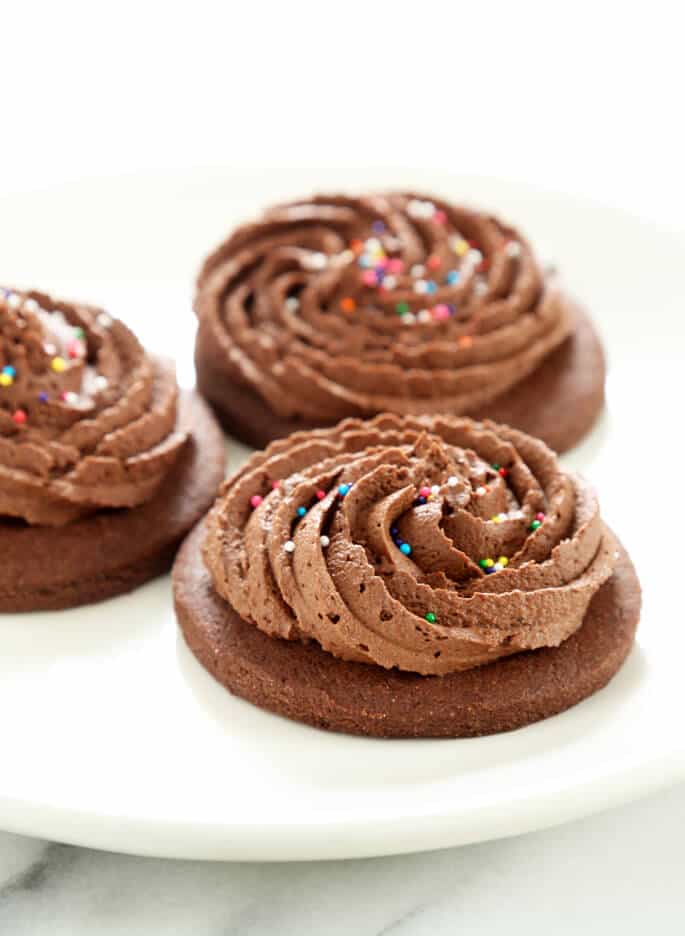
These soft gluten free chocolate cutout cookies roll out so easily and hold their shape perfectly during baking. Perfect for any holiday!
Whatever the season, whatever the occasion, a good cutout sugar cookie recipe is a must, don't you think? It might be that Easter is coming, and you're itching to use that cut little bunny cookie cutter. Or it's Christmas, and Santa needs a plate of cookies shaped like snowmen or stars. Or you're missing Lofthouse cookies now that you're gluten free, and soft, tender round sugar cookies topped with thick frosting are what you're after. Since we already have the definitive recipes for classic gluten free cutout sugar cookies and cream cheese cutout sugar cookies here on the blog, it's time we settled on the perfect recipe for soft gluten free chocolate cutout cookies. Well, maybe “settle” is the wrong word…

These extraordinary sugar cookies are super easy to make, roll out like a dream and hold their shape perfectly.
The dreamy chocolate frosting is, of course, completely optional, as are the nonpareils. But I've never been able to resist nonpareils. If you're in the U.S. like I am, Signature Brands makes Betty Crocker and CakeMate nonpareils and sprinkles (jimmies?), and they're safely gluten free.

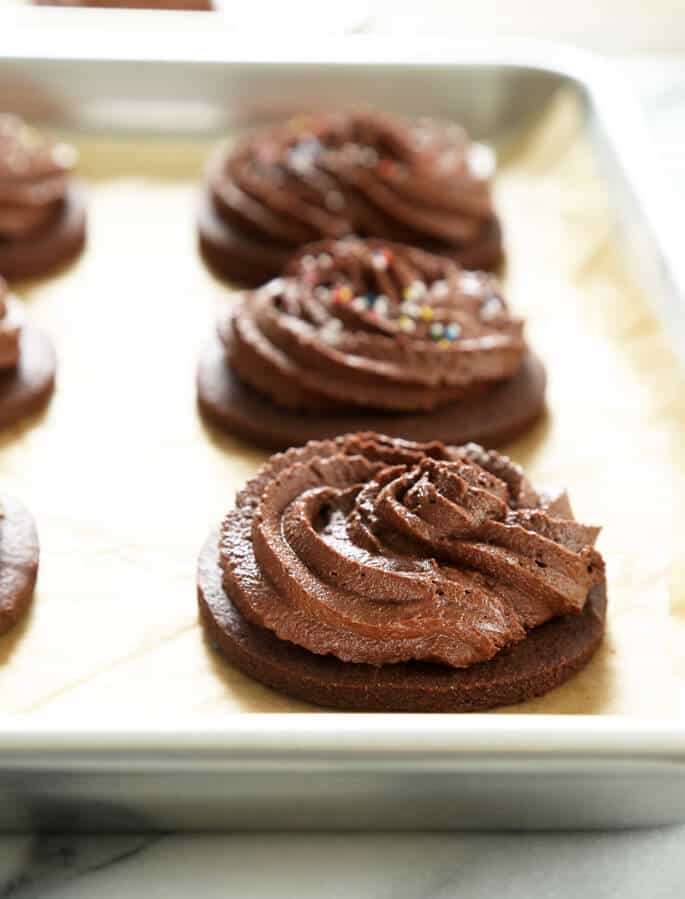
About half the time, I load the frosting into a piping bag and pipe a lovely swirl of chocolate frosting with a 1M or similar open star tip, and the other half I just spoon a mound on there. For you, though, I swirled. You're worth it. And in case you're wondering, the cookies themselves do freeze beautifully for months. I wouldn't freeze the raw dough, though, as it will take quite a while to defrost enough to be rolled out. And the dough is so easy to make that I'd make it fresh, then roll out the dough, cut your shapes, bake, cool and then freeze.

Soft Gluten Free Chocolate Cutout Cookies
Ingredients
For the cookies
1 1/2 cups (210 g) all purpose gluten free flour (I used Better Batter)
1/2 teaspoon xanthan gum (omit if your blend already contains it)
1/4 cup (36 g) cornstarch (or try arrowroot)
1/2 cup (40 g) unsweetened cocoa powder (natural or Dutch-processed)
3/4 teaspoon baking powder
1/8 teaspoon baking soda
1/4 teaspoon kosher salt
1/2 cup (100 g) granulated sugar
8 tablespoons (112 g) unsalted butter, melted and cooled
1 egg (50 g, weighed out of shell) at room temperature, beaten
1/2 teaspoon pure vanilla extract
Lukewarm water by the 1/4-teaspoonful, as necessary
For the frosting
4 ounces unsweetened chocolate, chopped
1/4 cup (2 fluid ounces) heavy whipping cream
8 tablespoons (112 g) unsalted butter, at room temperature
3 cups (345 g) confectioners’ sugar
1/8 teaspoon kosher salt
Instructions
Preheat your oven to 350°F. Line baking sheets with unbleached parchment and set aside.
In a large bowl, place the flour, xanthan gum, cornstarch, cocoa powder, baking powder, baking soda, salt and sugar, and whisk to combine well. Create a well in the center of the dry ingredients, and add the butter, egg, vanilla and 1/4 teaspoon lukewarm water, mixing to combine after each addition. Add more water by the 1/4 teaspoonful as necessary to ensure that the dough holds together and isn’t stiff. Roll the dough between two sheets of unbleached parchment paper into a rectangle a bit less than 1/3-inch thick. Using a 2 1/2-inch round cookie cutter, cut out rounds of dough and place them about 1-inch apart on the prepared baking sheets. Gather and reroll scraps until you have used up all the dough. Place the baking sheets in the freezer for 5 minutes or until the dough is firm.
Remove the baking sheets from the freezer and place in the preheated oven. Bake until firm to the touch, about 12 minutes. Remove from the oven and allow to cool completely on the baking sheets.
While the cookies are cooling, make the frosting. Place the chopped chocolate in a medium-size heat-safe bowl. In a small saucepan, heat the cream until simmering. Pour the cream over the chopped chocolate, allow it to sit until the chocolate begins to melt, mix until melted and smooth and set aside to cool briefly. In the bowl of your stand mixer fitted with the paddle attachment (or a large bowl with a hand mixer), place the butter and salt, and beat on high speed until creamy. Add the confectioners’ sugar and salt, mix on low speed until the sugar is incorporated, raise the speed to high and beat until light and fluffy. Reduce the mixer speed to low, and add the chocolate and cream mixture in a slow, steady stream. Beat until well-combined.
Once the cookies are completely cool, pipe or spoon a generous amount of frosting onto each, and sprinkle with any decorations, like nonpareils or sprinkles, immediately. Allow the frosting to set at room temperature or in the refrigerator.
Versions of the recipe were first published on the blog in 2012 and 2013. Recipe, method and photos all updated in 2016.
Lynn Davis says
If I have a homemade GF AP flour blend of 2:1:1 with white rice flour, potato starch, and tapioca starch respectively, would I still want to add the cornstarch with these cookies? I’d like to give them a try! :)
Nicole Hunn says
I’m afraid that flour blend is likely too simple to work in this recipe, Lynn. I recommend you use of the blends I list as my approved all purpose gluten free flour blends (just use the link in the recipe).
Carol Guchek says
Does the icing on these cookies get firm enough to stack them in containers to transport?
Jennifer S. says
I’m thinking not….
Nicole Hunn says
Actually, Carol, if you chill them in the refrigerator before you pack them, they’ll stack and travel just fine. My husband did that and brought an even dozen to his office. :)
Allison says
I made these as mini sandwich cookies filled with the frosting from your soft frosted sugar cookie recipe – adorable and delicious! I also ordered a copy of your new cookbook :)
Judy Ameigh Grover says
ty was looking for a good cut out cookie recipe
Judy Ameigh Grover says
ty was looking for a good cut out cookie recipe
Jess says
These look so good! I’m printing it now- it’s going into my every growing stack of “nicole’s cookies: to try”. Seriously- when do you have time to make all these yummy treats?! I love it! We tried your chocolate shortbread cookies this weekend and I AM IN LOVE! They were so good! I hid half the batch from my kids so that I could eat them this week in secret! Don’t judge me. :)
love jess
gfshoestring says
I judge not, Jess, lest I be judged. I have time to make all of these treats because, well, it’s my job! ;) So glad you enjoyed the chocolate shortbread. For real detail cutout work, though, these are your cookies!
xoxo Nicole
Sara Jouadi says
Thank goodness for you! I was hoping you’d have ones for Christmas. My kiddos will be so happy to decorate again this year! Can they just be white ones if we exclude the cocoa? Or is that a totally seperate recipe?
Nicole Hunn says
Hi, Sara,
I’m afraid not. As you suspected, plain sugar cookies are a totally separate recipe. There’s a recipe in my First Cookbook, if you’re interested.
xoxo Nicole
Al says
These look GREAT! They make me think of oreos! This is my first GF xmas as well and I’d love your thoughts on Tara’s questions as well. Loving your quick and easy book!
gfshoestring says
Thanks so much for picking up a copy of Quick & Easy, Al! These cookies actually do taste very similar to Oreos, actually. Great idea! Oh, & I answered Tara’s question. Hope it helps.
xoxo Nicole
MaryAnn says
Do you think it would work ok to make this dough ahead of time – either refrigerate for a day (or freeze for longer) before baking? These look awesome – can’t wait to try them. I always make sugar cookies for my kids to decorate on Xmas eve – they are delish, but chocolate is my fave, so this will be a great addition! Just ordered your second book last night! :)
Nicole Hunn says
You bet, MaryAnn. They sure would work if you make the dough ahead of time. The dough freezes very well, as do they baked (and undecorated) cookies. And thank you for your support of my second book. I really really appreciate it!
xoxo Nicole
MaryAnn says
Do you think it would work ok to make this dough ahead of time – either refrigerate for a day (or freeze for longer) before baking? These look awesome – can’t wait to try them. I always make sugar cookies for my kids to decorate on Xmas eve – they are delish, but chocolate is my fave, so this will be a great addition! Just ordered your second book last night! :)
gfshoestring says
You bet, MaryAnn. They sure would work if you make the dough ahead of time. The dough freezes very well, as do they baked (and undecorated) cookies. And thank you for your support of my second book. I really really appreciate it!
xoxo Nicole
Tara0802 says
Hi a quick question. This is my first year baking gf for xmas. I cant wait to try some of your cookie recipes! Im wondering though about the difference in how long gf cookies can “keep” successfully vs regular cookies. For example certain cookies i would make early cuz i knew they would hold up stored in plastic bags for a few weeks vs others i knew would only be fresh for a few days. Im trying to plan my gf holiday baking and im clueless as to what i can make early and the beat way to store it. Can you offer any suggestions? Im thinking you probably have a lot if experience at this so i thought i would ask. Please help a gf xmas baking virgin out ;) thanks!!!
gfshoestring says
Hi, Tara,
Good question! You really can use your previous experience as a guide. Gluten-free cookies do not age much differently than conventional cookies, unless you omit xanthan gum (or guar gum) as an ingredient. Xanthan gum really helps extend the shelf life of your GF baked goods. That being said, I always prefer the freezer to the refrigerator. I almost never refrigerate cookies, as the refrigerator tends to dry everything out. But wrap well in freezer-safe wrap, squeezing out any air, and you should be good to go!
xoxo Nicole